
Installation Guide


Height xx"
product use
24mm
L
1
2
L
L
1
2
R
Height xx"
product use
24mm
1a
1d
1b
1b
1a
1e
1d
1e
1f
1c
6mm
6mm
Height 60"
product use
14
2
9
H
e
i
g
h
t
7
2
"
p
r
o
d
u
c
t
u
s
e
M
ark h
o
l
e
loc
ati
ons o
n
th
e
w
all fo
r
the l
eft
wa
ll
b
rack
e
t
.
M
ark h
o
l
e
loc
ati
ons o
n
th
e
w
all fo
r
the l
eft
wa
ll
b
rack
e
t
.
1
2
49.
5
Height 60"
product use
Height 72"
product use
17
3
5
4
9.
5
1
2
4
9.5
31
49.5
L
31
49.5
R
A
A
J J
[24]
[25]
[25]
[25]
[25]
[24]
[24]
[24]
N
N
K
K
N
N
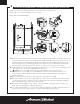
48" width=46-1/8" (1171mm) to 46-1/2" (1181mm)
60" width=58-1/16" (1475mm) to 58-7/16" (1485mm)
INSTALLATION INSTRUCTIONS
1
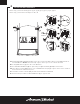
• In this step, you’ll need following parts: [24] x1, [25] x1
• In this step, you’ll need the following tools: A, E, J, K, N
PREPARING INSTALLATION OF WALL BRACKETS
IMPORTANT GENERAL INFORMATION
This unit is best installed by two people.
Cover drain with tape prior to installation to prevent the loss of small parts.
Unpack your unit carefully and inspect for freight damage. Lay out and identify all parts using Box
Contents and Assembly Drawing as a reference. Before discarding the carton check to see that no
small hardware parts have fallen to the bottom of the box. If any parts are damaged or missing refer to
the description noted in the instructions when inquiring about replacements.
Handle the glass panels carefully and protect the edges. Although tempered glass is very resistant to
breakage, the glass can still break if unequal pressure is applied during installation and the sharp corners
of the panel can damage tile and ooring surface.
Be sure to wear safety glasses whenever drilling or cutting. When drilling holes in ceramic tile or marble
use a center punch and hammer to carefully break the glazed surface. This will prevent skidding
when drilling.
NOTE: TEMPERED GLASS CANNOT BE DRILLED, CUT OR MODIFIED.
NOTICE: Before drilling into the wall on step 1c, verify the height of the holes a second time utilizing a tape measure.
The bottom holes should measure from the top of the tub/base as follows:
60" Curved Door - installation: 56-1/2" (1435mm). 72" Curved Door - installation: 68-9/16" (1741mm).
If your measurement does not equal above dimensions, adjust all 4 hole locations up or down accordingly.
1a. Measure 15/16" (24mm) from outside edge of tub or base. Place outside edge of LEFT template [24] at
end of 15/16" (24mm) mark on deck of tub or base, level and hold template in place using tape.
1b. Following template for screw hole locations, mark all 4 screw locations.
1c. If using supplied Wall Anchors [1] drill wall using 6 mm drill bit. If not using Wall Anchors, drill using
appropriate size bit for screw being used. NOTE: Verify height of marked screw hole locations on
template using a tape measure. For 60" Height on template, measure 56-1/2" (1435mm) on tape
measure. For 72" Height on template, measure 68-9/16" (1741mm) on tape measure.
1d to 1f. Perform same template and drilling procedure for the RIGHT side template [25].