
Installation Guide


2
INSTALLING WALL BRACKETS
N
[4]
[1]
Screw
ST4x35
2a
2c
2f
2b
2d
2e
B
F
G
F
F
[23]
[2]
[4][3]
N
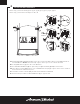
2a. Starting with RIGHT Wall Bracket [4], remove all 4 screws from rubber Glass Catcher [23] and remove
from Wall Bracket. NOTE: Observe how lip of glass catcher goes to the outside of bracket.
2b. If using Wall Anchors [1], place into each drilled hole.
2c. Screw RIGHT Wall Bracket [4] into place using 4 supplied ST4x35 [2] Phillips Head screws.
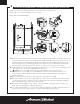
2d. Place Glass Catchers [23] back into slots of Wall Brackets keeping lip of glass catcher to the outside of
the bracket and screw back into place.
2e. Orientation of Glass Catchers [23] should look like illustrations in 2e & 2f.
2f. Perform same procedure for LEFT Wall Bracket [3] on opposite side.
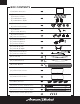
• In this step, you’ll need following parts: [1] x8, [2] x8, [3] x1, [4] x1, [23] x4, [25] x1
• In this step, you’ll need the following tools: B, F, N