THE BEST BATH OR SHOWER EXPERIENCE? THE ONE NOBODY INTERRUPTS. Thank you for buying an American Standard bath or shower product. We’re so grateful you did, and you will be too. Not just while you’re waking up each morning, but also every time a dirty gardener, sweaty soccer player, or muddy dog gets cleaned up. How do we know? Just like you, we’ve lived with that same beautiful chaos called life for almost 150 years.
OWNERS MANUAL Ovation Curve™ Curved Corner Shower Door AM00846400 INSTALLATION INSTRUCTIONS Thank you for selecting American Standard – the benchmark of fine quality for over 150 years. To ensure this product is installed properly, please read these instructions carefully before you begin. Certain installations may require professional help. Also be sure your installation conforms to local codes.
INSIDE THE BOX 36"x 72" Curved Shower Door Image shown may vary from product purchased. RECOMMENDED TOOLS AND MATERIALS Installation steps will indicate which tools should be used with asscociated letter Drill 1/4" (6 mm)) 1/4" (6mm) & 1/8" (3.2mm) Drill Bits Drive Drill Bits#2 #2 Square Square Drive BitBit Caulking Gun Level Drill A B C D Phillips Screwdriver Hammer H Regular Drill Screwdriver 1/8" (3.2 mm) 1/4" (6mm) & 1/8" (3.
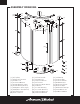
BOX CONTENTS 1x Installation Instruction [1] 1x Top Rail [2] 1x Bottom Threshold [3] 2x Wall Posts [4] 2x Inserted Gaskets [5] 1x Side Gasket (Longer) [6] 1x Side Gasket (Shorter) [7] 1x Magnetic Seal (Longer) [8] 1x Magnetic Seal (Shorter) [9] 1x Fixed Panel A. [10] 1x Door Panel-L [11] 1x Fixed Panel B [12] 1x Handle Set [13] 2x Exterior Wheels [14] 4x Fasteners [15] 2x Interior Adjust Wheels [16] 1x Wrench [17] 1x 2 mm Allen Key [18] 1x 2.
ASSEMBLY DRAWING [ 24] [ 25] [ 27] [ 26] [ 1] [ 4] [ 14] [ 7] [ 8] [ 13] [ 9] [ 11] [ 15] [ 10] [ 12] [ 3] [ 16] [ 6] [ 17] [ 29] [ 5] [1] 1x Top Rail [2] 1x Bottom Threshold [3] 2x Wall Posts [4] 2x Inserted Gaskets [5] 1x Side Gasket (Longer) [6] 1x Side Gasket (Shorter) [7] 1x Magnetic Seal Longer) [8] 1x Magnetic Seal (Shorter) [9] 1x Fixed Panel A [10] 1x Door Panel-L [ 20] [ 23] [ 19] [ 22] [ 18] [ 2] [11] 1x Fixed Panel B [12] 1x Handle Set [13] 2x Exterior Wheels [14] 4x Fasteners [1
INSTALLATION INSTRUCTIONS IMPORTANT GENERAL INFORMATION This unit is best installed by two people. Cover drain with tape prior to installation to prevent the loss of small parts. Unpack your unit carefully and inspect for freight damage. Lay out and identify all parts using Box Contents and Assembly Drawing as a reference. Before discarding the carton check to see that no small hardware parts have fallen to the bottom of the box.
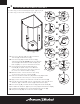
2 INSTALLING FIXED PANELS • In this step, you’ll need following parts: [1] x1, [4] x2, [9] x1, [11] x1, [14] x4, [17] x1, [28] x1 • In this step, you’ll need the following tool: B NOTE: TWO PEOPLE REQUIRED 2a 2b [9] [9] [3] 2c [3] 2c [1] 2a 2c = [9] [1] 2d 2a [17] [14] [11] 2e 2e [14] [1] [9] 2e 2f [9] [4] = [9] [3] [28] [4] NOTE: Fixed Panel A [9] MUST be installed on left side only. See above illustration for reference. 2a. Insert Fixed Panel A [9] into Wall Post [3]. 2b.
3 INSTALLING BOTTOM GUIDE/CAP & BOTTOM THRESHOLD • In this step, you’ll need following part: [2] x1, [19] x1, [21] x1, • In this step, you’ll need the following tools: A, B, C, G, I 3a [19] [9] 3b [11] [21] [2] [2] 3c 3d I [11] [2] [9] B [2] [19] 3e [21] J F 3f [2] Shower Base A 3.2mm 3g [19] 3h [21] [2] [11] [9] 3a. Place slot in Bottom Guide A-L [19] over Bottom [2] Threshold [2] and Fixed Panel A [9]. 3b.
4 INSTALLING EXTERNAL/INTERNAL WHEELS & DOOR PANEL-L • In this step, you’ll need following parts: [10] x1, [13] x2, [15] x2, [17] x1, [20] x1, [29] x1 View from inside [13] 4a 4d [29] [15] [17] [10] 4a 4b 4e [13] [10] [17] [1] 4f 4c [13] [1] 4e 4g [13] [17] [29] [10] [10] [2] View from inside 4g 4a. Unscrew and separate 2 Exterior Wheels [13] and 2 Interior Adjust Wheels [15] as illustrated.
5 INSTALLING SIDE GASKET/MAGNETIC SEAL AND HANDLE SET • In this step, you’ll need following parts: [5] x1, [6] x1, [7] x1, [8] x1, [12] x1, [18] x1 5a 5c [9] [1] [10] [5] [12] [6] 5b 5a [10] 5d [10] 5b [1] [11] [10] [8] [12] [7] 5c 5e [18] [10] 5a. Install Longer Side Gasket [5] onto left edge of Door Panel-L [10]. Install Shorter Side Gasket [6] onto right edge of Fixed Panel A [9]. 5b. Install Longer Magnetic Seal [7] onto right edge of Door Panel-L [10].
6 ADJUSTING DOOR PANEL-L • In this step, you’ll need following part: [15] x1 6a 6b [16] [13] 6c [13] Cover Cap Cover Cap Correct Door Alignment 6a. Slide Door Panel-L [10] closed and observe if the door securely seals against both Magnetic Seals [8] & [7] equally. If a gap exists at either end of Door Panel-L [10] it will be necessary to adjust the Exterior Wheels [13] to correctly fit the Door Panel to the Magnetic Seals.
POST INSTALLATION CLEAN-UP Remove all construction debris from bath. Tile grout can be removed with a wooden popsicle stick or tongue depressor. Do not use wire brushes or any other metal implement on bath surface. Post installation clean-up generally can be completed using warm water and liquid dishwashing detergent. Stubborn dirt or stains may be removed using granular Spic and Span® mixed with water. Painter’s naphtha can be used to remove excess adhesives and/or wet oil-base paint.
WARRANTY SHOWER DOORS 10 YEAR WARRANTY AS America, Inc. (“American Standard®”) warrants to the original non-commercial owner that it will, at its sole option, repair or replace this product or any part of this product, if it confirms that the product is defective in materials or workmanship under normal use and maintenance for 10 years. This warranty is non-transferable to subsequent purchasers or owners.
TELL US WHAT YOU THINK! Please leave us a product review or story at americanstandard.com/reviews Great Tub 03/13/2018 06:52:29 CDT American Standard Bathtubs Saver 60 Inch by 34 Inch Integral Apron Bathtub. Left Hand Drain Love the tub. It is very roomy and would definitely buy it again. Our old tub cracked so we got this one to replace it. This one feels like it is more durable and not as flimsy as the last one. Register your warranty and sign up for an idea-filled newsletter at americanstandard.
LA MEILLEURE EXPÉRIENCE DE BAIN OU DE DOUCHE? CELLE QUE PERSONNE N’INTERROMPT. Merci d’avoir acheté une baignoire ou une douche American Standard. Nous sommes si contents que vous l’ayez fait, vous le serez également. Pas seulement au réveil le matin, mais aussi chaque fois qu’un jardinier sale, qu’un joueur de soccer en sueur ou qu’un chien couvert de boue doit se nettoyer. Comment le savons-nous? Tout comme vous, nous vivons dans ce même désordre qu’est la vie depuis presque 150 ans.
MANUEL DU PROPRIÉTAIRE Porte de douche en coin incurvée Ovation MD AM00846400 CONSIGNES D’INSTALLATION Merci d’avoir choisi American Standard, la référence en matière de qualité supérieure depuis plus de 150 ans. Pour vous assurer de l’installation adéquate de ce produit, veuillez lire ces consignes avant de commencer. Certaines installations peuvent nécessiter l’aide d’un professionnel. Assurez-vous que votre installation respecte les codes locaux.
CONTENU DE LA BOÎTE Porte de douche incurvée de 36 po ou 72 po L’illustration peut être différente du produit acheté. OUTILS ET MATÉRIEL RECOMMANDÉS Les outils à utiliser seront indiqués par la lettre correspondante à chacune des étapes de l’installation. Drill 1/4 po (6 mm)) Mèche de 1/4" (6mm) & 1/8" (3.2mm) perçage à embout carré Drill Bitsno #22Square Drive Bit Pistolet de calfeutrage Niveau Perceuse A B C D Tournevis cruciforme Marteau H Tournevis à Drill tête plate 1/8 po (3.
CONTENU DE LA BOÎTE 1x consignes d’installation Instructions [1] 1x Rail du haut [2] 1x Seuil [3] 2x Poteaux muraux [4] 2x Joints insérés [5] 1x Joint latéral (long) [6] 1x Joint latéral (court) [7] 1x Scellant magnétique (long) [8] 1x Scellant magnétique (court) [9] 1x Panneau fixe A [10] 1x Panneau de porte L [11] 1x Panneau fixe B [12] 1x Poignée [13] 2x Roulettes extérieures [14] 4x Attaches [15] 2x Roulettes intérieures de réglage [16] 1x Clé [17] 1x Clé Allen de 2 mm [18] 1x Clé Allen de 2,5 mm [19]
DESSIN DE MONTAGE [ 24] [ 25] [ 27] [ 26] [ 1] [ 4] [ 14] [ 7] [ 8] [ 13] [ 9] [ 11] [ 15] [ 10] [ 12] [ 3] [ 16] [ 6] [ 17] [ 29] [ 5] [1] 1x Rail du haut [2] 1x Seuil [3] 2x Poteaux muraux [4] 2x Joints insérés [5] 1x Joint latéral (long) [6] 1x Joint latéral (court) [7] 1x Scellant magnétique (long) [8] 1x Scellant magnétique (court) [9] 1x Panneau fixe A [10] 1x Panneau de porte L [ 20] [ 23] [ 19] [ 22] [ 18] [ 2] [11] 1x Panneau fixe B [12] 1x Poignée [13] 2x Roulettes extérieures [14]
CONSIGNES D’INSTALLATION RENSEIGNEMENTS GÉNÉRAUX IMPORTANTS l est plus facile d’installer cette unité à deux personnes. Couvrez le drain avec du ruban avant l’installation pour éviter de perdre des petites pièces. Déballez votre produit avec soin et vérifiez qu’il n’est pas endommagé par le transport. Étalez et identifiez toutes les pièces au moyen de la page Contenu de la boîte et du dessin de montage. Avant de jeter la boîte, assurez-vous qu’aucune pièce n’y est tombée.
2 INSTALLATION DES PANNEAUX FIXES • Pièces requises pour cette étape : [1] x1, [4] x2, [9] x1, [11] x1, [14] x4, [17] x1, [28] x1 • Outils requis pour cette étape : B REMARQUE : DEUX PERSONNES NÉCESSAIRES 2a 2b [9] [9] [3] 2c [3] 2c [1] 2a 2c = [9] [1] 2d 2a [17] [14] [11] 2e 2e [14] [1] [9] 2e 2f [9] [4] = [9] [3] [28] [4] 2a. Insérez le panneau fixe A [9] dans le poteau mural [3]. 2b.
3 INSTALLATION DU GUIDE/CAPUCHON ET DU SEUIL DU BAS • Pièces requises pour cette étape : [2] x1, [19] x1, [21] x1, • Outils requis pour cette étape : A, B, C, G, I 3a [19] [9] 3b [11] [21] [2] [2] 3c 3d I [11] [2] [9] B [2] [19] 3e [21] J F 3f [2] Base de douche A 3.2mm 3g [19] 3h [21] [2] [11] [9] 3a. Placez la fente du guide du bas A-L [19] par-dessus [2] le seuil [2] et le panneau fixe A [9]. 3b.
4 INSTALLATION DES ROULETTES INTÉRIEURES/EXTÉRIEURES ET DU PANNEAU DE PORTE L • Pour cette étape, vous aurez besoin des pièces suivantes : [10] x1, [13] x2, [15] x2, [17] x1, [20] x1, [29] x1 Vue de l'intérieur [13] 4a 4d [29] [15] [17] [10] 4a 4b 4e [13] [10] [17] [1] 4f 4c [13] [1] 4e 4g [13] [17] [29] [10] [10] [2] Vue de l'intérieur 4g 4a. Dévissez et séparez les 2 roulettes extérieures [13] et les 2 roulettes intérieures de réglage [15] comme illustré.
5 INSTALLATION DU JOINT LATÉRAL/SCELLANTMAGNÉTIQUE ET DE LA POIGNÉE 5a • Pièces requises pour cette étape :[5] x1, [6] x1, [7] x1, [8] x1, [12] x1, [18] x1 5c [9] [1] [10] [5] [12] [6] 5b 5a [10] 5d [10] 5b [1] [11] [10] [8] [12] [7] 5c 5e [18] [10] 5a. Installez le joint latéral long [5] sur le bord gauche du panneau de porte L [10]. Installez le joint latéral court [6] sur le bord droit du panneau fixe A [9]. 5b.
6 RÉGLAGE DU PANNEAU DE PORTE L • Pièce requises pour cette étape : [15] x1 6a 6b [16] [13] 6c [13] Couverture cap Couverture cap Alignement correct de la porte 6a. Faites glisser le panneau de porte L [10] de sorte à le fermer et regardez si la porte s’appuie de manière égale sur les deux scellants magnétiques [8] et [7].
NETTOYAGE APRÈS L’INSTALLATION AS America, Inc. (« American Standard ») garantit à l’acheteur original qu’il retirera tous débris de construction de la douche, à sa demande. L’enduit de carrelage peut être retiré avec un bâtonnet de bois ou un abaisse-langue. N’utilisez pas de brosses métalliques ni tout autre instrument métallique sur la surface de la douche. En général, de l’eau tiède et du détergent liquide pour la vaisselle conviennent pour nettoyer après l’installation.
GARANTIE GARANTIE DE 10 ANS SUR LES PORTES DE DOUCHE AS America, Inc. (« American Standard® ») garantit au propriétaire original non commercial qu’il réparera ou remplacera, à son entière discrétion, ce produit ou toute pièce de ce produit qui révèle un défaut de fabrication ou de main-d’œuvre dans des conditions normales d’utilisation et d’entretien durant une période de 10 ans. La présente garantie ne peut être transférée à un achat ou un propriétaire subséquent.
FAITES-NOUS PART DE VOS COMMENTAIRES! S’il vous plaît laissez-nous une critique de produit ou une histoire à americanstandard.com/reviews Baignoire géniale 03/13/2018 06:52:29 HAC American Standard Économiseur de baignoire 60 pouces par 34 pouces intégral Baignoire à tablier. Renvoi à gauche J’adore la baignoire. Il est très spacieux et l’achèterait certainement à nouveau. Notre vieille baignoire s’est fissurée, alors nous avons eu celle-ci pour la remplacer.
¿LA MEJOR EXPERIENCIA DE TINA O DUCHA? LA QUE NADIE INTERRUMPE. Gracias por comprar una tina o ducha American Standard. Estamos muy agradecidos y usted también lo estará. No solo cuando se esté despertando cada mañana, sino también cada vez que se lave un jardinero sucio, un jugador de fútbol sudado o un perro embarrado. ¿Cómo lo sabemos? Tal como usted, hemos vivido con el mismo caos hermoso de la vida por casi 150 años.
MANUAL DEL PROPIETARIO Puertas de ducha de alcoba Ovation ® AM00846400 INSTRUCCIONES DE INSTALACIÓN Gracias por elegir American Standard, el parámetro de excelente calidad por más de 150 años. Para asegurar la instalación adecuada de este producto, por favor lea las instrucciones con atención antes de comenzar. Algunas instalaciones pueden requerir ayuda profesional. Asimismo, asegúrese de realizar la instalación de conformidad con los códigos locales.
DENTRO DE LA CAJA 36" 0 72" Puerta de ducha curva La imagen puede variar del producto comprado. HERRAMIENTAS Y MATERIALES RECOMENDADOS Los pasos de instalación le indicarán qué herramientas deben utilizarse con la letra asociada Drill 1/4" (6 mm)) 1/4" (6mm) & 1/8" (3.2mm) Broca #2Bit Drill Bits #2cuadrada Square Drive Caulking Gun Nivel Taladro A B C D Destornillador Phillips Martillo H Destornillador comúnDrill 1/8" (3.2 mm) 1/4" (6mm) & 1/8" (3.
CONTENIDO DE LA CAJA 1x Instrucciones de instalación [1] 1x riel superior [2] 1x umbral inferior [3] 2x postes de pared [4] 2x juntas insertadas [5] 1x junta lateral (más larga) [6] 1x junta lateral (más corta) [7] 1x empaque magnético (más largo) [8] 1x empaque magnético (más corto) [9] 1x panel fijo A [10] 1x panel de pared L [11] 1x panel fijo B [12] 1x juego de manijas [13] 2 ruedas exteriores [14] 4x sujetadores [15] 2x ruedas de ajuste interior [[16] 1x llave [17] 1x llave Allen de 2 mm [18] 1x llav
DIAGRAMA DE ENSAMBLAJE [ 24] [ 25] [ 27] [ 26] [ 1] [ 4] [ 14] [ 7] [ 8] [ 13] [ 9] [ 11] [ 15] [ 10] [ 12] [ 3] [ 16] [ 6] [ 17] [ 29] [ 5] [1] 1x riel superior [2] 1x umbral inferior [3] 2x postes de pared [4] 2x juntas insertadas [5] 1x junta lateral (más larga) [6] 1x junta lateral (más corta) [7] 1x empaque magnético (más largo) [8] 1x empaque magnético (más corto) [9] 1x panel fijo A [10] 1x panel de pared L [ 20] [ 23] [ 19] [ 22] [ 18] [ 2] [11] 1x panel fijo B [12] 1x juego de manij
INSTRUCCIONES DE INSTALACIÓN INFORMACIÓN GENERAL IMPORTANTE Se recomienda que dos personas instalen la unidad. Cubra el desagüe con cinta antes de realizar la instalación para no perder las piezas pequeñas. Desempaque la unidad con cuidado y fíjese que no haya sido dañada durante el envío. Despliegue las piezas e identifíquelas usando el diagrama de ensamblaje y la lista de contenido de la caja como referencia. Antes de desechar la caja, asegúrese de que no haya piezas pequeñas de ferretería en el fondo.
2 INSTALACIÓN DE LOS PANELES DE VIDRIO FIJOS • En este paso, necesitará las siguientes piezas: [1] x1, [4] x2, [9] x1, [11] x1, [14] x4, [17] x1, [28] x1 • En este paso, necesitará las siguientes herramienta: B NOTA: SE REQUIEREN DOS PERSONAS 2a 2b [9] [9] [3] 2c [3] 2c [1] 2a 2c = [9] [1] 2d 2a [17] [14] [11] 2e 2e [14] [1] [9] 2e 2f [9] [4] = [9] [3] [28] [4] 2a. Inserte el panel fijo A [9] en el poste de la pared [3]. 2b.
3 INSTALACIÓN DE LA GUÍA INFERIOR/TOPE Y UMBRAL INFERIOR • En este paso, necesitará la siguiente pieza: [2] x1, [19] x1, [21] x1, • En este paso, necesitará las siguientes herramientas: A, B, C, G, I 3a [19] [9] 3b [11] [21] [2] [2] 3c 3d I [11] [2] [9] B [2] [19] [21] 3e J L F 3f [2] Base de ducha A 3.2mm 3g [19] 3h [21] [2] [11] [9] [2] 3a. Coloque la ranura de la guía inferior A-L [19] sobre el umbral [23] inferior [2] y el panel fijo A [9]. 3j 3i Tornillo 3b.
4 INSTALACIÓN DE RUEDAS EXTERNAS/INTERNAS Y EL PANEL DE PUERTA-L • En este paso, necesitará las siguientes piezas: [10] x1, [13] x2, [15] x2, [17] x1, [20] x1, [29] x1 [13] 4a Vista desde el interior 4d [29] [15] [17] [10] 4a 4b 4e [13] [10] [17] [1] 4f 4c [13] [1] 4e 4g [13] [17] [29] [10] [10] [2] Vista desde el interior 4g 4a. Desenrosque y separe las 2 ruedas exteriores [13] y las 2 ruedas de ajuste interior [15] como se indica en la ilustración.
5 INSTALACIÓN DE LA JUNTA LATERAL/JUNTA MAGNÉTICA Y EL JUEGO DE MANIJAS • En este paso, necesitará las siguientes piezas: [5] x1, [6] x1, [7] x1, [8] x1, [12] x1, [18] x1 5a 5c [9] [1] [10] [5] [12] [6] 5b 5a [10] 5d [10] 5b [1] [11] [10] [8] [12] [7] 5c 5e [18] [10] 5a. Instale la junta lateral más larga [5] en el borde izquierdo del panel de la puerta-L [10]. Instale la junta lateral más corta [6] en el borde derecho del panel fijo A [9]. 5b.
6 AJUSTAR EL PANEL DE LA PUERTA-L • En este paso, necesitará las siguientes piezas: [15] x1 6a 6b [16] [13] 6c [13] Tapa de la cubierta Tapa de la cubierta Alineación correcta de la puerta 6a. Deslice el panel de la puerta-L [10] para cerrarlo y observe si la puerta sella de forma segura contra ambos sellos magnéticos [8] y [7] por igual.
LIMPIEZA POSTERIOR A LA INSTALACIÓN AS America, Inc. (“American Standard”) garantiza al comprador consumidor original que, a opción del primero, retirará todos los desechos de construcción. La lechada de los azulejos puede retirarse usando un palito de paleta o un abate lengua de madera. No utilice cepillos de alambre ni otro implemento de metal sobre la superficie de la tina. La limpieza posterior a la instalación generalmente puede realizarse usando agua tibia y detergente líquido para vajilla.
GARANTÍA GARANTÍA POR 10 AÑOS DE LAS PUERTAS DE DUCHA AS America, Inc. (“American Standard®”) garantiza al comprador no comercial original que, a criterio exclusivo del primero, reparará o reemplazará este producto o cualquiera de sus partes, si confirma que el producto presenta defectos en los materiales o la mano de obra en condiciones de uso y mantenimiento normal por 10 años. Esta garantía es intransferible a compradores o dueños posteriores al comprador originario.
¡DÍGANOS QUÉ PIENSA! Déjenos una reseña o una historia del producto en americanstandard.com/reviews Gran tina 03/13/2018 06:52:29 CDT American Standard Tina de 60 pulg. por 34 pulg. Integral Tina con delantal. Drenaje izquierdo Amo la bañera. Es muy espacioso y definitivamente lo compraría de nuevo. Nuestra vieja bañera se rompió, así que compramos esta para reemplazarla. Este se siente como si fuera más duradero y no tan endeble como el anterior.