
Installation Guide


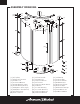


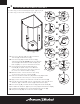


Table Of Contents

3
INSTALLING BOTTOM GUIDE/CAP & BOTTOM THRESHOLD
• In this step, you’ll need following part: [2] x1, [19] x1, [21] x1,
• In this step, you’ll need the following tools: A, B, C, G, I
3.2mm
[2]
[2]
[2]
[2]
[21]
[11]
[11]
[19]
[9]
[19]
[2]
[19]
[9]
3b3a
3d3c
3f3e
3h
3g
3j
3k
3i
[9]
[21]
[2]
[19]
[9]
[2]
[11]
[21]
[21]
[2]
[11]
[2]
[2]
I
J
F
Shower
Base
A
Screw
ST4x25
[23]
Screw
ST4x25
[23]
GG
[21]
[11]
[22]
B
3a. Place slot in Bottom Guide A-L [19] over Bottom
Threshold [2] and Fixed Panel A [9].
3b. Place End Cap [21] over Bottom Threshold [2]
and Fixed Panel B [11]. NOTE: Evenly space Bottom
Threshold [2] between Bottom Guide A-L [19] and
End Cap [21] so no spaces exist between the two.
3c. Check that both Fixed Panel A [9] and Fixed
Panel B [11] are plumb using a Level. Mark the
surface of the shower base deck using a pencil at
the center slot of Bottom Guide A-L [19] .
3d. Mark the surface of the shower base deck using
a Pencil at the center hole of End Cap [21].
3e. Remove both Bottom Guide A-L [19] and End Cap [21] and drill
at both marked locations using a 3.2 mm (1/8") Drill Bit.
3f. Apply a silicon sealant to the underside of the Bottom Threshold [2]
3g. Place Bottom Threshold [2] on deck of Shower Base, then place Bottom
Guide A-L [19] over Bottom Threshold [2] and Fixed Panel A [9].
3h. Place End Cap [21] over Bottom Threshold [2] and Fixed Panel B [11].
3i. Screw Bottom Guide A-L [19] into place using supplied ST4x25 Screw [23].
3j. Screw End Cap [23] into place using supplied ST4x25 Screw [23].
3k. Snap Screw Cap [22] over screw hole of End Cap [23].