
Use and Care Guide


710013-100
4
Wipe door bottom frame with clean cloth.
Cut vinyl sweep 1" longer than drip rail and slide it into groove
on underside of drip rail.
Position drip rail with tape backing still in place on inside of
door bottom frame even with bottom edge and set 3/4" in from
edge with magnet. The drip rail should be adjusted so that it
angles down toward the hinge side and does not hit bottom
frame of corner posts when door is closed.
Mark location and then remove backing from tape and press
drip rail in place. Insert plastic plug in drip rail opposite hinge
side to allow water to drain back into shower.
HOW TO CARE FOR YOUR ENCLOSURE
Do not use scouring powder, pads or sharp instruments
on metal or glass panels. Occasionaly wipe with mild
detergent diluted in water to keep the panels and metal
parts looking new. Use squeegees following each shower
to eliminate water spots on the inside of the glass panels.
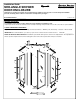
HOW TO ORDER REPLACEMENT PARTS
Provide the following information to your Dealer.
1. Part Name
2. Part Number
3. Part Description
(Length, Size,
Color, etc.)
4. Model Number
Key Part Part No.
No. Name
1 WALL TRIM 5879
2 BOTTOM TRIM 5879
3 PANEL FRAME, TOP, SIDES 5493-3
4 135° POST 5792
5 HINGE JAMB W/HINGE 61/5466
6 STRIKE JAMB W/MAG. STRIP 5466-M
7 TOP/BOTTOM FRAME 1393/EX103
8 SIDE FRAME 1393X103
9 STRIKE SIDE W/MAG. 1393MX103M
10 HEADER, RIGHT, LEFT, CENTER 8880
11 135° HEADER PLATE E9032
12 HANDLE 6627
13 THRESHOLD, RIGHT, LEFT & CENTER 8104
14 DRIP CAP PLUG DCP1
15 VINYL STRIP PVS2
16 DRIP RAIL 2482T
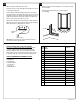
Caulk along inside of the wall jamb on each side where they
meet the walls.
Caulk all joints where parts are screwed together
(see drawing).
10
11
CAULK
PIVOT
SIDE
PART # DCP-1
NOTE: Drip rail should not be removed after it has been
set in position as the tape may tear.