
Cadet 1.6 GPF Two-Piece Pressure Assisted Toilets Installation Instructions


9
11
12
10
ADJUSTMENTS
The flushometer tank is designed and factory-adjusted to provide a
consistent, safe seal depth in the bowl after each flush. Field refill
adjustment is not required. The refill has been preset and locked.
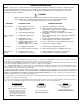
FLUSH ACTUATOR ADJUSTMENT - The spacing between the bellcrank
and flush actuator may be adjusted to assure positive operation of the trip
lever. Proceed as follows:
a. Remove tank cover and check that there is approximately 1/32"
(0.8mm) gap between the top of the actuator and bottom of the spring
rod when it is lifted to remove slack from linkage.
b. If necessary, loosen set screw in actuator cap and turn cap to increase
gap (clockwise) or decrease gap (counterclockwise), as needed.
c. Tighten setscrew securely after adjustment is completed. Replace
tank cover.
CARE AND CLEANING
When cleaning your toilet, wash it with mild, soapy water, rinse thoroughly with clear water and dry with a soft cloth.
Avoid detergents, disinfectants, or cleaning products in aerosol cans. NEVER use abrasive scouring powders or
abrasive pads on your toilet seat. Some bathroom chemicals and cosmetics may damage the seat's finish.
REPAIR PARTS LIST
NOTE: "XXX" and "YYY" represent color or trim finish options.
Specify when ordering.
ITEM PART NO. DESCRIPTION QTY
1
2
3
4
5
6
7
8
9
10
11
1
1
1
1
1
1
1
1
1
1
1
1
1
738473-YYY0A
738494-YYY0A
4098.100.XXX
735083-400.XXX
3099.016.XXX
3083.016.XXX
3109.016.XXX
034783-XXX0A
738493-0070A
738495-0070A
004602-0070A
738496-0070A
047562-0070A
047563-0070A
730292-0070A
735083-600.XXX
603111-0030A
TRIP LEVER-LH
TRIP LEVER-RH
TANK (COMPLETE WITH COUPLING
COMPONENTS AND TANK TRIM)
• TANK COVER
BOWL, ELONGATED
BOWL, ROUND FRONT
BOWL, ELONGATED 16-1/2"H
• BOLT CAP COVER KIT (INCL
TWO COVERS/WASHERS)
SPRING ROD ASSEMBLY-LH
SPRING ROD ASSEMBLY-RH
COUPLING GASKET
LOWER SUPPLY ASSEMBLY (35 PSI)
UPPER SUPPLY ASSEMBLY
VALVE CARTRIDGE ASSEMBLY
TANK COUPLING KIT
TANK COVER FOR LOCKING DEVICE
COVER LOCKING DEVICE KIT
1
2
3
4
5
6
9
10
8
7
11
- 3 -
SET
SCREW
1/32"
APPROX.
730479-100 Rev. A
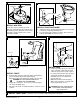
CONNECT WATER SUPPLY
a. Connect water supply line between
shutoff valve and tank water inlet
fitting. Tighten COUPLING NUT 1/4 turn
beyond hand tight. Check that refill tube
is inserted into overflow tube.
b. Turn on supply valve and allow tank to
fill until float rises to shutoff position.
c. Check for leakage at fittings, tighten or
correct as needed.
d. Do not use plumber's putty to seal
these fittings.
TANK
COUPLING NUT
FLEXIBLE
SUPPLY
WATER INLET
COMPRESSION
COLLAR
WASHER
VALVE NUT
TRIM PLATE
CAUTION: Overtightening of
COUPLING NUT could result in
breakage and potential flooding.
VALVE