
Installation Guide


- 3 -
755905-100 Rev. 1 06/20
9
8
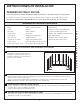
HOLES FOR PLUMBING
When all 3 tub or shower walls are cut and trimmed, it will be necessary to mark-up all 3 walls in their installed positions
to indicate the exact locations of the plumbing xtures, and drill using an appropriately sized hole saw.
TRIMMING TUB OR SHOWER WALLS TO FIT
NOTE: Outside edges of the tub and shower walls have
a reveal (nished, cornered edge). When trimming
the tub or shower walls for height, trim or cut
walls from the bottom. When trimming for width,
trim or cut from the inside corners.
10
FINAL DRY FIT
Perform another dry t of the tub or shower walls before adding any adhesive on the drywall to ensure all hole locations and
grab bar locations are in correct alignment.
11
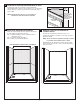
APPLYING ADHESIVE
a) Place 1/8"-1/4" vertical beads of evenly spaced adhesive
along the back wall. Corner reinforcements must also
have a bead of adhesive on the face. (See Figure)
NOTE: Applying beads of adhesive thicker than 1/4" may
make it difcult to spread behind the panel once it is
up and installed, creating a ripple effect on the wall.
Additionally, a large horizontal bead of adhesive must be applied
towards the top of the walls and
on the drywall above the tub or
shower base.
b) Once adhesive is applied on the drywall, carefully place
the rear tub or shower wall onto the adhesive using a set of
suction cups.
c) Continue the installation by carefully installing the side walls,
in the same manner as the rear wall.
NOTE: Ensure adhesive is applied on front entrance wall
where the nished edge (90 degree bend) of the side
wall contacts.
Adhesive
Adhesive
NOTE: The use of suction cups can aid in the installation
of the tub or shower walls. Firmly press the rear
wall against the drywall top to bottom, left to right.