
Operating instructions


Pub. No. 18-HE56D1-9 7
Installer's Guide
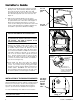
3. Use the provided blunt tip screws to fasten the rail into
place. The metal tabs on the rails should be facing the
front of the air cleaner enclosure. After installation, one
of the tabs will be flush with the front of the enclosure
and the other will extend past the front edge of the
enclosure. See Figure 18.
4. With the rail now firmly affixed to the air cleaner case
with two screws, it may be desirable to add an optional
third screw on the rail for extra support. A third hole is
provided for this purpose, as well as a screw. To
prevent the drill bit from ‘walking’ use the existing hole
located in the center of the rail as a guide (much like the
installation template was used earlier).
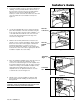
Figure 17
This tab
is flush.
This tab
extends
past.
2. Leaving the template in place to prevent the drill bit from
“walking”, use the provided drill bit to drill two holes in
the air cleaner enclosure. Do not try to mark and then
drill the holes, because the drill bit will have the
tendency to “walk” on the flat sheet metal case. This will
cause the metal rail to be installed incorrectly. See
Figure 17.
PUSH
Figure 18
Figure 19
Figure 20
Two edges
align.
5. Move the installation template to the other side of the air
cleaner enclosure. Place the template onto the
enclosure as indicated in Figure 19. The template must
be pushed towards the back of the air cleaner enclosure
until the front flange of the installation template is fully
flush against the leading edge on the case. The
template must also be pushed towards the one inch
U-channel rail as shown in Figure 19.
6. Drill two holes, using the template to guide the drill
bit to keep the bit from 'walking' as done previously.
See Figure 20.
NOTE: The filter mount rails are not installed in the same
orientation. If they are installed the same way, the screw
heads will be in the way of the filter installation.
U-channel
rail