INSTALLATION INSTRUCTIONS PASSAGE™ SHOWER BASES MODELS: A8010T-RHO, A8010T-LHO, A8011T-RHO, A8011T-LHO, A8012T-CO Visit http://www.americanstandard-us.com/passage-collection for coordinating products. Thank you for selecting American Standard – the benchmark of fine quality for over 100 years. To ensure this product is installed properly, please read these instructions carefully before you begin. (Certain installations may require professional help.) Local building codes vary by location.
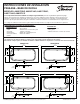
A8012T-CO 48" (1219mm) 24" (610mm) 16" (413mm) 34" (864mm) 2-3/4" (70mm) 1" (25mm) 2-1/4" (57mm) 1 Ensure that the floor and stud walls are square and plumb on a level floor as shown in Figure A. Provide a 5" x 5" (127 x127mm) opening in the floor for the drain and refer to the product rough-in for actual drain location. Draw a line 3-1/4" (82mm) above the level subfloor on the wall studs at each side of the opening.
Mix a non-shrinking bedding material such as mortar and apply enough bedding material to support the entire bottom of the shower base. Concrete is NOT recommended. The shower base is NOT to be supported by the base flange.
POST INSTALLATION CLEAN-UP Remove all construction debris. Tile grout can be removed with a wooden popsicle stick or tongue depressor. Do not use wire brushes or any other metal implement on surface. Post installation clean-up generally can be completed using warm water and liquid dishwashing detergent. Stubborn dirt or stains may be removed using granular Spic and Span® mixed with water. Painter's naphtha can be used to remove excess adhesives and/or wet oil-base paint.
INSTRUCCIONES DE INSTALACIÓN PASSAGE™ BASE DE DUCHA MODELOS: A8010T-RHO, A8010T-LHO, A8011T-RHO, A8011T-LHO, A8012T-CO Visite http://www.americanstandard-us.com/passage-collection para ver los productos que hacen juego. Gracias por elegir American Standard, el parámetro de excelente calidad por más de 100 años. Para asegurar que este producto se instale de manera adecuada, lea las instrucciones con atención antes de comenzar. (Ciertas instalaciones pueden requerir ayuda profesional.
A8012T-CO 48" (1219mm) 24" (610mm) 16" (413mm) 34" (864mm) 2-3/4" (70mm) 1" (25mm) 2-1/4" (57mm) 1 Asegúrese de que el piso y las paredes de entramado estén en ángulo recto y a plomo sobre un piso nivelado conforme se muestra en la Figura A. Realice una abertura de 5" x 5" (127 x127mm) en el piso para el drenaje y consulte la preparación del producto para ver la ubicación del drenaje real.
3 Mezcle material de cimentación de baja deformación como mortero y aplique la suficiente cantidad para soportar el fondo entero de la base de la ducha. NO se recomienda el concreto. La base de la ducha NO se soporta con la brida de la base.
LIMPIEZA POSTERIOR A LA INSTALACIÓN Retire todos los residuos de construcción. El mortero de los azulejos se puede quitar con un palito de paleta o una espátula médica de madera (para la garganta). No use cepillos metálicos o cualquier otro implemento de metal en la superficie. Por lo general, la limpieza posterior a la instalación se puede realizar usando agua tibia y un lavalozas líquido. La suciedad o manchas difíciles de quitar se pueden remover usando un producto como Spic and Span® mezclado con agua.
INSTRUCTIONS D'INSTALLATION PASSAGE™ DOUCHER LA BASE MODÈLES: A8010T-RHO, A8010T-LHO, A8011T-RHO, A8011T-LHO, A8012T-CO Pour trouver des produits associés, visitez http://www.americanstandard-us.com/passage-collection Merci d'avoir choisi American Standard, la référence en matière de qualité depuis plus de 100 ans. Afin de garantir une installation adéquate, veuillez lire ces instructions attentivement avant de commencer. (L'installation peut nécessiter l'aide d'un professionnel dans certains cas.
A8012T-CO 48 po (1219mm) 24 po (610mm) 16 po (413mm) 34 po (864mm) 2-3/4 po (70mm) 1 po (25mm) 2-1/4 po (57mm) 1 TRACER UN REPÈRE SUR LES MONTANTS À AU-DESSUS DU NIVEAU DU SOUS-PLANCHER Assurez-vous que le plancher et les montants sont d'aplomb et d'équerre, selon ce qui est illustré à la Figure A. Créez une ouverture de 5 po x 5 po (127 x 127 mm) dans le plancher pour le renvoi et consultez le raccordement du produit pour obtenir l’emplacement réel du renvoi.
3 Mélangez un matériau d'assise à faible affaissement, par exemple du mortier, et appliquez une bonne couche de ce matériau pour supporter l'ensemble du fond de la base de douche. Le béton N'est PAS recommandé. La base de douche NE doit PAS être supportée par la bride de la base.
INSTALLATION APRÈS NETTOYAGE Éliminez tous les débris de construction. Le ciment de carrelage peut s’enlever au moyen d’une languette en bois ou un abaisse-langue. N’utilisez pas de brosses métalliques et ne frottez avec aucun objet métallique sur la surface. Le nettoyage après l’installation peut, habituellement, être exécuté avec de l’eau tiède et du détergent liquide pour lave-vaisselle. Les tâches tenaces peuvent être éliminées avec des granules de Spic and SpanMD mélangée avec de l’eau.
INSTALLATION INSTRUCTIONS PASSAGE™ CUSTOM SHOWER WALL SYSTEM MODELS: P2971SWT, P2974BWT Visit http://www.americanstandard-us.com/passage-collection for coordinating products. Thank you for selecting American Standard – the benchmark of fine quality for over 100 years. To ensure this product is installed properly, please read these instructions carefully before you begin. (Certain installations may require professional help.) Also be sure your installation conforms to local codes. BEFORE YOU BEGIN....
1 DRY FITTING THE TONGUE AND GROOVE PANELS ON THE WALL 1) Dry fit the panels starting with the rear most panels first. Keep a 1/8" (5mm) gap above the tub deck or shower base for all panels. When connecting several panels together, panels use a tongue and groove system to connect to each other. See Illustration 2. NOTE: The use of suction cups will aid in the handling and installation of the shower wall panels. Illustration 2 TONGUE AND GROOVE ASSEMBLY 2) Dry fit the 2 side panels next.
3) With the aid of suction cups, move first rear panel onto the wall keeping a space of approximately 1/8" (5mm) off the surface of the tub deck or shower base. Press panel firmly over entire surface to ensure firm contact of panel to adhesive on wall. NOTE: It may be necessary to brace or support the panels against the wall until the panels stay securely in place. See illustration 6.
POST INSTALLATION CLEAN-UP Remove all construction debris. Tile grout can be removed with a wooden popsicle stick or tongue depressor. Do not use wire brushes or any other metal implement on surface. Post installation clean-up generally can be completed using warm water and liquid dishwashing detergent. Stubborn dirt or stains may be removed using granular Spic and Span® mixed with water. Painter's naphtha can be used to remove excess adhesives and/or wet oil-base paint.
INSTRUCTIONS D'INSTALLATION Déballez vos nouveaux panneaux de douche et vérifiez avec attention qu'ils n'ont subi aucun dommage. Vérifiez que la taille des panneaux correspond à votre installation. Consultez les informations d’installation American Standard à la page de spécifications pour connaître les dimensions spécifiques à chaque modèle. REMARQUE : Manipuler avec une grande précaution les surfaces frontales des panneaux. Utiliser uniquement des linges non abrasifs pour éviter les rayures.
1 INSTALLATION À SEC DES PANNEAUX À LANGUETTE ET RAINURE SUR LES MURS 1) Installer les panneaux à sec en commençant par le panneau le plus à l’arrière. Laisser un espace de 1/8 po (5 mm) au-dessus du tablier de la baignoire ou la base de la douche pour tous les panneaux. Lorsque vous reliez plusieurs panneaux, utiliser un système de rainure et languette pour les relier. Voir image 2. REMARQUE : L'utilisation de ventouses aidera à la manipulation et l’installation des panneaux de douche muraux.
3) À l’aide des ventouses, déplacer le premier panneau arrière sur le mur en laissant un espace d’environ 1/8 po (5 mm) de la surface du tablier de la baignoire ou la base de la douche. Appuyer fermement sur le panneau et sur la surface complète pour assurer un contact ferme entre le panneau et l’adhésif sur le mur. REMARQUE : Il peut être nécessaire d’installer un support ou un renfort pour les panneaux contre le mur jusqu’à ce qu'ils tiennent fermement en place. DE LAVABO RENFORTS Voir image 6.
NETTOYAGE APRÈS INSTALLATION Retirez tous les déchets de construction. Le coulis du carrelage peut être retiré à l’aide d’un bâton de popsicle en bois, ou d'un abaisse-langue. Ne pas utiliser de brosse métallique ou autre matériel en métal. Le nettoyage après installation se fait habituellement à l'aide d'eau chaude et d'un savon liquide à vaisselle. Les taches résistantes peuvent être retirées à l'aide d'une pierre Spic and SpanMD et de l'eau.
INSTRUCCIONES DE INSTALACIÓN SISTEMA PERSONALIZADO DE PAREDES DE DUCHA PASSAGE™ MODELOS: P2971SWT, P2974BWT Visite http://www.americanstandard-us.com/passage-collection para ver los productos que hacen juego. Gracias por elegir American Standard, el parámetro de excelente calidad por más de 100 años. Para asegurar que este producto se instale de manera adecuada, lea las instrucciones con atención antes de comenzar. (Para algunas instalaciones puede necesitarse ayuda profesional).
1 INSTALAR EN SECO LOS PANELES DE LA LENGÜETA Y LA RANURA EN LA PARED 1) Instale en seco los paneles. Comience con los paneles posteriores. Mantenga una brecha de 1/8" (5 mm) por encima de la superficie de la tina o la base de la ducha para todos los paneles. Para conectar varios paneles, se usa un sistema de lengüetas y ranuras. Ver la ilustración 2 NOTA: Use ventosas para manipular e instalar los paneles de la pared de la ducha.
3) Con la ayuda de ventosas, mueva el primer panel posterior hacia la pared. Mantenga un espacio de aproximadamente 1/8" (5 mm) de la superficie de la tina o la base de la ducha. Presione el panel firmemente sobre toda la superficie para asegurar un contacto firme del panel con el adhesivo en la pared. NOTA: Puede ser necesario colocar una ménsula o soporte para sostener los paneles contra la pared hasta que estén fijados en su lugar. Ver la ilustración 6 4) Aplique adhesivo como en el paso 2.
LIMPIEZA POSTERIOR A LA INSTALACIÓN Retire todos los desechos de construcción. La lechada de los azulejos puede retirarse usando un palito de paleta o un abate lengua de madera. No utilice cepillos de alambre ni otro implemento de metal sobre la superficie. La limpieza posterior a la instalación generalmente puede realizarse usando agua tibia y detergente líquido para vajilla. La suciedad o manchas rebeldes pueden limpiarse usando Spic and Span® granular mezclado con agua.