
Installation Guide


755796-100 Rev. 1 8/19
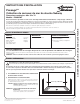
STEP 4: APPLYING SEALANT FOR SEAMS AND JOINTS
1) Once all panels are securely in place and set, apply the
tub and tile sealant to all corners, seams between panels
and gaps between bottom panels and shower base.
(Illustration 6)
NOTE: Wipe any excess adhesive from the panel
with damp cloth.
Allow 24 hours for the sealant to dry before use.
Illustration 6
STEP 3: INSTALLING SIDE WALL PANELS
1) Orient side panel to match subway tile design
of top rear panel.
2) Align grout lines of side panels with rear wall panel
grout lines. Trim side panels if needed to fit within alcove
area. (Illustration 4)
Trim or cut from bottom edge of side panels so that the
top edge of the panels are level with the top edge of
the back panels.
Tri mming Panels:
a) Measure shower enclosure.
b) Apply masking tape to approximate cut area on the tile
finished side to prevent chipping and protect surface.
c) Transfer measurement to panel.
d) Using a jigsaw with a fine tooth blade, cut along line on
finished tile side. Ensure a new blade is used.
3) Once both side panels are properly dry fitted, mark all
panels and trim as needed:
a) Apply tape to approximate location
b) Mark all plumbing locations
c) Drill holes at each location using hole saws large enough
to accomomdate the opening but small enough to be
covered by the trim plates. (Illustration 5)
NOTE: Drill from nished tile side.
Do not use wood/paddle bits or grit hole saws as
they will chip.
4) Wipe panels and walls with a damp cloth to remove any
dust or debris. Allow to fully dry.
5) Apply 1/4" (6mm) bead of adhesive on the substrate in
evenly spaced vertical strips every 6" (152mm) for each
panel, top to bottom. (Illustration 3) Apply one row of
adhesive horizontally to the top and bottom edges of the
substrate. (Illustration 3) Place wall into place and press
firmly over entire surface to ensure adhesion. Wipe off
excess adhesive with a damp cloth.
6) Repeat on second wall panel.
SHOWER VALVE
Illustration 4
Illustration 5
CORRECT
PANEL POSITION
TOP REAR PANEL
RIGHT SIDE PANEL
TOP REAR PANEL
RIGHT SIDE PANEL
REAR CORNER
INCORRECT
PANEL POSITION
REAR CORNER
GROUT
LINES
- 3 -