
Installation Guide


- 2 -
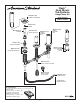
3a
NOTE: For unfinished surface use larger VALVE LOCK RING.
NOTE: For finished surface use small VALVE LOCK RING.
Larger VALVE LOCK RING can be used on nished surface for Colony Pro, Quentin,
Estate, Fitzgerald, and Studio S.
• Insert the HOT and COLD VALVE BODIES through the mounting deck from below. The HOT VALVE BODY
is marked with a red label. Assemble the VALVE LOCK RINGS so they are ush with the top of the
VALVE BODIES.
• Tighten the VALVE BODY mounting nuts securely.
• Fasten the VALVE LOCK RINGS to the unnished surface with #8 at screws (Not provided)
• Thread HOSE CONNECTOR (1) onto VALVE BODY (3, 5). Thread HOSE CONNECTOR (2) onto TEE (4).
Tighten HOSE CONNECTOR (1) and (2) rmly.
Note: Hoses have different thread ends. Make sure to connect the fine thread to the Hot/cold valve bodies.
• Insert HAND SHOWER SHANK (6) through mounting deck from top and secure it with MOUNTING NUT.
• Install HOSE and PLUG (7) from above deck.
MOUNT SIDE VALVE BODIES
3
M965908 (7/18)
SMALL
VALVE
LOCK RING
FITTING
MOUNTING
DECK
LARGE
VALVE
LOCK RING
SPOUT
SHANK
HOT
COLD
FRICTION WASHER
MOUNTING NUT
VALVE LOCK RING FLUSH WITH
TOP OF THREADS ON VALVE SHANK
VALVE
BODY
# 8 FLAT
SCREWS
5
1
1
7
6
3
2
2
4
FOR COPPER TUBE INSTALLATION (not supplied)
2
1
5
3
4
NOTE: Remove cartridge to protect from brazing process.
• Remove SLEEVES (1) from the SIDE VALVES and PLUG (5)
from spout shank.
• Remove CARTRIDGES from the Side Valves
(Follow instruction in Step 5 to remove Cartridges )
• Remove VALVE PIPE (2) if installing (R910) or
remove VALVE PLUG (3) if Installing (R900)
• Take INSERTS (4) out from SIDE VALVES
and TEE.
• Cut copper tubes as needed and braze joints.