
Installation Guide


- 3 -
5
MAKING CONNECTIONS
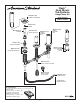
SERVICE — TO CHANGE THE DIRECTION OF HANDLE ROTATION
• Turn off the water supplies.
• Turn HANDLE to the off position and remove HANDLE.
• Unthread SCREW from CARTRIDGE.
• Remove the SLEEVE from the CARTRIDGE.
• Unscrew the VALVE LOCK NUT and remove.
(17 mm deep socket is required)
• Remove the CARTRIDGE.
• Remove the SPRING CLIP.
• Remove the STOP WASHER. Turn it 90˚ and replace.
• Replace the SPRING CLIP.
• Reverse the above steps to reassembly the components.
• If the spout drips, operate the handles several times
from the off to the on position. Do not force - the handles only turn 90˚
4
M965908 (7/18)
WATER SUPPLY
CONNECTIONS
WATER SUPPLY
CONNECTIONS
1
3
2
4
VALVE
LOCK NUT
SLEEVE
SCREW
VALVE
CARTRIDGE
SPRING
CLIP
STOP
WASHER
90
DEEP SOCKET
17 mm (11/16")
• Connect the water supply lines to the VALVE BODY.
For R910 installation, install HAND SHOWER HOSE (1) to the TEE.
• Insert HAND SHOWER HOSE (1) through HAND SHOWER SHANK (2) and
thread HAND SHOWER HOSE (1) into TEE (4).
• Place HOSE PLUG (3) into HAND SHOWER SHANK (2).