
Installation Guide


- 4 -
M965906 Rev. 1.2 (8/19)
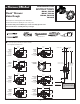
COLD
1
2
3
HOT
5
4
8
7
6
3-1/2"
SIDE VIEW
n Finished wall should allow for a 3-1/2" diameter opening.
n Discard or throw away PLASTER GUARD (8).
n Thread MOUNTING PLATE (4) on to the valve with the two SCREWS (5).
n Install Mounting Screws (7) through Escutcheon Holder (8) and into Threaded holes (6).
Tighten Mounting Screws (7) Securely.
Note: MOUNTING PLATE (4), Mounting Screws (7), Escutcheon Holder (8), and the two SCREWS (5) can be found
packaged with the Belshire Trim rather than the valve.
n Connect HOT and COLD water supplies per connection method of selected valve.
n Connect RISER PIPE (1) to VALVE BODY (2) top outlet marked “UP”.
n Connect TUB FILLER PIPE (3) to bottom outlet.
n Service stops are primarily used to shut water off. To shut “HOT” or “COLD” water using a at head screwdriver,
turn the head of the screw vertically. And to turn the water back on, turn the screw horizontally.
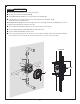
THIN WALL INSTALLATION FOR BELSHIRE TRIMS
3
CAUTION
Turn off hot and cold water
supplies before beginning.