
Installation Guide

754916-100
3
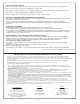
DRAIN CONNECTION
Using recommended drain opening, connect bath drain to waste line. Tighten all drain joints securely.
33
2
A.) THIS BATH MUST BE SUPPORTED ALONG IT'S ENTIRE BOTTOM. We recommend the use of mortar as bedding material (sand is not
recommended). Apply enough bedding to support the complete bottom of the bath. After the bedding has been poured, and before it sets,
position the bath within the recess until the rim is leveled against the leveling stringers (see "Typical Recess Installation") shown below.
The rim of the bath MUST NOT support weight. Allow the bedding material to completely harden before applying weight to the rim or
bottom of the bath.
C.) Any finish material such as tile or wallboard must be self-supporting if it contacts the deck of the bath.
Flooring will be butted against the bottom of the tub apron, also holding the tub in place.
B.) Check level front to back and side to side, shim as necessary. To secure the tub to wood studs, use drywall screws with flatwashers or roofing
nails immediately above the flange of the bath. To secure the tub to steel studs, use 4" drywall screws and flatwashers.
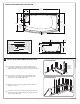
TYPICAL RECESS INSTALLATION
34" Typ.
(864mm)
60-3/16"
(1529mm)
3
0"
(762
mm)
TU
B WIDTH
LEVELING
STRINGERS
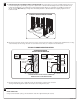
SUGGESTED BATH
INSTALLATION METHOD
SECURE THE BATH TO THE STUDS AS SHOWN FOR
WOOD OR STEEL STUD CONSTRUCTION.
TYPICAL FLANGE MOUNTING DETAIL
STUD
WATERPROOF DRYWALL
OR CEMENT BOARD
WATERPROOF DRYWALL
OR CEMENT BOARD
TILE
SEALANT
TUB
ROOFING NAIL
1" x 3" (25 x 76mm) WOOD
STRINGER FULL LENGTH
1" x 3" (25 x 76mm) WOOD
STRINGER FULL LENGTH
STEEL
STUD
WASHER
TILE
SEALANT
TUB
4" (102mm)
DRYWALL
SCREW
WOOD
STUDS
STEEL
STUDS