
Installation Guide


- 2 -
M965930 Rev. 1.1 (3/20)
1
Figure 1.
2
PLASTER
GUARD
Figure 2.
2
5
8
3
4
6
1
Figure 3.
7
5
UP
UP
C
H
OFF
2
2a
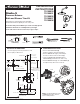
• Figure 1. Push CAP (1) over VALVE CARTRIDGE (2) until
seated against stop.
• Figure 2. Make sure O-RING (6) is secure within
ESCUTCHEON HOLDER (3). Push ESCUTCHEON
HOLDER (3) onto CAP (1) and attach with LONG SCREWS (4).
Mount ESCUTCHEON SUPPORT (5) to ESCUTCHEON
HOLDER (3) with 4 SHORT SCREWS (8).
• Figure 3. Install ESCUTCHEON (7) onto CAP (1) and push
ush against nished wall. ESCUTCHEON (7) will snap t
onto ESCUTCHEON SUPPORT (5).
INSTALL VALVE TRIM (STANDARD WALL INSTALLATION)
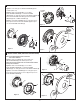
INSTALL VALVE TRIM (THIN WALL INSTALLATION)
2
6
2
Figure 1.
Figure 3.
Figure 2.
3
3
4
5
UP
M
9
1
0
7
5
0
M
9
1
0
7
5
0
1
2
7
2
UP
1
C
H
OFF
Note: Plaster Guard will remain installed for
thin wall installation.
• Figure 1. Remove SCREWS (7), push CAP (1) over
VALVE CARTRIDGE (2) until seated against stop.
Note: Escutcheon Holder must be installed with number
facing out on bottom.
• Figure 2. Make sure O-RING (5) is secure within
ESCUTCHEON HOLDER (3). Push ESCUTCHEON
HOLDER (3) onto CAP (1) and attach with LONG SCREWS (4).
• Figure 3. Install ESCUTCHEON (6) onto CAP (1) and push
ush against nished wall. Escutcheon (6) will snap t onto
ESCUTCHEON HOLDER (3).