
Installation Guide


- 1 -
Product names listed herein are trademarks of AS America, Inc.
© AS America, Inc. 2018
Thank you for selecting American Standard...
the benchmark of fine quality for over 100 years.
RECOMMENDED TOOLS
M965934 (8/18)
ROUGHING-IN DIMENSIONS
Townsend
®
Pressure Balancing
Bath and Shower Trim Kit
INSTALLATION
INSTRUCTIONS
TU353500
TU353501
TU353502
TU353507
TU353508
Plumbers’ Putty
or Caulking
Adjustable Wrench Channel Locks
Phillips Screwdriver
Certied to comply with ANSI A112.18.1M
• To assure proper positioning in relation to wall.
Note roughing-in dimensions.
H
C
OFF
Teon Tape
Flat Blade Screwdriver
4"
(102 mm)
BOTTOM OF TUB
74" (1880 mm)
FOR HEAD
CLEARANCE
18" (457 mm)
OPTIONAL
6.5" REF.
(165 mm)
1/2" (12 mm) NPT
1/2" (13 mm)
COPPER
8-1/4"
(210 mm)
2-3/4" MAX. (69 mm)
1-3/4" MIN. (45 mm)
OPTIONAL TO FINISHED
FLOOR USUALLY
BETWEEN 65'' AND 80''
(1651 AND 2032 mm)
TOP OF TUB RIM
1-5/8" TO 3-1/4"
(41 TO 83 mm)
1-5/8" TO 3-1/4"
(41 TO 83 mm)
FINISHED WALL
3.3/8" (85 mm) REF.
7" (177 mm) REF.
2-9/16"
(65 mm)
1-1/2" REF.
(38 mm)
6-1/8"
(156 mm)
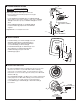
CARTRIDGE INSTALLATION
1
1
2
6
5
3
4
UP
UP
To ensure that your installation proceeds smoothly-please
read these instructions carefully before you begin.
For use with shower heads rated at 4.9 L/min (1.3 gpm) or higher.
• Remove PLASTER GUARD (6)
(Keep it installed for thin wall Installation).
• Remove BONNET NUT (1) by unthreading it
Counter clockwise. Remove test CAP (2).
• Remove PROTECTIVE HOUSING (3) from
CARTRIDGE (4). Install with “UP” text on top.
• Reinstall BONNET NUT (1) onto VALVE BODY (5)
and tighten rmly with 12 Nm or 9 lbs/ft.
NOTE: Specied tightening torque
of BONNET NUT (1) is critical to
assure sealing function.