
Installation & Assembly


Installation Guide
10
Installation videos available online at:
www.AmericanTinCeilings.com/videos
BACKSPLASH, WALL AND PROJECT INSTALLATION
Each kitchen has a unique layout and the possible starting point of your project can vary. In the majority of installations,
we suggest beginning from the left side and working to the right. We are available to answer any questions on your specific
layout.
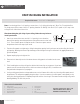
1. Starting from the left side, measure 24 1/2” from the farthest left point of your space. This will mark the location of your
first panel.
2. From your countertop, take a vertical measurement of the wall you are installing your tile on to. If you reach a cabinet,
note the measurement from the countertop to underneath your cabinet and proceed to Step #3.
3. Mark your tile according to the measurements in Step #2 and cut accordingly so the tile fits under the cabinet. For vary-
ing cabinet heights, repeat Steps #2 and #3 as necessary.
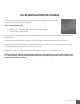
4. Measure and cut your J-Channel Edge Trim for the outer left edge of your starting panel. J-Channel Edge Trim gives the
exposed edge of the backsplash a finished appearance. Use a hacksaw to cut it to the proper height.
5. Apply the J-Channel Edge Trim to the exposed edge of the tile.
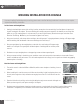
6. Lay your tile upside down. Apply a construction adhesive (we recommend a quick setting adhesive such as Loctite
®
Power Grab
®
) to the back of the panel while keeping the adhesive at least 1/4” to 3/8” away from the edges. This will
prevent the adhesive from bleeding past the edge of the panel. With a back and forth motion, apply the adhesive to the
rest of the panel 3” apart. Keep a wet rag handy in case any of the adhesive seeps out from the back of the panel. If any
adhesive seeps out, wipe this off immediately.
7. Place the panel with the attached J-Channel Edge Trim on the wall. Press firmly until the adhesive takes hold
– approximately 20-30 seconds.
8. Continue measuring and cutting your tiles in accordance with the cabinet heights of your space as in Steps #2 and #3.
Proceed with installing the next tile following Step #6.
Note: If your tile overlaps an outlet, you will need to manually cut out the outline of the outlet from your tile. To do this,
measure from the nail rail (the row of dimples) of the previously installed tile to the nearest side of the outlet. Using this
measurement, make a vertical mark on the tile that will overlap the outlet. Take another measurement from the nail rail
of the previously installed tile to the far side of the outlet and a make another vertical mark on the tile to be installed.
Finally, measure from the top and bottom of the outlet and make horizontal marks on the tile to be installed. When you
have finished, the four sides of the outlet will be marked to be cut out.
Using a drill and a 1/2” drill bit, drill a hole in the center of your marks. Then, using a pair of aviation tin snips, cut out
the hole for the outlet. Apply adhesive to the tile and install, making sure that the panels are lined up on the dimples of
the nail rail.