
Troubleshooting guide


AMW B-SERIES
OPERATOR MANUAL
INSTALLATION
START UP PROCEDURE
WATER CONNECTION
The National Sanitation Foundation requires the following for an NSF approved water hook-up:
• A quick disconnect water connection or enough coiled tubing so that the machine can be moved for cleaning underneath.
• An approved backflow prevention device, such as a double check valve to be installed between the machine and water supply.
A 1/4” male flare adapter is provided. Installation to a water filter system is recommended to prevent lime and scale build-up in the machine.
• Water pipe connections and fixtures directly connected to portable water supply shall be sized, installed and maintained in accordance with
federal, state and local codes.
• Flush the water line to purge any debris from the supply line.
Connect a 1/4” pressurized water line to the 1/4” male connection
(on rear of brewer) and turn the water supply on.
a) Minimum water pressure to the machine: 30 psi
b) Maximum water pressure to the machine: 80 psi
NOTE: Single head machines may be used without a pressurized water
supply. (See Pour-Over Mode section)
ELECTRICAL CONNECTION
NOTE: Wiring connections should be performed by a qualified technician.
(Refer to serial tag to verify model number of your machine)
• Remove front panel.
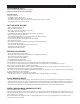
• Connect electrical service through rear of machine to terminal block
(inside front panel) marked L1, N, and L2. (See Figures A and B)
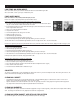
• On dual volt units, flip voltage switch (inside front panel next to terminal
block) to 120V for 120 Volt service or 240V for 120/208, or
120/240 Volt service. (See Figures A, B and table below)
• Re-install front panel.
• Turn on (plug-in) electrical service to brewer.
• Water tank will fill after a 7-second delay. The machine will make a
hissing sound when this occurs. On single head models, allow
approximately 1.5 minutes for the brewer to fill. On two head models, allow approximately five minutes for the brewer to fill.
NOTE: If water supply is inadequate or not connected, display will read “P-O” after 4 minutes of fill time (Refer to Pour-Over Mode
section). If Fill Cycle times out and display reads “P-O” before tank is full, turn unit OFF then ON again to reset and continue filling.
• The tank will begin heating slightly before machine fills.
• Turn brewer on by pressing ON/OFF switch in front of machine. (Light will illuminate)
• The brewer settings can be adjusted through the front touch pad. (Refer to Adjustments section)
• The water will be hot and the brewer will be ready to brew when “READY” light illuminates.
• Set Brew volume. (Refer to Setting Brew Volume section)
POWER REQUIREMENTS:
(Refer to serial tag for voltage to be supplied.)
Figure A
Figure B
For 120V, 15A or 20A Service
(2 Wire + Ground)
For 120/208-240V, 20A Service
(3 Wire + Ground)
N
N
CONNECT NEUTRAL (N) TO MIDDLE
CONNECT HOT (L1) TO LEFT SIDE
CONNECT GROUND TO SCREW
CONNECT HOT (L2) TO RIGHT SIDE
CONNECT NEUTRAL (N) TO MIDDLE
CONNECT HOT (L1) TO LEFT SIDE
CONNECT GROUND TO SCREW
ON
DUAL VOLT UNITS
,
F
LIP
SWITCH TO
“120V”
O
N DUAL
VOLT UNITS,
F
LIP SWITCH TO
“120V”
Applied Volts Models Watts Amps NEMA Plug Cord AWG Connections
120
B-3, B-3WL, B-3WR 1800 15
5-15P, 5-20P for CUL 3X14
Hot to L1
Neutral to N
Ground to ground screw
B-SAP, B-ID 1780 14.9
120/208
B-3, B-3WL, B-3WR 2920 14.1
L14-20P 4X12
Hot to L1
Neutral to N
Hot to L2
Ground to ground screw
B-SAP, B-ID, B-DAP, B-DGP 2620 12.6
B-6 5110 24.6
L14-30P 4X10
B-DAP, B-DGP (30A) 4510 21.7
120/240
B-3, B-3WL, B-3WR 3800 15.9
L14-20P 4X12
Hot to L1
Neutral to N
Hot to L2
Ground to ground screw
B-SAP, B-ID, B-DAP, B-DGP 3500 14.6
B-6 6600 27.5
L14-30P 4X10
B-DAP, B-DGP (30A) 6000 25