
Installation Guide


1.2
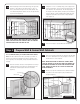
Measure up from the high point 34
1
⁄2” and draw a level line
across the wall to establish the top of the base cabinets. If
installing cabinets before your flooring, be sure to allow for
the thickness of the material you plan to use. (Figure 2)
1.3
Then measure up from there another 19
3
⁄8”. This will be the
baseline for the wall cabinets. (When you are finished, the
wall cabinets will sit at 53
7
⁄8” above the high spot in the
floor). (Figure 2) Please refer to your design elevations to
verify dimensions specific to your layout
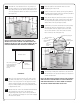
In order for cabinets to work properly and look right, they must be
installed level, plumb and flush with each other. This is easy enough
to achieve with some advanced planning.
1.1
First, locate the floor’s highest point. In order to do this,
place your level at the base of the wall, checking several
places along the wall until you find the high point in the
floor. Mark this spot. (Figure 1)
Suggested Tool and Material List
• ANSI Z87.1 Rated Safety Goggles
• Layout from Designer
• Framing Square
• Hammer
• Pry Bar
• Phillips and Flathead Screwdrivers
• Level
• Tape Measure
• Pencil
• Straight Edge
• Drill
• Properly Rated Extension Cord
•
7
⁄32” Drill Bit for Pre-drilling the Hanging Rail
•
3
⁄32” Drill Bits for Frame & Filler Attachment Pilot Holes
• Jigsaw or Table Saw
• Miter Box
• Clamps or C-Clamps
• Stud Finder
• 6’ Step Ladder
• Wood Shims
• Pin Nailer
• Small Finish Nails
• 1 x 2 or 1 x 3 Furring Strips
• Scrap Lumber (for 55” Propping Stick or T-Brace)
• Circuit Tester
• #10 x 2
1
⁄2” Pan Head Screws (for wall attachment to stud)
• #8 x 2
1
⁄2” Trim Head Screws (for frame attachment)
WARNING
FAILURE TO PROPERLY SECURE THE CABINETS MAY RESULT
IN SERIOUS INJURY! THE SCREWS RECOMMENDED ARE
FOR INSTALLATIONS INVOLVING DRYWALL AND WOOD
STUD CONSTRUCTION, NOT FOR CONCRETE OR BRICK. IF
SECURING CABINETS TO ANOTHER MATERIAL, CONSULT AN
INSTALLATION PROFESSIONAL TO IDENTIFY THE PROPER
FASTENERS.
Step 1 Measure, Measure… and Measure Again
Figure 2
Level
Straight edge
Shim to level
34
1
/
2
” from
highest point
level line
Highest point level line
20
1
/
2
”
Toekick line
19
3
/
8
”
Base line for wall cabinets
Wall stud locations
Figure 1
Shim to level
Highest point level line
Toekick line
Level
Straight edge
20
1
/
2
”
Mark floor at
high point
Wall stud locations
4