
Installation Guide


Step 5 Install End Panels (where applicable)
WARNING
TO REDUCE THE RISK OF DEATH OR SERIOUS PERSONAL
INJURY OR PROPERTY DAMAGE, AVOID ANY CONTACT WITH
PLUMBING, WIRING OR GAS LINES. THESE LINES ARE OFTEN
IN THE WALLS AND UNDER THE FLOOR.
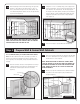
End panels are used to finish off a run of cabinets or box out an
appliance. Make sure to install plumb and level.
5.1
If your application uses a finished end panel, first trim the
panel to fit and then attach the panel to the side of the
cabinet. This can be done with contact adhesive or
1
⁄2”
finishing nails. (Figure 14)
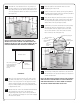
5.2
When installing a refrigerator or dishwasher return, it is
important to mount a cleat at the floor to secure this panel.
Simply cut a piece of 1 x 2 dimensional lumber about 20”
long so it is not exposed at the front of the panel. Then
secure to the floor with 2–3 fasteners (concrete screws for
concrete floors / wood screws for wood floors). Secure the
cleat to the panel (DWR, RR, SFR, etc.) with 2–3 wood
screws. (Figure 15)
Figure 14
End panel
Last cabinet
Figure 15
Refrigerator
or dishwasher
return
Cleat
Step 6 Install Base Cabinets
Installing base cabinets is very similar to the wall cabinets above.
The idea again is to lay out all the cabinets in position and make
sure all cabinets are level, square and plumb.
6.1
Remove all shelves, drawers and doors. You might want to
mark (or stack them in position) for reinstalling later. This
will make the cabinets lighter and easier to handle.
(See Appendix for drawer removal technique.) (Figure 16)
Figure 16
Remove doors, drawers,
shelves, and sliding shelves
or roll out trays
Continued
9