
Instructions / Assembly


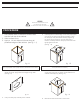


1. Prior to installation, identify the "face" (polished/gloss)
surface and the "top edge" of the backsplash. Apply
masking tape along bottom edge of backsplash and
alongthebackedgeofthevanitytop(seeg.2.1)The
tape needs to be set away from the back edge of the
topforthethicknessofthesplash+1/8-inches,this
willaidintheremovalofexcesssilicone.
g2.1
2.
Apply a bead of color matched or clear
silicone caulk along the bottom edge of the
backsplash
. (seeg.2.2)
g2.2
3. Apply dabs of silicone to the backside
of the backsplash. (seeg.2.3)
g2.3
4. Carefullysetbacksplashintoplaceagainstwalland
vanity top. Be sure to lightly press backsplash into
place.Donotuseexcessiveforce.(seeg.2.4)
g2.4
5. Applyathinbeadofcolormatchedorclearsilicone
along the joint between the backsplash and the vanity
top.
6. Smooth the silicone bead with a clean, white cotton
cloth dampened with a denatured alcohol.
7. Remove masking tape from backsplash and vanity top.
8. Repeatsteps1-7toattachsidesplashes.(ifapplicable)
9. Wait24hoursbeforeusingvanitytoptoallowtimefor
silicone to fully cure.
Note:Followallmanufacturer'sinstructionsandsafety
information on all silicone caulk containers.
Ensure adequate ventilation before applying silicone.
bacKSPLaSH InSTaLLaTIOn PROcEDURE