
Installation Guide

ALUM-A-LINE
INSTALLATION INSTRUCTIONS
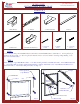
PARTS LIST:
STEP 1
STEP 2
ph. (800)851-0865
web www.americana.com
3. Valance Bracket
7. 1 1/4" Bolt
w/ Nut
4. Panel
9. 1 1/2" Lag
Screw
8. #2 Tek
Screw
1. Wall Bracket
5. Return Arm
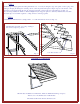
Fig. 1-1
Fig. 2-1
2. Stringer
6. Return Arm Extension
Locate wall studs and position Wall Brackets around window. Attach Wall Brackets to wall with 2 - 1 1/2" Lag Screws per
bracket as shown (see Fig. 1-1). Note: Lag Screws must hit solid wood. Do Not attach to sheeting, siding, flashing, or any
other non-structural surface.
Attach Stringer to upper Wall Bracket with 1 - 1 1/4" Bolt w/ Nut per bracket. Attach Return Arm to lower Wall Bracket with
1 - 1 1/4" Bolt w/ Nut per bracket. Attach Valance Bracket to Stringer with #2 Tek screw. Attach Return Arm Extension to
Return Arm with 1 - 1 1/4" Bolt w/ Nut per bracket. (see Fig. 2-1)
Wall Bracket
1 1/2" Lag Screw
(2 per Bracket)
1 1/4" Bolt w/ Nut
Extension
Valance Bracket
Return Arm
Wall Brkt.
Stringer
#2 Tek
Screw