
Use and Care Manual


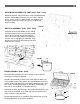
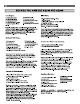

(FIG E)
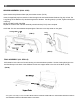
(FIG F)
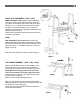
(FIG C)
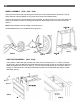
(FIG D)
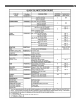
7
27 14
SHELF & LEG ASSEMBLY (9320 - 9325)
WIRE LEG SHELF: (FIG C) Make certain "INDENTS"
are to the outside on both Roller (12) and Fixed Legs
(13). Attach a Crossbrace (24) to each side of the Legs
with #10-24 x 1 1/4" Bolts (14) and #10-24 Lock Nuts
(7). Make sure the Star Washer on the Lock Nut is
against the Crossbrace. Use eight Bolts and Nuts for as-
sembly; tighten only snug.
Fit the ends of the Wire Leg Shelf (25) into the holes on
top of each Crossbrace.
(9329)
WPC LEG SHELF (27): (FIG D) Same as Wire Leg
Shelf except attach the except Crossbraces are already
attached to the shelf slats. Attach the crossbraces to the
Legs with #10-24 x 1 1/4" Bolts and #10-24 Lock Nuts,
tighten only snug.
Push two Leg Caps onto the bottom of the Fixed Leg.
TOP FRAME ASSEMBLY (9320 - 9325 - 9329)
(FIG E) With the Roller Leg to the Left, attach the Top
Frame (16) to the Legs. Place the Top Frame ends
underneath the top of the Fixed and Roller Leg Frames.
NOTE: Make sure the large hole in the Top Frame
is to the rear and the Top Frame’s edges are down.
Insert a #10-24 x 2" Bolt (17) through the Leg Frames
and ends of the Top Frame.
Attach 10-24 Lock Nuts and tighten snug.
(FIG F) If your Grill did not come with accessory Side
Tables (9320 Model), close up the four square ends of the
Top Frame with Insert Plugs (23).
At this time go back and tighten all Bolts and Nuts se-
curely before proceeding.