
Use and Care Manual


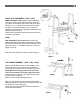

HOOD/BOWL ASSEMBLY TO CART (9320 - 9325 - 9329)
Rotate the element, using the Control, to the Vertical/Rotisserie
position. Set Hood/Bowl assembly over the holes in the Top
Frame. (FIG L) 10-24 x ½” Bolts through the Grill Bowl and
through the Top Frame. Attach four 10-24 Lock Nuts and
tighten securely.
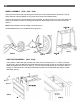
BASE ASSEMBLY: (9300 - 9309)
Place Main Grill Assembly (2 or 3) on its back. Turn the Control
Housing to the Rotisserie position.
Set Main Grill Assembly over the holes in the Table Top Base (10).
(FIG N) Make sure the hole patterns are aligned between each part
and the large round depression in the Base is toward the rear. Insert
four 10-24 x 1/2" Bolts (4) through the Grill Bowl and the Base. At-
tach four 10-24 Lock Nuts (7) and tighten securely.
Starting at the back, align the gap in the Flexible Base Extrusion (22)
with the lip on the bottom of the Table Top Base and press fi rmly in
place around the entire perimeter.
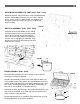
Set the Grill Assembly up on the Base. Place the Drip Cup (11) into
the large depression in the back of the Base.
(FIG L)
(FIG N)
4
7
11
10
22
(FIG M)
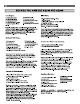
DRIP CUP ASSEMBLY (9320 - 9325 - 9329)
Install the Wire Drip Cup Holder (21) by holding
the small loop at the top of the wire then thread-
ing the other end down through the indicated
hole in the center of the bottom of the grill bowl
until the wire is hanging by the small loop. Snap
the foil Drip Cup (11) into the opening in the wire
under the grill. (FIG M)
11
21