9291096COM Side Cabinet (Left/Right) B Keep this Assembly Manual for future reference WARNING - Anchor unit to stud in wall - Do Not allow children to climb on unit - Put heavy items on lower shelves or drawers - Two people required for assembly B349291096COM ameriwoodhome.
Contact Us! Do NOT return this product! Contact our friendly customer service team first for help. Assembly Tips Call us! 1-800-489-3351 Monday-Friday 9am - 5pm CST You Tube Visit ameriwoodhome.com Helpful Hints PEOPLE NEEDED FOR ASSEMBLY: 1-2 ESTIMATED ASSEMBLY TIME: 1 HOUR - Open your item in the area you plan to keep it to avoid excessive heavy lifting. - Identify, sort and count the parts before attempting assembly. - Compression dowels are lightly tapped in with a hammer.
k Qu i c Ti p Before You Start Read through each step carefully and follow the proper order Separate and count all your parts and hardware Give yourself enough room for the assembly process Have the following tools: Flat Head Screwdriver, Phillips Head Screwdriver, Hammer and a Power Drill with a 5/16” (8mm) drill bit. Failure to do so may result in stripping the screw.
Cam Lock Fastening System This Cam Lock Fastening System will be used throughout the assembly process. 1 2 3 4 Refer to the enlarged diagram to identify the parts on the HINGES.The TOP OPENER may need some adjustments. Follow the text below to make needed adjustments. TOP OPENER ADJUSTMENTS: To adjust the TOP OPENER from front to back , loosen the mounting screw several turns, then turn the adjusting screw in or out. Tighten the mounting screw after making adjustments.
Board Not actual size A B x1 T9291096010 TABLE TOP x2 T9291096020 BIG WOODEN LEGS E F x1 T9291096050 BOTTOM PANEL x1 T9291096060 CABINET TOP PANEL I J x1 T9291096090 LEFT SIDE PANEL x1 T9291096100 RIGHT SIDE PANEL M x1 T9291096130 BACK PANEL C x4 T9291096030 SMALL WOODEN LEGS G x2 T9291096070 CABINET TOP OPENER K x1 T9291096110 CENTER PANEL N x2 T9291096140 ADJUSTABLE SHELF ameriwoodhome.
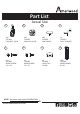
Part List Actual Size 1 x36 TAT0051 CAM BOLT 15/18 5 x24 TAT0001 WOOD SCREW 3.5 X 16 2 3 x36 TAT0052 CAM LOCK 15/18 x36 TAT0061 CAM COVER 6 7 x2 TAT0002 WOOD SCREW 3.5 X 12 NOTE! Hardware pack inside 9291096COM1 ameriwoodhome.
Part List Not Actual Size 9 x7 TAT0044 ADJUSTABLE GLIDE M6 X 25 MM X 22 MM 13 x4 TAT0043 NUT-HEX NUT 5/16” 18MM(RB) 10 11 x6 TAT0101 BOLT M6 x35MM M6 X 35MM x6 x6 TAT0041 TAT0042 WASHER-FLAT 5/16”(RB) WASHER-SPRING 5/16”(RB) 14 15 x1 TAT0032 PUSH LOCK BLACK x4 TAT0036 PNEUMATIC HINGES 5/8” FULL OVERLAY 17 x1 TAT0121 L-KEY M4 ameriwoodhome.
Step 1 9 x7 TAT0044 Screw the ADJUSTABLE GLIDES (9) into the two BIG WOODEN LEGS (B), four SMALL WOODEN LEGS (C) & SUPPORT LEG (D). B X2 C X4 D ameriwoodhome.
Step 2 11 x4 TAT0041 12 x4 TAR0042 13 x4 TAT0043 16 x1 TAT0045 Fasten the BIG WOODEN LEGS (B) to TABLE TOP (A). B 11 13 12 B 16 A IMPORTANT! Align holes of BIG WOODEN LEGS (B) with proper holes of TABLE TOP (A). ameriwoodhome.
Step 3 10 x4 TAT0101 17 x1 TAT0121 Fasten the SMALL WOODEN LEGS (C) to BOTTOM PANEL (E) . 17 10 E C C C IMPORTANT! Align holes of SMALL WOODEN LEGS (C) with proper holes of BOTTOM PANEL (E) . ameriwoodhome.
Step 4 Fasten the SUPPORT LEG (D) to BOTTOM PANEL (E). D E Step 5 7 x4 TAT0081 7 ameriwoodhome.
Step 6 8 x20 TAT0091 Insert the WOOD DOWELS (8) into the holes shown in the Panels (H), (I), (J) & (K). I J K H x2 8 ameriwoodhome.
Step 7 8 x8 TAT0091 Insert the WOOD DOWELS (8) into the holes shown in the Panel (L) & (M). L M 8 ameriwoodhome.
Step 8 8 x2 TAT0091 Insert the WOOD DOWELS (8) into the holes shown in the TABLE TOP (A). B B A 8 ameriwoodhome.
Step 9 USE POWER TOOL (NOT INCLUDE) F IMPORTANT! Drill these holes through with a 5/16” (8mm) drill for LEFT SIDE assembly shown. F IMPORTANT! Drill these holes through with a 5/16” (8mm) drill for RIGHT SIDE assembly shown. CAUTIONS Please drill slowly to avoid the panel damage. ameriwoodhome.
Step 10 Insert the CAM BOLTS (1) into all holes shown in Panels (E) & (F). 1 x20 TAT0051 E F ameriwoodhome.
Step 11 Insert the CAM BOLTS (1) into all holes shown in Panels (I), (J), (L) & (M). 1 x16 TAT0051 J I L M ameriwoodhome.
Step 12 Insert the CAM LOCKS (2) into all holes shown in Panels (H),(I), (J), (K), (L) & (M) J 2 x36 TAT0052 I H The arrow in the CAM LOCK (2) must point toward the hole in the edge of the board. x2 K L M Quick Tip Proper orientation of CAM LOCK ameriwoodhome.
Step 13 15 x4 TAT0036 5 x16 TAT0001 M 5 15 Step 14 6 14 x1 14 TAT0032 6 x2 TAT0002 P ameriwoodhome.
Step 15 H H M Step 16 tighten the CAM LOCKS (2). Press the CAM COVERS (3) into the CAM LOCKS (2). 3 x8 TAT0061 L 3 ameriwoodhome.
Step 17 3 x8 TAT0061 17 x1 TAT0121 M L J 3 I 17 Attach the LEFT SIDE PANEL (I) & RIGHT SIDE PANEL (J) to the CENTER BACK IMPORTANT! PANEL (L) & BACK PANEL (M) and tighten the CAM LOCKS (2) using the L-KEY (17). Press the CAM COVERS (3) into the CAM LOCKS (2). ameriwoodhome.
Step 18 3 x8 TAT0061 17 x1 TAT0121 M J L I E 3 17 Attach the Panels (I), (J), (L) & (M) to the BOTTOM PANEL (E) and tighten the IMPORTANT! CAM LOCKS (2) using the L-KEY (17). Press the CAM COVERS (3) into the CAM LOCKS (2). ameriwoodhome.
Step 19 IMPORTANT! Arrow marking facing up. 3 x2 TAT0061 K 3 Attach the CENTER PANEL (K) and tighten the CAM LOCKS (2). Press the CAM COVERS (3) into the CAM LOCKS (2). ameriwoodhome.
Step 20 3 x6 TAT0061 F 3 Press the CAM COVERS (3) into the CAM LOCKS (2) ameriwoodhome.
Step 21 5 x8 TAT0001 G G ameriwoodhome.
Step 22 4 x8 TAT0071 N N N 4 ameriwoodhome.
Step 23 P O If the SLIDING DOORS are not square in the CABINET, rotate clockwise to increase roller height rotate anti-clockwise to decrease roller height. ameriwoodhome.
Step 24 11 x2 TAT0041 12 x2 TAT0042 10 x2 TAT0101 17 x1 TAT0121 DO NOT attempt to move the completed assembly without removing the TABLE TOP. A F ameriwoodhome.
Maximum Loads This unit has been designed to support the maximum loads shown. Exceeding these load limits could cause sagging, instability, product collapse, and/or serious injury. 100 lbs 45.35 kgs 100 lbs 45.35 kgs 25 lbs 11.35 kgs Warning: Risk of injury to persons - do not place a television on this furniture. This furniture is not approved for use with a television. ameriwoodhome.
of Conformity applies to the Dorel Home Furnishings, Inc. product 1. This by this manual. applies to compliance of this product with the CPSC Ban on Lead-Containing Paint (16 2. This CFR 1303). 3. This product is distributed by: Dorel Home Furnishings, Inc. 410 East First Street South Wright City, MO 63390 636-745-3351 4. Site of Manufacture: Muar, Malaysia. 5. See front page of manual for date of manufacture. de Conformidad se aplica al producto de Dorel Home Furnishings, Inc. por este manual de 1.
Register your product to receive the following: * New trend details -sneak peek on what's new * Surveys -have a voice within our community * Exclusive deals and discount codes * Quick and easy replacement part service To register your product, visit Ameriwoodhome.
Español Cubierta Delantera Este libro de instrucciones contiene información IMPORTANTE de seguridad. Por favor lea y manténgalo para referencia en el futuro. No Regrese este producto! Comuniquese con nuestro amistoso equipo de servicio al cliente para obtener ayuda. Llamenos al: 1-800-489-3351 (Gratis) Lunes - Viernes 9am - 5pm CST Visitar: www.ameriwoodhome.com PRECAUCION Este mueble puede volcarse y causar graves heridas y/o muerte. Anclar el mueble a un poste de madera en la pared (si esto se requiere).
Español Página 7 Utilice este paso si está sujetando la pata de madera al panel superior (se vende por separado) Importante : Alinee los agujeros de la Pata de Madera con los agujeros apropiados de la mesa redonda Página 29 CARGA MAXIMA Esta unidad ha sido diseñada para soportar la carga máxima anotada. El exceder estos límites puede causar inestabilidad, colapsarse y/o causar serias lesiones. ADVERTENCIA: Riesgo de lesiones a las personas - no coloque un televisor sobre muebles.
Français Couverture Avant CE LIVRET D'INSTRUCTION CONTIENT DES INFORMATIONS IMPORTANTES SUR LA SÉCURITÉ. VEUILLEZ LIRE ET GARDER POUR UNE RÉFÉRENCE FUTURE Ne retournez pas ce produit! Contactez notre équipe de service à la clientèle amicale d'abord pour obtenir de l'aide. Appelez-nous: 1-800-489-3351 (sans frais) du Lundi au Vendredi de 9h à 17h Heure Centrale Visitez: www.ameriwoodhome.com ATTENTION Le meuble peut basculer et causer des blessures graves ou la mort.
Français Page 7 Utilisez cette étape si vous fermez la jambe en bois sur le panneau supérieur (vendu séparément) Important : Alignez les trous de la jambe en bois avec des trous appropriés de la table ronde Page 29 CHARGES MAXIMALES Ce meuble a été conçu pour supporter les charges maximales indiquées. En excédant ces limites de charge, le meuble pourrait devenir instable, s'effondrer, et/ou causer des blessures graves.