
Service manual

1-45
S-104-100
Revised 09/2004
e-mail: service@amfreece.cz; parts@amfreece.cz; website: www.amfreece.com
Phones: +420 582 309 146 (Service), +420 582 309 286 (Spare Parts); Fax: +420 582 360 606
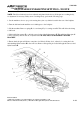
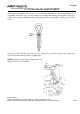
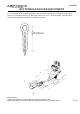
LOOPER AND NEEDLE ALIGNMENT
1. Make sure the main power is OFF. Turn the left hand crank until the machine is in home position.
Insert a needle. Re-install the left hand looper.
2. Turn the right hand stitch wheel until the needle aligns with the tip of the left hand looper.
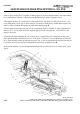
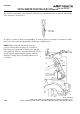
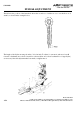
3. Turn the left hand crank until machine cycles approximately 1/2 way through the 1st row of stitches.
Note the distance between the needle and looper. A magnifying glass may be necessary (the distance is
difficult to see with the naked eye). Continue turning the left hand crank until the machine cycles 1/2 way
around the eye. Note the distance between the needle and looper. Continue turning the left hand crank
until the machine cycles 1/2 way through the 2nd row of stitches. Note the distance between the needle
and looper. An equal distance should be maintained at all 3 stopping points.
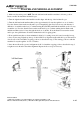
4. If an equal distance has not been maintained, adjust by loosening screws A located on needle bar cap,
so they are just snug. Lightly tap the top of the needle bar to align the needle with the looper. This must be
done at each of the 3 machines stopping positions as described in step 3. The starting position is with the
machine 1/2 way through the 1st row of stitches.
5. Once the needle and looper are in alignment in all 3 of machine stopping positions described in step 3,
re-tighten screws A and re-check the alignment. Repeat the above steps as necessary.