
Service manual


1-58
S-104-100
Revised 09/2004
e-mail: service@amfreece.cz; parts@amfreece.cz; website: www.amfreece.com
Phones: +420 582 309 146 (Service), +420 582 309 286 (Spare Parts); Fax: +420 582 360 606
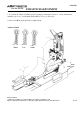
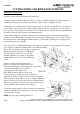
CUTTING STEEL AND KNIFE ADJUSTMENTS
Replacing the Cutting Steel
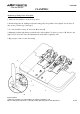
To replace cutting steel A, perform the following steps:
1. Install cutting steel A into cutting lever C by loosening screw D and sliding new steel in. It must be
seated all the way back to the location pin. Once the steel is in place, re-tighten screw D.
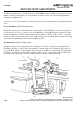
2. Manually lower cutting lever C to ensure cutting steel A is centered over knife E. If it is not centered,
loosen nuts F, located on both sides of the machine; using studs G, move cutting lever C to the right or
left as necessary. The cutting lever should be free of binds and have no side play. Once the adjustment has
been made, fasten the studs in place by re-tightening nuts F.
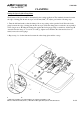
3. Back off the cutting pressure until a light pressure is felt when cutting steel A meets knife E. This is
done by loosening jam nuts B, moving nuts out to decrease the cutting pressure (move nuts in to increase
the cutting pressure), and turning the left hand crank to cycle machine,, checking for the slight pressure
between the cutting steel and knife.
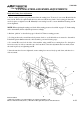
4. It is important to visually check the impression made by the knife onto the cutting steel. The impres-
sion is made by cycling the machine under power without stitching.
This is done by turning on the main power, raising lever
H, and pressing the start lever. Lever H should
be held for approximately 1/2 of a cycle. The
machine will make one complete cycle without
stitching. Repeat for 5 cycles. Turn off the main
power.
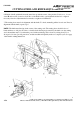
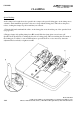
5. Remove cutting steel A and inspect the
impression on the bottom surface of the steel
made by knife E. Lightly file any high spots on the cutting
steel until an even impression is former
representing the entire length of the
knife. When an uneven impression has been
formed, the high spot is the area on the cutting steel
which left the impression. This is the area of the cutting steel
which touched the knife. The low spot of a cutting is where the
impression can not be seen because it never touched the knife.
The low spot should not be filed. Steps 4 and 5 may need to be
repeated until the desired impression is achieved.
6. Once the desired impression has been achieved, re-install the
cutting steel and adjust the cutting pressure (see step 3) until the
cut of the fabric is clean.
NOTE: See page 1-94 for ordering instructions.