00 100 95 95 75 75 25 25 5 5 0 0 100 100 95 95 75 75 25 25 5 5 0 0 3 1
100 100 95 95 75 75 25 25 5 5 0 0 Vielen Dank . . . . . . dass Sie sich für einen Geschirrspüler aus unserem Hause entschieden haben. Zu Ihrer eigenen Sicherheit, und um Ihnen den gesamten Funktionsumfang nahe zu bringen, lesen Sie bitte diese Anleitung sorgfältig durch und bewahren Sie sie für späteres Nachschlagen auf. Bevor Sie den Service rufen . . . . . . lesen Sie bitte den Abschnitt „Fehlerhilfe” auf Seite 23/24.
100 95 75 25 5 0 Inhaltsverzeichnis 100 Wichtige Sicherheitshinweise, bitte beachten! . . . . Installation . . . . . . . . . . . . . . . . Elektrischer Anschluss . . . . . . . . . . . Anschluss an das Kaltwasserleitungsnetz . . . . . Anschluss an die Warmwasserleitung . . . . . . Übersicht der Geräteteile . . . . . . . . . . . Die Frontblende . . . . . . . . . . . . . Aufbau des Geschirrspülers . . . . . . . . . Die Programmtabelle . . . . . . . . . . . . . Vor dem ersten Spülen . . . . . . . . . .
100 Wichtige Sicherheitshinweise, bitte beachten! 95 75 25 5 0 100 95 75 25 100 95 • Überprüfen Sie die Verpackung des Gerätes sofort nach Anlieferung auf Transportschäden. Sollten Sie Beschädigungen finden, kontaktieren Sie Ihren Lieferanten. Nehmen Sie ein beschädigtes Gerät nicht in Betrieb.
100 Installation 100 95 95 Elektrischer Anschluss 75 75 Vorsicht! 25 Halten Sie sich strikt an die hier beschriebene Vorgehensweise. Andernfalls besteht Lebensgefahr durch elektrischen Schlag! 5 0 25 5 Benutzen Sie kein Verlängerungskabel oder einen Adapterstecker für dieses Gerät.
100 Übersicht der Geräteteile 100 95 95 Die Frontblende 75 75 25 25 5 5 0 0 1 EIN / AUS - Schalter - schaltet das Gerät ein und aus 2 EIN / AUS - Anzeige - leuchtet, wenn Sie die EIN / AUS-Taste gedrückt haben 3 Display - zur Anzeige der verzögerten Einschaltzeit und Fehlercodes 4 Einschaltverzögerungstaste - um das Gerät mit bis zu 24 Stunden Verzögerung mit dem Spülgang beginnen zu lassen 5 Salz-/Klarspüleranzeige - leuchtet, wenn Sie Salz für die Wasserenthärtung bzw.
100 Aufbau des Geschirrspülers 100 95 95 75 75 25 25 5 5 0 0 1 2 3 4 5 Oberer Geschirrkorb Sprüharme Unterer Geschirrkorb Salzbehälter Hauptfilter 6 7 8 9 10 Reinigerbehälter Tassenablage Besteckkorb Grobfilter Spender für Klarspülmittel 100 100 95 95 75 75 25 25 5 11 Wasserablaufschlauch 12 Wassereinlaufschlauch 0 5 0 7 7
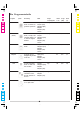
100 Die Programmtabelle 100 95 95 Programm Symbol Beschreibung Ablauf Reiniger Vor-/Hauptspülen Laufzeit in min. Energie (kWh) Wasser (ltr.
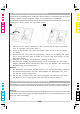
100 95 Vor dem ersten Spülen 100 95 Bevor Sie das Gerät zum ersten Mal benutzen, . . . 75 25 5 0 75 . . . . . . . . . . . . stellen Sie den Wasserenthärter ein (A), füllen Sie 0,5 ltr. Wasser in den Salzbehälter und füllen diesen dann mit Salz (B), füllen Sie den Klarspülerspender auf (C), lesen Sie die Informationen zum Reiniger (D). 25 5 0 A - Stellen Sie den Wasserenthärter ein Mit dem gezeigten Einstellring stellen Sie den Wasserenthärter ein.
0 95 75 B - Salz in den Wasserenthärter geben Verwenden Sie ausschließlich ein für den Einsatz in Wasserenthärtern vorgesehenes Salz! Alle anderen Salzarten, speziell normales Speisesalz, werden den Wasserenthärter beschädigen. Der Salzspeicher befindet sich unterhalb des unteren Geschirrkorbs und sollte kurz bevor Sie eins der Spülprogramme starten wollen wie folgt befüllt werden: 100 95 75 25 25 5 5 0 0 1. Entfernen Sie den unteren Geschirrkorb.
100 95 75 25 5 0 Wann müssen Sie Klarspüler nachfüllen? Ihr Gerät verfügt über eine Anzeige in der Frontblende, die aufleuchtet, wenn Sie Klarspüler nachfüllen sollten. Zusätzlich gibt Ihnen der schwarze Punkt am Klarspülerbehälter eine Übersicht über den Füllstand. Je schwärzer der Punkt ist, umso mehr Klarspüler befindet sich im Behälter. Sie sollten den schwarzen Punkt nicht kleiner als ¼ werden lassen.
100 95 75 Tipp: Erhöhen Sie die Dosis, wenn Ihr Geschirr nach dem Spülen Wassertropfen oder Kalkreste aufweist. Verringern Sie die Dosis, wenn Ihr Geschirr nach dem Spülen klebrig-weißliche Schlieren aufweist oder ein bläulicher Film auf Gläsern oder Messern zurückbleibt. 100 95 75 D - Informationen zum Reiniger 25 5 0 Der Reiniger ist notwendig, um die Verschmutzungen vom Geschirr zu entfernen und aus dem Gerät zu transportieren.
100 95 75 25 5 1. Um den Reinigerbehälter zu öffnen, drücken Sie auf die Verriegelung - die Abdeckung öffnet sich dann. 2. Geben Sie direkt vor dem Spülvorgang die gemäß der Programm-Tabelle auf S. 8 erforderliche Menge eines Marken-Spülmaschinenreingers ein. 3. Geben Sie den Reiniger für den Hauptspülgang in das linke Fach (1). „MIN” bedeutet hier ca. 20 gr. Reiniger. 4. In das rechte Fach (2) geben Sie für die Programme „INTENSIV” und „NORMAL” den Reiniger für den Vorspülgang, ca. 5 gr.
100 95 75 25 5 0 Zum Einsatz von „2in1”, „3in1”, „4in1”, „5in1”-Kombinations-/Kompakt-Reinigern Dabei handelt es sich um Produkte mit integrierter bzw. kombinierter Reiniger-/Klarspüler-Funktion und Salzfunktion. Bevor Sie solche Produkte zum Einsatz bringen sollten Sie sicherstellen, dass der Härtegrad Ihres Wassers kompatibel mit Kombinations-Reinigern ist. Näheres dazu finden Sie auf der Verpackung.
100 95 75 25 1. 2. 3. 4. 5. 6. 7. Tassen kleine Schüsseln große Schüsseln Gläser Untertassen Teller Dessertteller 100 95 75 25 5 5 0 0 Sie können den oberen Korb in der Höhe verstellen Sollten Sie für größere Gegenstände mehr Platz im unteren oder oberen Korb benötigen, so können Sie die Höhe des oberen Korbes variieren. Dazu verfügt der obere Korb über zwei Rollensätze in unterschiedlicher Höhe.
100 100 95 95 75 7. 8. 9. 10. 11. 25 5 75 Dessertteller ovale Servierplatten Essteller Suppenteller Besteckkorb 25 5 0 0 Um den Platz im unteren Korb noch variabler zu halten, können Sie die Geschirrhalter wie gezeigt umklappen. Der Besteckkorb Damit das Besteck optimal gespült wird, ordnen Sie es mit den Griffen nach unten in den Besteckkorb ein.
100 95 75 Nicht geeignet zur Reinigung im Geschirrspüler sind: — Besteck mit Griffen aus Holz, Horn, Porzellan oder Perlmutt — Gegenstände aus nicht-hitzebeständigem Plastik 100 95 75 — Älteres Besteck mit nicht-hitzebeständigen geklebten Verbindungen — Geklebtes Geschirr 25 25 — Gegenstände aus Zinn, Kupfer, Kunstfasern oder nicht-rostfreiem Stahl 5 0 5 — Gläser aus Bleikristall 0 — Servierplatten aus Holz — Gegenstände, die als nicht-spülmaschinengeeignet gekennzeichnet sind.
100 95 75 25 5 0 Abbruch oder Änderung eines Spülvorganges Ein bereits laufendes Programm kann nur dann gewechselt werden, wenn es erst eine kurze Zeit läuft. Andernfalls ist der Reiniger evtl. bereits freigesetzt bzw. das Waschwasser bereits abgepumpt. In diesem Fall müssen Sie Reiniger nachfüllen. Öffnen Sie die Tür nur einen Spalt weit. Öffnen Sie die Tür nicht weiter, bevor die Sprüharme anhalten. WARNUNG! Heißer Dampf oder Wasser kann entweichen.
100 95 75 25 5 0 Das Filtersystem 100 Der Filter verhindert, dass größere Essensreste oder andere Gegenstände in die Pumpe gelangen können. Die Rückstände können zum Verstopfen des Filters führen. Das Filtersystem besteht aus drei Teilen, dem Hauptfilter, dem Grobfilter und dem Feinfilter. 1. Hauptfilter Essenreste und größere Partikel werden durch einen speziellen Wasserstrom, der vom unteren Sprüharm erzeugt wir, zerkleinert und in den Abfluss gespült. 95 75 25 5 0 2.
100 95 Reinigen der Filter 100 Für beste Spülergebnisse müssen die Filter gereinigt werden. 75 95 75 Ø Kontrollieren Sie die Filter nach jedem Spülvorgang und entfernen Sie eventuelle Verschmutzungen. 25 Ø Wenn Sie zunächst den Grobfilter (2) abschrauben, können Sie das Filtersystem entnehmen. Entfer- 25 nen Sie sämtliche Essensrückstände und reinigen Sie die Filter unter fließendem Wasser. 5 0 Ø Nun nehmen Sie den Hauptfilter (1) nach oben heraus.
100 Reinigen der Sprüharme 100 Es ist nützlich, die Sprüharme von Zeit zu Zeit zu reinigen, da sich die Düsen und Lager mit Chemikalien zusetzen können. Dazu schrauben Sie die Mutter im Uhrzeigersinn vom Arm und entfernen den Dichtungsring. Entnehmen Sie den Sprüharm und waschen ihn sorgfältig in Seifenwasser aus. Zum Reinigen der Düsen können auch weiche Bürsten benutzt werden. Setzten Sie den Sprüharm wieder ein.
100 95 75 Ø Wenn Sie in den Urlaub wollen 100 Bevor Sie in Urlaub gehen, sollten Sie einen Spülvorgang mit leerem Geschirrspüler durchlaufen lassen. Dann ziehen Sie den Netzstecker und drehen die Wasserzufuhr ab, lassen Sie die Tür leicht geöffnet. Dies lässt die Dichtungen länger leben und vermeidet Geruchsbildung während Ihrer Abwesenheit. 95 75 Ø Bei Umzug des Geschirrspülers 25 5 25 Wenn Sie die Position des Gerätes verändern, sollte es ständig in aufrechter Position transportiert werden.
100 95 Fehlerhilfe 100 Sollte das Gerät nicht wie in dieser Anleitung beschrieben arbeiten, probieren Sie bitte zunächst die hier aufgelisteten Tipps aus, bevor Sie sich an eine Service-Firma wenden. 75 25 75 Problem Mögliche Gründe Was ist zu tun? Geschirrspüler läuft nicht Sicherung ist durchgebrannt oder der Schutzschalter hat ausgelöst Neue Sicherung einsetzten lassen oder Schutzschalter wieder aktivieren. Andere Verbraucher auf dem gleichen Stromkreis ausschalten.
100 Fleckige und stumpfe Gläser 95 75 1. 2. 3. 4. 5. 6. 7. sehr hartes Wasser geringe Wassertemperatur überladener Geschirrspüler falsche Beladung alter oder feuchter Reiniger kein Klarspüler falsche Reinigerdosierung 25 5 0 Um Flecken zu verhindern: 1. Entnehmen Sie alle Metallteile 2. Nehmen Sie nicht mehr Reiniger 3. Wählen Sie den längsten Vorgang 4. Starten Sie den Geschirrspüler für ca. 18-22 min bis zum Hauptspülvorgang 5.
100 Die Fehlerzeichen 100 95 95 Fehlerzeichen Bedeutung Mögliche Ursache E1 Wasseraufnahme dauert zu lange Wasserkran geschlossen, Wasseraufnahme wird behindert oder Wasserdruck zu gering E3 Aufwärmphase dauert zwar lange, aber die nötige Temperatur wird nicht erreicht Fehlfunktion des Temperatursensors oder des Heizelements E4 Überfüllt Es wurde zu viel Frischwasser aufgenommen E6 Fehlfunktion des Temperatursensors Kurzschluss oder defekter Temperatursensor E7 Fehlfunktion des Temperat
100 100 95 95 75 75 25 25 5 5 0 0 100 100 95 95 75 75 25 25 5 5 0 0 26 26
100 100 95 95 75 75 25 25 5 5 0 0 100 100 95 95 75 75 25 25 5 5 0 0 27 27
100 100 95 95 75 75 25 25 5 5 0 0 100 100 95 75 25 5 Diese Anleitung ist urheberrechtsgeschützt. Alle Rechte vorbehalten. Weder die Anleitung als Ganzes, noch Auszüge daraus dürfen ohne unsere vorherige, schriftliche Zustimmung reproduziert werden. Amica International GmbH 59387 Ascheberg Deutschland Irrtümer und Änderungen der Technischen Eigenschaften vorbehalten.