Dear Costumer, Please read this User Information carefully and keep it to refer to at a later date. Pass it on to any subsequent owner of the appliance. This manual contains sections of Safety Instructions, Operatin g Instructions, Installation Instructions and Troubleshooting Tips etc. Carefully reading it before using the dishwasher will help you to use and maintain the dishwasher properly.
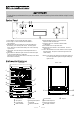
To get the best performance from your dishwasher,read all operating instructions before using it for the first time. 5 2 6 7 10 1 3 4 8 1 Power Button: To turn on/off the power supply. 2 Power Light : To be on when the Power Button is Pressed down. 3 Delay Button: Press this button to set the delayed hours for washing. You can delay the start of washing up to 8 hours. One press on this button delays the start of washing by two hours. 4 Delay Light: To be on when you have delayed the start of washing.
Before usi ng your dishwasher for the first time: A. B. C. D. Set the water softener Pour 1/2 litre of water inside the salt container and then fill with dishwasher salt Fill the rinse aid dispenser Function of detergent The water softener must be set manually, using the water hardness dial . The water softener is designed to remove minerals and salts from the water, which would have a detrimental or adverse effect on the operation of the appliance.
Always use salt intended for use with dishwasher. The sal t container is locat ed beneath the lower rack and should be filled as foll ows: Atte ntion! Only use salt specifically designed for use in dishwa shers! All other t ypes of salt not spe ci fically designed for use in a dishwasher, e specially table salt, will damage the water softener. In case of dam ages caused by the use of unsui table salt the m anuf acturer does not give any warranty nor is liable for a ny cause d damages.
If there is no rinse-aid w arning light in the control panel, you can judge the amount of rinse-aid by the color of the optical level indicator "D" located next to the cap. When the rinse-aid container is full, the whole indicator will be dark .As the rinse-aid diminishes, the size of the dark dot decreases. You should never let the rinse aid get below 1 / 4 full. D (Rinse-Aid indicator) As the rinse aid diminishes, the size of the black dot on the rinse aid level indicator changes, as illustrated below.
Detergents with its chemical ingredients are necessary to remove dirt, crush dirt and transport it out of the dishwasher. Most of commercial quality detergents are suitable for this purpose.
Fill in detergent 1 2 Fill the detergent dispenser with detergent. The marki ng indicates the dosing levels , as illustrated on right: 1 The place of main wash cycle detergent placed , “MIN”means approximately 20g of detergen. 2 The place of pre-wash cycle detergent placed , approximately 5g of detergent Please observe the manufacturers dosing and storage recommendations as stated on the detergent packaging. Close the lid and press until it locks in place.
Your dishwasher has a 3 in 1 program which needs not salt and rinse aid but a THREE IN ONE tablet. And this dishwasher comes with a 3 in 1 tablet container as an accessory. NOTE: Only 3 in 1 program uses 3 in 1 tablet. If using 3 in 1 tablet in other programs, the appliance will not get a best performance. 1、Referring to the below sketch map, hang the 3 in 1 tablet container on the upper basket.
For best performance of the dishwasher, follow these loading guidelines. Features and appearance of racks and silverware baskets may vary from your model. Attention before or after Loading the Dishwasher Racks Scrape off any large amounts of leftover food. It is not necessary to rinse the dishes under running water. Place objects in the dishwasher in following way: 1.Items such as cups, glasses, pots/pans, etc. are stood upside down. 2.
We recommend that you place large items which are most difficult to clean into the low er rack: pots, pans, lids, serving dishes and bowls, as shown in the figure to the right. It is preferable to place serving dishes and lids on the side of the racks in order to avoi d blocking the rotation of the top spray arm. Pots, serving bowls, etc. must always be placed top down. Deep pots should be slanted to allow w ater to flow out.
Silverware Basket Silverware should be placed in the silverware basket with handles at the bottom: If the rack has side baskets, the spoon should be loaded individually into the appropriate slots, especially long utensils should be placed in the horizontal position at th e front of the upper rack.
Di shes and items of cutlery must not lie inside one another, or cover each other To avoid damage to glasses, they must not touch Load large items which are most difficult to clean into the lower rack T he upper rack is designed to hold more delicate and lighter dishware such as glasses, coffee and tea cups Attention! Long bladed knives stored in an upri ght position are a potential hazard! Long and/or sharp items of cutl ery such as carving knives must be positioned horizontally in the upper basket.
For the heaviest soiled loads, such as pots,pans,casserole dishes and dishes that have been sitting with dried food on them for a while. Pre-wash (50℃) Pre -wash (50℃) Wash (70 ℃) Rinse Rinse Rinse ( 55 ℃) Drying 4/20 g. 120 1.2 18 For normally soiled loads, such as pots , plates, glasses and lightly soiled pans. standard daily cycle. Pre-wash(50 ℃) Wash (50 ℃) Rinse Rinse (65 ℃) Drying 4/20 g. 140 0.95 12 For lightly soiled loads,such as plates,glasses,bowls and lightly soiled pans.
Premise: A cycle that is underway can only be modified if it has only been running for a short time. Otherwise, the detergent may have already been released, and the appliance may have already drained the wash water. If this is the case, the detergent dispenser must be refilled (see the section entitled " Loading the Detergent " ).
The filter prevent larger remnants of food or other objects from getting inside the pump. This residue can occasionally clog up the filters. The filter system consists of a coarse filter,a flat (Main filter) And a microfilter(Fine filter). 1 Main filter Food and soil particles trapped by this filter are pulverized by a special jet on the lower spray arm and washed down the drain. 2 2 Coarse filter Larger items, such as pieces of bone or glass, that could clog the drain are trapped in the coarse filter.
Filter assembly For best performance and results, the filter assembly must be cleaned. The filter efficiently removes food particles from the wash water, allowing it to be reci rculated during the cycle. For this reason, it is a good idea to remove the larger food particles trapped in the filter after each wash cycle by rinsing the semicircular filter and cup under running water. To remove the filter assembly, pull on the cup handle in the upward direction.
To clean the edge around the door, you should use only a soft warm, damp rag. To prevent penetration of water into the door lock and electrical components, do not use a spray cleaner of any kind. Also, never use abrasive cleaners or scouring pads on the outer surfaces because they will scratch the fini sh. Some papers towels can also scratch or leave marks on the surface. Never use a spray cleaner to clean the door panel for it could damage the door lock and electrical components.
Improper connection of the equipment-grounding conductor can result in a risk of electric shock. Check with a qualified electrician or service representative if you are in doubt whether the appliance is properly grounded. Do not modify the plug provided with the appliance; If it is not fit for the outlet. Have a proper outlet installed by a qualified electrician. In order to avoid that there is more water staying in the inlet hose, please close the hydrant after using.
Water Outlet Connect the water drain hose. The drain hose must be correctly fitted to avoid water leaks. Ensure that the water inlet hose is not kinked or squashed. Extension Hose If you need a drain hose extension, observe to use a simil ar drain hose. It must be no longer than 4 metres; otherwise the cleaning effect of the dishwasher could be reduced. Syphon Connection The waste connection must be at a height of between 50 cm (minimum) and 100 cm (maximum) from the bottom of the dish.
Before Calling for Service Review the charts on the following pages may make you be free of calling for service. ' Fuse blown, or the circuit breaker acted Replace fuse or reset circuit breaker. Remove any other appliances sharing the same circuit with the dishwasher Power supply is not turned on Make sure the dishwasher is turned on and the door is closed securely. Make sure the power cord is properly plugged into the wall socket.
Combination of soft water and too much detergent Use less detergent if you have soft water and select a shortest cycle to wash the glassware and to get them clean. Tea or coffee stains using a solution of 1/2 cup of bleach and 3 cups warm water to remove the stains by hand. You have to wait for 20 minutes after a cycle to let the heating elements cool down before cleaning interior; otherwise, burns will happen.
Technical data Type : ZWM 416 W Weight gross(kg) 41 Nr of programs 6 Height(cm) 85 Energy class( * ) A Width(cm) 45 0.74 Depth(cm) 58 Energy consumption(kWh/cycle)( ** ) Wasshing efficiency A Depth with opened door(cm) 118 Drying efficiency B Hot water connection <60 Loading Capacity(Place settings) 8 Water Pressure Range(kPa) Water consumption(l/cycle) 11 Voltage(V) Noise level(dB(A)/re1pW) 49 Connected value(kW) Weight net(kg) 36 Fuse(A) 0.04-1.