Installation Instructions Freedom Series Panel Wall Surface Mounted Corporation
Note Panel wall installation should conform to local building codes. The installation instructions provided are for the Amico standard products. Slight modifications to the installations may be required. The product shipped to the job site may not be exactly as shown on the installation drawings. Before Installation 1. Review a copy of the final approved shop drawing(s) and/or submittal package.
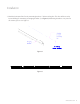
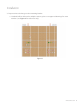
Installation 1. Mark the horizontal line for the mounting bracket: 7” below ceiling line. This line will be used to locate drilling for mounting of hanging bracket. (see Figure 2) Mounting bracket is one piece for all sections, please see Figure 3. 7” below finish ceiling Figure 2 Figure 3 www.amico.
Installation 2. Align bracket horizontally according with headwall mounting location. Refer to drawings. Mount bracket to the wall using hardware compliant to local building codes (supplied by others).
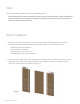
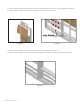
Installation 3. Prepare units to be hang over the mounting bracket a. Headwall will be delivered in multiple sections, please see approved drawings for exact number ( see Figure 5 for references only) Figure 5 www.amico.
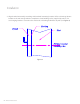
b. Remove laminate panels located at the top section and bottom sections, where applicable. (Figure 6) c. Hang all units in place and make sure the bottom line up for all sections. Figure 6 Figure 7 d. Secure units through lower rear bracket to wall, where applicable. (Figure 7) e. Secure each section to each other using the hardware provided by Amico. See Figure 8 for details.
Other Installation Notes 4. Make all med gas and electrical connections. www.amico.
www.amico.com Amico Architectural | www.amico.com 85 Fulton Way, Richmond Hill Ontario, L4B 2N4, Canada 71 East Industry Court, Deer Park NY 11729, U.S.A Toll Free Tel: 1.877.264.2697 Toll Free Fax: 1.866.440.4986 Tel: 905.763.7778 Fax: 905.763.8587 Email: info@amico.com C US LISTED INSTALL INSTR.