
Quick Installation Guide

STEP 3. Connecting the Device for Configuration
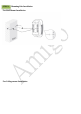
(1) Connect one end of the Ethernet cable into the LAN1 port of the Access
Point and the other end to the Ethernet port on the computer.
(2) Plug in power source by different ways that depends on user setup
environment
(A) PoE Switch (Plug in from LAN1 Port)
(B) PoE Injector (Plug in from LAN1 Port)
(C) DC Power Adapter (Plug in from DC Jack)
- Connect the Power Adapter to the DC-IN port of the Access Point
and plug the other end into an electrical outlet.
Note: The Access Point supports both IEEE 802.3at PoE (Power over Ethernet) or the
included power adapter. You may use either one as the power source. DO NOT use both at
the same time.
STEP 4. IP Address Configuration
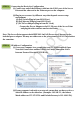
(1) Once your computer is on, ensure that your TCP/IP is enabled. Open
Network Connections and then click Local Area Connection. Select
Internet Protocol Version 4 (TCP/IPv4).
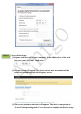
(2)If your computer is already on a network, ensure that you have set it to a
Static IP Address on the interface. (Example: 192.168.1.2 , the Subnet
Mask address as 255.255.255.0. and Default Gateway is 192.168.1.254 )