
User's Manual
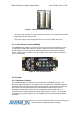
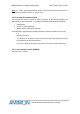


Table Of Contents
- 1. Purpose
- 2. The System
- 3. Setting-up a Link
- 4. System Configuration
- 5. User Interface
- 5.1 Video Input selection
- 5.2 Video input status Tx & Rx
- 5.3 Registration (both Tx and Rx)
- 5.4 Association (Tx & Rx)
- 5.5 RF frequencies table selection
- 5.6 Manual Transmission power (Tx only)
- 5.7 Manual frequency selection
- 5.8 Broadcast mode (both Tx and Rx)
- 5.9 Link exists (both Tx and Rx)
- 5.10 Communication error (both Tx and Rx)
- 5.11 DVI mode (Rx Only)
- 6. Basic Troubleshooting

WHDI Reference Design Setup Guide
Dev Kit-UG1_Rev 1.0.28
3. Setting-up a Link
3.1 Enabling communication to the wireless module
Seagull boards can work with Shaldag application boards. Canary and Pashosh use
I2C protocol with the Seagull board, while Shaldag uses SPI protocol. The Seagull
boards contain Dip Switch to select I2C/SPI communication. In case using
Pashosh/Canary, dip switch 1 should be set to ‘On’ (as the figure below). In case
using Shaldag dip switch should be off.
Figure 3 – SW6
3.2 Basic Link Set-Up
To create a link, follow the below procedure:
Connect the Tx module to a video source using an HDMI cable. Use HDMI 0
port by default (this is Shaldag based system default)
Connect the Rx module to a display (monitor/TV/projector) using an HDMI
cable.
Connect the power supplies to both Tx and Rx modules. Ensure that the
power switches are off.
Power on the Tx using the power switch and wait for the status LEDs (L2) to
turn on. They should be red if no source is connected and turn green if a legal
source is connected and the video resolution is identified. Refer to section
5.5 for more information.
In case the source is off, turn it on and make sure it is set to output a legal
resolution (refer to section 4.1). The status LEDs (L2) on the Tx should turn to
green once the source was recognized and the transmission is set and (refer
to section 5.5).
Make sure your display is on and set to the right input source.
Power on the Rx using the power switch. L1 yellow LEDs should turn on once
association is completed and the link is connected (refer to section 5.5). Link
establishment process may take 10-15 seconds.
Once link is established, RX L2 LEDs should turn green, and there should be
audio and video reception on the display.
In case the display has only a DVI port and the Rx can be connected to a
display via an HDMI to DVI cable. Refer to section 5.7 for explanation on
setting DVI mode.
Confidential Under NDA
Internal document. Information subject to change
11 Page