Sliding Shower Door/6mm Installation Instructions Size:48"x72" 60"x72"
● Please read these instructions in full before installing IMPORTANT ● Check that the bathtub has been installed to the manufacturer’s instructions. Please note - All product is supplied without a tray. ● Opening wall adjustments 48"Slider - adjustment = (46.50"-47.44")x72" 60"Slider - adjustment = (58.19"-60")x72" GENERAL SAFETY INSTRUCTIONS ● Do not fix the wall profile to newly plastered, painted or papered walls as chemical reaction may cause discolouration to the surface finish.
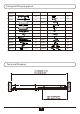
IDENTIFICATION OF PARTS 6HD08 6HD17 6HD18 6HD13 6HD20 6HD19 6HD21 6HD06 6HD01 6HD02 6HD03 6HD07 6HD04a 6HD04b 6HD05 6HD12 6HD11 6HD09 6HD22 6HD10 6HD23 2
Fixings & fittings supplied Item No.: Part Quantity Item No.: Quantity Part 6HD01 X1 6HD13 6HD02 X1 6HD14 X2 6HD03 X1 6HD15 X1 6HD04 X2 6HD16 X1 6HD05 X1 6HD17 X2 6HD06 X1 6HD18 X2 6HD07 X1 6HD19 X2 6HD08 X1 6HD20 X2 6HD09 X1 6HD21 X1 6HD10 X1 6HD22 X1 6HD11 X8 6HD23 X4 6HD24 6HD12 ST4X40 Technical Drawing 3 ST4X40 L X1 R 4 X4 2.
RH LH Halo screen is reversible for Left hand and Right hand. But the mounting instruction is the same for both directions. Below step is followed by Right hand. For left hand, please follow below steps in mirror direction. 1. - Measure the wall with spirit level to make sure the wall is vertical. a. Put the wall profile 6HD01 against the wall, ensuring the distance between the profile and the base edge is correct. Adjust the profile to make sure it is vertical by using a spirit level.
2. -Insert fixed glass panel 6HD03 into the wall profile. - Then insert single blade seal 6HD02 from the inside of cabin between wall profile and glass panel with tool 6HD16. 6HD03 X1 6HD02 X1 6HD16 X1 6HD03 6HD03 6HD02 6HD02 3. 6HD16 a.Mark the holes position of the rail profile wall seat by using tool 6HD15. b.Drill the holes(φ6mm)acoordingly. c.Insert the wall plugs 6HD11(2X) in the holes. d.Fix rail profile seat 6HD20 on the wall with screws 6HD13(2X).
4. - Loose the back nut E of 6HD19 to disassemble 6HD19 to part E, F and G. Insert back nut E into the holes on the rail profile. -Peel off the skin of paper on the F. Insert F also into the hole to fix nut E tightly on the rail profile. - Disassemble wall bracket 6HD20 to part H and I with hex key 6HD24. - Put part H on the other end of rail profile 6HD08. 6HD19 X2 6HD24 X1 2.5 6HD20 X1 6HD24 2.5 I H F E 6HD19 G F 6HD20 E E 6HD19 F E F 6HD19 5. F a.
6. - Insert the rail profile into wall bracket next to fixed glass panel again. - Put fixing part H of 6HD19(2X) through the holes of the glass panel to reach rail profile. Fasten 6HD19 by hex key. - Fix the rail profile and the wall bracket with hex key for both ends. 6HD19 X2 6HD24 4 2.5 X1 6HD03 6HD24 6HD19 4 7. - Apply silicone on the back of sliding guide 6HD23. -Put it right next to the fixed glass panel.
8. - Apply vertical seal 6HD04(1X) on the sliding glass panel 6HD05 and cut under the rail profile. - Apply anti-water seal 6HD09 on bottom of the sliding glass panel 6HD05. -Attached the magetic seal 6HD06 on the edge of sliding glass panel 6HD05. 6HD05 X1 6HD04 X1 6HD06 X1 6HD09 X1 6HD04a 6HD05 6HD06 6HD09 9. -Mount rollers 6HD17(2X) on the sliding glass panel 6HD05. -Mount handle 6HD07 on the sliding glass panel.
. -Put the sliding glass panel 6HD05 on the rail profile to make sure bottom edge on the channel of sliding guide. Roller adjustment: -From inside of the cabine, take off the back cover from the roller. -Turn the nut of the roller with tool 8HD14 until the door is vertical against the magnetic seal well. -Fasten both rollers and put the covers back. 6HD05 6HD03 6HD03 6HD05 11.
12. -Apply silicone on the back of aluminium anti-water strip6HD10 and strip cover6HD22. -Insert 6HD10 into the hole of sliding guide 6HD23. - Put 6HD22 cover on the other end. 6HD10 X1 6HD22 X1 6HD10 6HD22 13. Finally, at all points connected to the wall, the bathtub and the profiles, use silicone sealant only on the outside of the shower enclosure. Please do not take shower within 24 hours after silicon sealant.
Technical and Customer Support:1-312-666-3552 V18G27 11