2 Panel BathScreen Installation Instructions Size:55"x39"
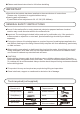
●Please read these instructions in full before installing IMPORTANT ●Check that the bathtub has been installed to the manufacturer’s instructions. Please note - All product is supplied without a tray. ●Opening wall adjustments 2 panel Bath screen adjustment =38.19"-39"(970-990mm) GENERAL SAFETY INSTRUCTIONS ●Do not fix the wall profile to newly plastered, painted or papered walls as chemical reaction may cause discolouration to the surface finish.
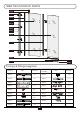
IDENTIFICATION OF PARTS 6FD15 6FD16 6FD01 6FD02 6FD03 6FD14 6FD05 6FD06 6FD07 6FD04 6FD08 6FD10 6FD09 6FD12 6FD11 6FD13 Fixings & fittings supplied Item No.: Part Quantity Part Item No.
RH LH 2Panel bath sceen is ok to be installed in left and right hand.Below steps are based on left hand.Please choose the direction and following below steps. Technical Drawing 460mm(18.11") 476mm(18.74") 970-990mm(38.
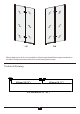
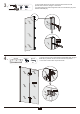
1. 6FD01 - Put the wall profile 6FD01 against the wall,and make sure the profile to be 10mm away from the outside edge.and ensure it isvertical using a spirit level. - Mark the holes on the wall. - Drill the holes(Ø6mm) accordingly. -Insert the wall plugs 6FD05(4x) in the wall. -Fix the wall profile 6FD01 on the wall with screws 6FD07(4x) . 6FD05 6FD07 ST4*30 4X 1X 4X 4X 4X 9 0.3 0 "(1 mm φ6mm ) 6FD05 4X 4X 6FD01 6FD07 2. 6FD03 -Insert screen panel 6FD03 into the wall profile.
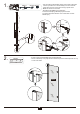
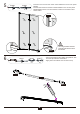
3. -From inside drill throught the vertical profile and into wall profile where shown,using a 3.2mm drill. -Fix wall profile and frame together with screws 6FD14(4x) and washers 6FD06(4x) 6FD06 6FD14 ST4*10 X4 X4 m φ3 m 6FD06 6FD14 4. 6FD04 X1 6FD10 X2 6FD17 4mm X1 -Connect the screen panel 6FD03 and 6FD04 with hinges 6FD10( 2x).Fasten inner screws with hex key 6FD17. -Cover the screws with cap from inside.
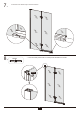
5. 6FD08 -Attached the vertical anti-water sealer 6FD08 on the screen panel 6FD04 -Attched the bottom anti-water sealer 6FD09 on the screen panel 6FD04.Make sure the vertical sealer is stand on the bottom antiwater sealer. 6FD09 X1 X1 6FD08 ! 6FD09 6. 6FD12 6FD11 6FD13 SILICONE L X1 R X1 R L Caution: The triangle bubble should be mounted towards the inside of the bathtub. -Connect the bottom anti-water strip 6FD11 with the end caps 6FD12 and 6FD13.
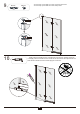
7. 8. -Put bottom anti-water strip on the door bottom. 6FD02 - Cover the wall profile with conceal profile 6FD02 from inside.
9. 6FD15 -Put the top cover 6FD15 on the vertical profile first. -Put the top cpver 6FD16 on the wall profile. 6FD16 R L X1 X1 6FD16 6FD15 10. SILICON E - Apply silicone sealant to the outside of the enclosure. Please note: Do not apply silicone sealant to the inside of the enclosure.Also please do not take shower within 24 hours after apply the silicone.
Cleaning and Maintenance: Please do not use abrasive or strong cleaning solutions on the shower enclosure, such as alcohol, petroleum liquids or any other chemical cleaner. Should there be any dirty stains on the shower enclosure, please clean it with a soft lint free cloth and warm soapy water. Please rinse it with clean water afterwards. We have taken great care to ensure that this product reaches you in perfect condition.