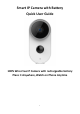
Smart IP Camera with Battery Quick User Guide 100% Wire-Free IP Camera with rechargeable battery Place it Anywhere, Watch on Phone Anytime 1
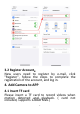
Content 1. Packing list......................................................... 3 2.Product Details .............................................. 4 3. Install Adorcam APP....................................... 5 4. Add Camera to APP........................................ 6 5. Device Menu................................................... 11 6. Share Video to Friend.................................. 14 11. LED Status Description............................. 16 12. Touble Shooting........................
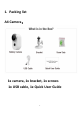
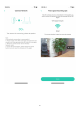
1.
2.
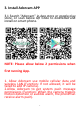
3. Install Adorcam APP 3.1 Search “Adorcam” in App store or google play store, or scan below QR Code to download and install on smart phone. NOTE: Please allow below 2 permissions when first running App. 1. Allow Adorcam use mobile cellular data and wireless LAN (Function: If not allowed, it will be failed to add IP camera). 2.Allow Adorcam to get system push message permissions (Function: When the camera triggers motion detection or audible alarm, the phone can receive alarm push).
3.2 Register Account: New users need to register by e-mail, click "Register", follow the steps to complete the registration of the account, and log in. 4. Add Camera to APP 4.1 Insert TF card Please insert a TF card to record videos when motion detected and playback. ( card not included, supports 128GB Max.
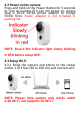
4.2 Power on the camera Press and hold on the Power Button for 5 seconds to Turn on Camera (if it can not power on, please plug in DC5V 1A/2A phone adapter to charge 15min first). Power adapter is not included in packing list. NOTE: Ensure the indicator light slowly blinking in RED before setup WiFi 4.3 Setup Wi-Fi 4.3.1 Bring the camera and phone to the router within 1 to 3 feet (30 to 100 cm) and connect wifi. NOTE: Please note camera only works under 2.4G Wi-Fi, not supports 5G Wi-Fi.
4.3.2 Run Adorcam App, Click “Add Device” and select “BATTERY CAMERA”. 4.3.3 Select 2.4Ghz WiFi SSID and input password, tap “Connection” 4.3.4 Follow the “Operation Guide” on App, aim the lens of the camera directly to the QR code at a distance of 5-8 inches. A tone will be heard when successfully scanned. 4.3.5 After the device recognizes the QR code, it will sound a tone, if heard it, then tap "Hear a tone" and waiting for “Connect Network”. 4.3.
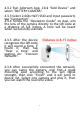
5. Device Menu 1. Play 2. Share 3. Snoone Alerts 4. Playback 5. Settings 6. Camera Name 7.Battery Volume 8.WiFi Signal 9. Disarm Mode 10. Motion Detection Off 11. Camera Time 12. Messages 13. Help 14. About app 15. Devices 16. Events 17. Security 18.
19. Bit rate 20. Record 21. Snaphot 22. Hold & Speak 23. Audio 24. Menu 25. Events 26. Night Vision 27. Sound Alarm 28. Settings 29.
Camera Settings Menu: No.
6. Share Video to Friend Click share icon or option and select permission and select connected cameras and input the friend’s account to share.
Appendix: LED Status Description No .
Trouble Shooting Sheet No. Description Solution and operation Unable to 1 connect 1) Check your WiFi name and password 2) Ensure your WiFi is 2.4G HZ, not the 5G HZ WiFI. 3) Ensure your camera and phone close to router 2 Reset 1) Press and power button twice Hear one tone. 2) Red light turns to flash slowly 1) If camera is online, you can select one new WiFi, input Change to a password to change; 3 new Network 2) If camera is not online, reset the camera and connect it to new wifi.
FAQ: 1. Battery Camera doesn't support 7/24 constantly recording, only supports events recording when sensor human body motion detection. 2. Battery camera doesn't support any PC S/W or browser. 3. Battery Camera doesn't support 5G Wi-Fi 4. Battery Camera charging supports DC5V 1A/2A plug. fully charged time: 5-6 hours 5. IP battery camera support offline recording. IP battery camera cannot work without Wi-Fi.
NOTE: This equipment has been tested and found to comply with the limits for a Class B digital device, pursuant to part 15 of the FCC Rules. These limits are designed to provide reasonable protection against harmful interference in a residential installation. This equipment generates uses and can radiate radio frequency energy and, if not installed and used in accordance with the instructions, may cause harmful interference to radio communications.