
Owners manual


www.amp-research.com
5/9
IM76154 rev 02.24.15
A M P R E S E A R C H P O W E R S T E P
T M
– C H E V R O L E T / G M C
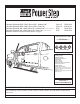
Front Idler Linkage: Thread supplied bolt (10) in
about half way into the first sheetmetal tab / hole from
front. Set linkage over bolt and Tighten lower bolt (10)
to 16ft-lbs(22N m). Finger tighten nut (12) onto bolt
(10). Install bolt (13) and torque to 16 ft-lb (22N m).
Next torque lower nut (12) to 16 ft-lb (22N m) using
wrench to hold lower bolt in place.
Slide mounting T-nut into position, aligning the end of
the board with the rear edge of the back door. Mount
board and tighten fasteners to 10 ft-lbs. Insure linkages
are squared to body prior to torquing fasteners.
Rear Drive Linkage: Install driver side Motor Linkage in fourth sheetmetal tab / hole from front. Linkage will
then clear parking brake cable.
Note: U-nut may be needed if
threaded insert is not present
on vehicle
Install U Nut (18) into position just forward of
brake cable T junction. Use supplied bolt (13) to
hold Brake cable rod into position.
Using the two 11” cable ties, mount controller to
support arm next to battery. Plug in harness (Ensure
that locking tabs engage)
Remove power fuse. Attach power lead (RED wire)
to positive pole on the battery. Attach ground lead to
negative battery pole.
CAUTION: Do not ground wrench when engaged with
nut.
19
5
10
NOTE: U Nut may not be needed
on some model trucks.
Front of Vehicle
13
12
15
10
Rear of vehicle
Crew Cab- Approx 29” from back of cab
Extended Cab- Approx 13” from back of cab
Install rear linkages with U Nut (18) here
Set linkage into second to last sheetmetal tab / hole from rear. Use supplied bolt (10) and nut(12) to
hold in position. Install bolt (13) into upper mounting hole and snug both bolts. Torque upper bolt (13)
to 16ft-lbs(22N m) first and then torque lower bolt (10) and nut (12) to 16 ft-lb (22N m). Repeat linkage
installation on Passenger side.
NOTE: U Nut may not be needed
on some model trucks.
13
12
10
15
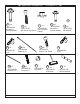
Note: Threaded nut may not be present
on some vehicles. Bolt will assemble the
same as step 3.
2
1
3
5
6
3
1
4
5