
Owner's Manual


Guitar Amplifier GVT52-112
7
®
™
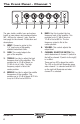
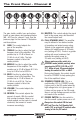
The Front Panel – Channel 2
The gain, treble, middle, bass and volume
knobs as seen above and mentioned below
[#8–#12]areforchannel2only.Seethe
previous page for the channel 1 illustration
and descriptions.
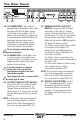
8. GAIN: This control adjusts the
gain of the amplifier.
9. TREBLE: Use this to adjust the high
frequency level of the amplifier. This
provides up to 12 dB of boost or
12 dB of cut at 5 kHz. The high
frequency output is flat at the
center position.
10. MIDDLE: Use this to adjust the middle
frequencies of the amplifier. This
provides up to 10 dB of boost @ 1 kHz
or up to 6 dB of cut at 800 Hz.
11. BASS: Use this to adjust the low
frequency level of the amplifier. This
provides up to 12 dB of boost or
12 dB of cut at 80 Hz. The low
frequency output is flat at the
center position.
12. VOLUME: This control adjusts the
output level.
13. REVERB: This control adjusts the
amount of reverb. With the control
fully counter-clockwise, there is no
reverb applied; as the control is turned
clockwise, the amount of reverb
increases accordingly.
8 9 10 11 12 13 14 15 1716
14. MASTER: This control adjusts the signal
level to the power amp, and therefore
the overall output level.
15. FULL/STANDBY/HALF: The amplifier
may be utilized in two distinct modes
of operation and output power rating.
Tetrode is the aggressive setting that
delivers full output power of 50 watts
rms[settingatFULL].Triodeisagentler
setting with more headroom that
reduces the output power to
25wattsrms[settingatHALF].
Always make sure this switch is in
STANDBY mode [middle position] when
powering the GVT52-112 ON or OFF
[17]. Allow at least 30 seconds before
moving this switch to FULL or HALF.
During short breaks, this switch should
be set to STANDBY to help prolong the
life of the amplifier’s tubes.
16. STANDBY/POWER LED: This is a
multi-function LED. In STANDBY mode,
it glows red. In the ON mode (when the
high voltage kicks in) it glows green. If
it does not turn green in the ON mode,
there is no high voltage present and the
unit needs to be serviced.
17. POWER SWITCH: Use this switch to
turn the overall system power on or off.
Always turn this switch ON first and
OFF last! Turn the Full/Standby/Half
switch [15] on at least 30 seconds after
turning on the On/Off switch.