User and Installation Guide DIGITAL Wireless Audio Transmitter / Receiver Model TX1, RX1 R
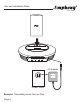
User and Installation Guide R Unpacking: Check that this package contains: One audio transmitter, one audio receiver, two AC adapters, two audio cables. S t e p 1Connecting the transmitter With the transmitter, you can send music from your iPod / iPhone or from any audio source that either provides a line-level audio signal or amplified speaker level signal.
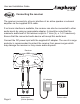
R User and Installation Guide iPod AC adapter DC 9 V Power outlet Example: Transmitting music from an iPod Page 3
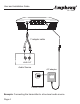
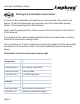
R User and Installation Guide Y adapter cable L R LINE OUT Audio Source AC adapter DC 9 V Power outlet Example: Connecting the transmitter to a line-level audio source Page 4
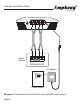
R User and Installation Guide Audio Source L R SPEAKER OUT AC adapter DC 9 V Power outlet Example: Connecting the transmitter to an amplified audio source Page 5
R User and Installation Guide Connecting the receiver S t e p 2 The receiver connects to a line-in interface of an active speaker or external amplifier via the supplied RCA cable. If no line-in interface is available, the receiver can also be connected to other audio inputs by using an appropriate adapter. It should be noted that the maximum audio level of the receiver output is 1 Vrms (Vpp ± 1.4 V maximum). Ensure that the connected audio device will accept this audio level.
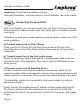
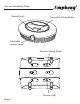
User and Installation Guide Pairing the transmitter and receiver S t e p 3 In order for the transmitter and receiver to communicate, they need to be paired. To pair the transmitter and receiver, push the transmitter pairing button. The transmit light will start flashing. Next, push the pairing button of the receiver which is located on the bottom of the receiver. You must push the receiver pairing button within one minute after you have pushed the transmitter pairing button.
R User and Installation Guide Transmit Light Transmitter Pairing Button Transmitter volume control Receiver Pairing Button Receive Light Page 8
User and Installation Guide Setting the transmitter volume control S t e p 4 The transmitter perfroms advanced analog-to-digital transmission of the audio signal. In order to achieve maximum dynamic range and avoid clipping of the audio, the transmitter volume control must be adjusted to your audio source. In order to properly set the transmitter volume control, turn the volume of the device connected to the receiver to a low setting.
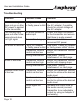
R User and Installation Guide Troubleshooting Problem Possible Cause Solution Faulty AC adapter Check the power outlet and or faulty power outlet the AC adapter; if possible, check for correct voltage of the AC adapter. No audio present at Check the audio connection audio input to the transmitter and ensure that there is audio present. Transmitter hung up Disconnect and then reconnect DC power.
User and Installation Guide Technical Specifications Transmitter: Audio transmission method: Digital, uncompressed Transmitter frequency: 2.4 GHz Transmitted data rate: 5 Mbps Transmitter operating range: max. 200 ft. line of sight, max. 50 ft. through walls and ceilings Audio sampling method: 128 times oversampling Receiver: Output level: 1 Vrms Frequency response: 2 Hz … 20 kHz Signal-to-noise ratio: 91 dB (Transmitter / Receiver, A-weighted) Total harmonic distortion: typ. 0.
R User and Installation Guide IMPORTANT SAFETY INFORMATION ATTENTION! READ THESE SAFETY INSTRUCTIONS CAREFULLY AND HEED ALL WARNINGS IN THIS MANUAL. POWER SOURCE To avoid product malfunction, and to protect against electric shock, fire or personal injury, please observe the following: • This product has been designed to work with 120-volt AC current using the supplied AC adapters.
Copyright (C) 2011 Amphony. All rights reserved. The information contained herein is subject to change without notice. Revisions may be issued to advise of such changes and/or additions. All product names, trade names, or corporate names mentioned in this document are acknowledged to be the proprietary property of the registered owners. FCC ID: PMJTX1 (Transmitter), PMJRX1 (Receiver) This device complies with part 15 of the FCC Rules.
User and Installation Guide R NON-USE PERIODS • When the product is not being used for a long period of time, unplug the product. CLEANING • Unplug the product before cleaning. • When the system gets dirty, wipe it with a clean, soft cloth. If necessary, wipe it with a soft cloth, slightly dampened with soapy water. Wipe dry immediately with a dry cloth. • Never use benzene, aerosol cleaners, thinner, alcohol or any volatile cleaning agent. • Do not use abrasive cleaners, as they may damage the finish.
Copyright (C) 2011 Amphony. All rights reserved. The information contained herein is subject to change without notice. Revisions may be issued to advise of such changes and/or additions. All product names, trade names, or corporate names mentioned in this document are acknowledged to be the proprietary property of the registered owners. FCC ID: PMJTX1 (Transmitter), PMJRX1 (Receiver) This device complies with part 15 of the FCC Rules.
Limited warranty WHAT YOUR WARRANTY COVERS This warranty extends only to the original user of the equipment (“you”, ”your”) and is limited to the purchase price of each part. Amphony and its affiliated companies (”we”, ”our”, ”us”) warrant this Wireless Transmitter / Amplifier Set against defects in materials or workmanship as follows.
LEGAL LIMITATIONS REPLACEMENT AS PROVIDED UNDER THIS WARRANTY IS YOUR EXCLUSIVE REMEDY. WE SHALL NOT BE HELD LIABLE FOR ANY INCIDENTAL OR CONSEQUENTIAL DAMAGES FOR BREACH OF ANY EXPRESSED OR IMPLIED WARRANTY ON THIS EQUIPMENT, NOR FOR ANY INCIDENTAL OR CONSEQUENTIAL DAMAGES RESULTING FROM THE USE OF, OR INABILITY TO USE, THIS EQUIPMENT. UNDER NO CIRCUMSTANCES SHALL OUR LIABILITY, IF ANY, EXCEED THE PURCHASE PRICE PAID FOR THIS EQUIPMENT, EXCEPT TO THE EXTENT PROHIBITED BY APPLICABLE LAW.