PowerTel 6 Bedienungsanleitung Operating Instructions Mode d’emploi Bedieningshandleiding
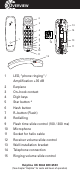
OVERVIEW 2 3 13 4 14 5 6 7 1 8 9 10 11 1 15 13 11 12 LED, “phone ringing“ / Amplification +35 dB 2 Earpiece 3 On−hook contact 4 Digit keys 5 Star button * 6 Hash button 7 R−button (Flash) 8 Redialling 9 Flash time slide control (100 / 300 ms) 10 Microphone 11 Socket for helix cable 12 Receiver volume slide control 13 Wall installation bracket 14 Telephone connection 15 Ringing volume slide control Helpline UK 0844 800 6503 (See chapter “Helpline“ for costs and hours of
GETTING STARTED Connecting the telephone Connect the helix cable at positions numbered (11). Only use the helix cable supplied because the equipment may not function if another helix cable is used. Connect the phone (14) to the telephone connection socket using the telephone connection line. Only use the telephone line supplied because the equipment may not function if another Wall mounting The telephone can also be installed on a wall. You require two screws in order to fix the telephone on a wall.
GETTING M AKING AND STARTED RECEIVING CALLS Taking a call When the phone rings, lift the receiver and take the call. Ending a call (on−hook) Replace the receiver to end the call. Making a call Lift the receiver. Wait until you hear the dialling tone. Dial the required telephone number using the digit keys (4). Redialling Your telephone stores the last phone number dialled.To redial the last number dialled, lift the receiver and wait until you hear the dialling tone. Press the Redialling button (8).
MAKING AND RECEIVING CALLS information please refer to the user guide of the PABX. Set the receiver volume The receiver volume is adjusted using a switch (12). • Slide the switch to the left: Low receiver volume. • Slide the switch to the middle: Medium receiver volume. • Slide the switch to the right: Attention: This phone is capable of providing extremely loud volumes when the amplifier is activated and the volume control is set to maximum.
APPENDIX Safety notes Please make sure you read this user guide carefully and keep it for further use. Intended use The telephone is suitable for connection within a analogue public telephone network system. Any other use is considered unintended use. Unauthorised modification or reconstruction is not permitted. Under no circumstances open the device or complete any repair work yourself. Installation location Make sure your device: • is on a dry, flat and stable surface.
APPENDIX points provided by the public waste authorities. Packaging materials must be disposed of according to local regulations. Helpline If you need some help and you’re in the UK, please call us on 0844 800 6503 (using an UK landline, at the time of going to print: calls cost 6p for connection charge and then 5p a minute. Mobile costs may vary). Lines are open Monday to Friday, 9am to 5pm, excluding public holidays. contact your supplier.
APPENDIX interposed private branch extension system.The terms of the guarantee do not apply to the rechargeable batteries or power packs used in the products.The period of guarantee is 24 months from the date of purchase. All deficiencies resulting from material of production faults which occur during the period of guarantee will be eliminated free of charge. Rights to claims under the terms of guarantee are annulled following intervention by the purchaser or third parties.
APPENDIX guarantee in accordance with this agreement must be asserted exclusively with regard to your sales outlet. Two years after the purchase of our products, claims under the terms of guarantee can no longer be asserted. Declaration of conformity This device fulfils the requirements stipulated in the EU directive: communications terminal equipment and the mutual recognition of their conformity. Conformity with the above mentioned directive is confirmed by the CE symbol on the device.