
User guide


4
SW915 DIGITAL AUDIO TRAVEL PARTNER
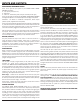
controlS and indicatorS:
ON-OFF SWITCH:
When power switch is in the ON position, the BATTERY STATUS LIGHT
will be illuminated. The color of the LIGHT indicates the condition of the
battery.
Yellow – battery low, recharge immediately
Red – battery must be recharged before use
To charge the batteries, connect the unit to 110VAC using the supplied
power cord. The red CHARGER ON LED will be illuminated indicating
battery is charging. The batteries will charge when unit is operating with
AC power, HOWEVER the unit will charge faster with the power switch in
the “off” position.
THE SW915 MUST BE PLUGGED IN AND CHARGING WHEN NOT IN USE
TO MAXIMIZE BATTERY LIFE. RECHARGING THE UNIT ONLY WHEN
THE BATTERY STATUS LIGHT IS YELLOW OR RED WILL SHORTEN THE
USEFUL LIFE OF THE BATTERIES.
MASTER VOLUME:
This is the master volume control for the system.
TREBLE:
This control cuts or boosts the treble level.
BASS:
This control cuts or boosts the bass level.
MICROPHONE VOLUME:
There are three microphone input channels, (Channels 1, 2 & 3 on the
Control Panel) and each channel has individual volume adjustment
controls.
VOICE/MUSIC:
Using the remote, press the V/M button to toggle between voice or
music. For speech, it provides a midrange boost for better sound
projection when in the VOICE position. This selection can also be
performed without use of the remote. Use the up or dwn buttons just
below the display on the Partner to scroll to the voice/music selection.
Use the Adjust button to toggle to either Voice or Music. Then press
Save to save your selection.
audio functionS and adjuStmentS
DUCKING CONTROL
The 'Ducking' feature facilitates announcements and paging by
automatically reducing the volume of all the other inputs when the
designated master input is used.
When Ducking is enabled, either wired microphone channel 1 or wireless
microphone 1 is set as the system 'Master.' When the sound picked
up by the master exceeds the 'Threshold' volume, all the other input
volumes in the SW915 are reduced to the 'Attenuation' level. When the
volume of the 'Master' drops below the 'Threshold' level for the time set
as 'Delay', the volumes of the other inputs return to normal. There are
four controls
1 DUCKING:
this control activates which source of the 915 that will
be used in the ducking circuit. The three settings are ‘Disabled’,
‘Microphone 1’, and ‘Wireless 1’. Select either ‘Microphone 1’ or
‘Wireless 1, to choose which of these two microphones are to be the
main microphone. Select ‘Disabled’ to turn the Ducking Control off.
2 ATTENUATION:
this determines the sound level to which the
other channels will be reduced to when speaking into the main
microphone. All the way down will mean there will be no effect on
the other channels
3 THRESHOLD:
This determines how loud the person speaking into
the main microphone has to be when the Voice Ducking feature is
active. This can help prevent any unwanted background noises from
inadvertently activating this feature.
4 DELAY:
This determines how long the Voice Ducking stays active
after the last sound through the main microphone is detected – a
period of silence will follow after the last sound, and the length of
that period of silence will be determined by this setting.
ECHO/REVERB
This is a sound effect feature that makes the audio signal sound as
though it’s in a large area, such as a large cathedral or a cave, by repeating
the sounds that come into the SW915 through the microphones or any
of the accessories. The listener will hear the original sound, plus the
repeated sounds created by this feature. There are two controls:
1 LEVEL:
this control determines the loudness of the echo. In the low
setting the repeated sound is perceived to be quite relative to the
original sound level. As the level is increased the volume of the echo
gets louder.
2 DELAY:
this control determines the amount of time that elapses
between the original sound and the echo. As the level is increased,
the amount of delay between the original sound and the echo is
increased.
TREBLE:
This control cuts or boosts the treble level.
BASS:
This control cuts or boosts the bass level.
PHANTOM POWER
The three microphone inputs on the control panel of the 915 can be
configured to supply phantom power for certain types of microphones,
such as condenser types, which require an extra voltage to operate:
Setup, Phantom Power: by selecting this function and using the adjust
command, the user can activate the phantom power for each individual
microphone channel by scrolling to the channel where the phantom
power is needed, and then activating or de-activating the phantom
power as needed.