
User guide


6
SW915 DIGITAL AUDIO TRAVEL PARTNER
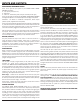
THERE ARE 4 LIGHTS ON THE
SPEAKER SIDE OF THE DIGITAL
AUDIO TRAVEL PARTNER. THEY
ARE FROM LEFT TO RIGHT:
WIRELESS 1
WIRELESS 2
BATTERY STATUS
POWER
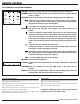
REMOTE CONTROL PICKUP PATTERN
The remote control for the 915 can be used to operate the controls from any direction around the 915, unless the user is standing
directly in front of the speakers. Also, the remote control will operate the 915 from a distance of up to 50 feet, and be in direct line of
sight for best results. 2 "AA" batteries are included. Velcro is included to attach your remote to the SW915.
1, 2, 3: Select the numbered Channel Control Button to adjust that
channel’s audio . These channels refer to the Combo and 1/8 mini
jacks
4 & 5: Adjusts the level of the selected function. Press 4 to raise level
and 5 to lower level. Level adjustments are for the selected function
such as volume
6 & 7: Function Selector- Used to scroll through functions for selection
8: Master Volume Selector- A short cut key that allows quick adjustment
of Master Volume. Just press this key and then the level keys to adjust
the Master Volume
9: Mute All- Press this button to mute ALL audio output ( Panic button)
10: Bass Control- Press this button and bass will be displayed. Then use
level buttons 4&5 to adjust
11: Treble Control- Press this button and treble will be displayed. Then
use level buttons 4&5 to adjust
12: Voice/Music switch- Press this button to toggle between voice
and music. In the Voice position, the vocal frequencies are enhanced
to produce louder and clearer vocals. These effects are absent in the
music position to allow “uncolored” music to be heard.
13: Not Used
14: Auxiliary Selection- Press this button to select the Auxiliary function
controlling the red/white RCA inputs.
indicator liGhtS
WIRELESS MICROPHONE POWER LIGHT
There are two yellow lights located above the speakers on the 915.
These lights are WIRELESS 1 & WIRELESS 2. They mean that the power
is on and they are ready to use.
In models equipped with one wireless microphone receiver, the first
light (from left to right) is active.
In models equipped with two wireless receivers, the first light will be the
indicator for Wireless Receiver #1 (from top to bottom on the control
panel) and the second light is the indicator for Wireless Receiver #2
BATTERY STATUS LED INDICATOR:
LED is green when battery
voltage is sufficient for operation. The LED Battery Status indicator
turns red when the battery voltage is low indicating that the unit should
be plugged into AC for continued operation.
CH 1 CH 2 CH 3
BASS TREB V/M
AUX CD MP3 TAPE
LEVEL DELAY THRSH CH1/W1
LEVEL DELAY
M VOL
MUTE ALL
DUCKING
REVERB
WRLS1
FASTER
NORMAL
SLOWER
FOLDER
SOURCE
RANDOM REPEAT
RECORD
WRLS2 WRLS3 WRLS4
1-800-267-5486 WWW.AMPLI.COM
CH 1 CH 2 CH 3
BASS TREB V/M
AUX CD MP3 TAPE
LEVEL DELAY THRSH CH1/W1
LEVEL DELAY
M VOL
MUTE ALL
DUCKING
REVERB
WRLS1
FASTER
NORMAL
SLOWER
FOLDER
SOURCE
RANDOM REPEAT
RECORD
WRLS2 WRLS3 WRLS4
1-800-267-5486 WWW.AMPLI.COM
CD PLAYER
BUTTON
remote control
15: CD Selection- Press this button
to select the CD player for audio
adjustments and CD player controls.
16: MP3 Selection- Press this button to select the (OPTIONAL) Digital
Player/Recorder for audio adjustments.
17: Tape Selection- Press this button to select the (OPTIONAL) Cassette
Player/Recorder for audio adjustments.
18-21: Wireless Selectors- Press these buttons to select a wireless
receiver for audio adjustments.