
User`s guide

User's Guide 27
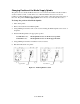
Printing the Configuration Label
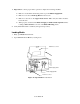
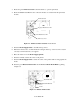
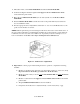
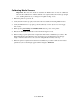
1. Power off the printer.
2. Make sure that 4 inch wide media is installed. The Self-test will print the maximum width of
the installed label.
3. Press and hold the FEED/Config button.
4. Power on the printer.
5. Release the FEED/Config button when the media begins to feed.
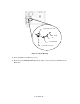
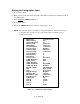
NOTE: The following figure is an example configuration printout. The feature setting on
your printer may vary based on any setup changes made or firmware version
installed in the printer.
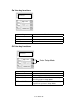
Figure 20 - Configuration Print Sample
Media Type Thermal Transfer
Media Sensing Gap
Sensor Threshold 70
Media Length 4.00 Inches
Media Width 4.00 Inches
Present Distance +0.24 Inches
Present Sensor Disabled
Vert Print Align 0.00 Inches
Horz Print Align +0.20 Inches
Vert Size Adjust 0
Print Darkness -8
Print Speed 6
Interface Select Auto Select
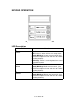
COM1: Baud Rate 9600
COM1: Parity None
COM1: Data Bits 8
COM1: Handshake RTS & XON
COM1: PAL Xmit Disabled
Emulation Mode PAL Emulation
Date Not Installed
Time Not Installed
Daylight Saving Disabled
Firmware Rev. 110152 B
Max Media Length 12.00 Inches
Keypad Lockout Disabled
Label Count 582
Drive A: 131072
Drive B: 262144
Drive C: 0
Drive D: 32768