Accel-7450 24-Pin Dot Matrix Printer Alignment & Test Guide © September 2012, AMT Datasouth Corp.
Copyright Declaration Information in this guide is subject to change without notice and does not represent a commitment on the part of AMT Datasouth Corporation. No part of this document may be reproduced or transmitted in any form by any means, for any purpose other than the purchaser’s personal use, without the expressed written permission of AMT Datasouth Corporation. For detail service and repair instructions the ACCEL 7450 Service Guide is available for purchase.
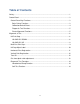
Table of Contents Safety .............................................................................................................................. 1 Control Panel .................................................................................................................. 3 Control Panel Key Functions........................................................................................ 3 Basic Printer Functions .....................................................................................
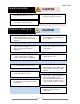
ACCEL-7450 SAFETY This GUIDE is to help qualified service technicians repair or adjust your ACCEL-7450 printer. Please read the guide carefully before repairing and making adjustments to your printer. The warranty will not cover any trouble with or damage to the printer resulting from repair or modification by unqualified persons.
ACCEL-7450 Operational safety Do not touch the print head immediately after printing because it is too hot. Do not put your finger under the tractor cover while loading fanfold paper. CAUTION Cautions in setting up Do not put your finger on the tractor gear, when using the rear tractor. CAUTION Unpack the printer. Make sure that the printer body and all accessories are included in the package and no parts are damaged.
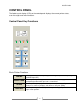
ACCEL-7450 CONTROL PANEL The liquid crystal display (LCD) on the control panel displays the current printer status, user messages and menu functions. Control Panel Key Functions Basic Printer Functions ONLINE This key is used to enable printing (ONLINE light ON) or disable printing (ONLINE light OFF). EJECT/LOAD Pressing this key loads paper to TOF and returns (Ejects) paper back to the load/parked position when pressed a second time.
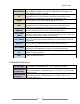
ACCEL-7450 Pressing this key temporarily changes the print impact for multipart forms HIGH IMPACT from NORMAL to DARK print mode. The HIGH IMPACT LED light is ON LF ENTER RLF ALT + JAM REMOVAL ALT + DARK FORM ALT + RESET ALT + FF when DARK print mode is selected. Pressing this key feeds the line in the forward direction at a pitch of 1/6 inch regardless of the LF PITCH setting in the printer’s control panel menu. Holding this key down produces continuous forward line feeding.
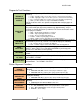
ACCEL-7450 Diagnostic Test Functions Power-up while pressing ALT + MENU keys together. LCD will display the following: SENSOR & GAP MOTOR OUTPUT PRINT GAP TEST USB DATA LOSS TEST ASCII SELF TEST HEX DUMP L.EG ~ left paper edge sensor value (sensor is located on head carrier) R.
ACCEL-7450 ALIGNMENT & TEST HA Print Gap Scope: This adjustment is used to set the nominal operating print gap (space between printhead and platen). Performing this procedure may be necessary when replacing the printhead, or experiencing light, missing and smearing print. This procedure is completed when “HA Print Gap Down” (downward pressure), and “HA Adjust UP” (printhead vs. platen gap) is adjusted.
ACCEL-7450 5. Press the ENTER key a second time to print “H” pattern. Paper will advance forward. 6. Press the LF key to decrease “HEAD GAP ADJ DW” value displayed on LCD. Press the ENTER key twice to print and verify “H” pattern. Continue repeating this step one number setting until “H” pattern print disappears. NOTE: if “H” pattern print was not witnessed during first print pass, increase numeric value one setting until “H” pattern print appears. HEAD GAP ADJ DW 16 17 * 7.
ACCEL-7450 HA GAP ADJ UP 9. Press the ENTER key and verify the print gap is electronically positioned. Print gap is established when the printhead moves down. 10. Press the ENTER key a second time to print “H” pattern. Paper will advance forward. 11. Press the EJECT key to remove paper. 12. Press the HIGH IMPACT key to exit menu and save settings. 13. Load cut sheet paper and start self-test print (LF key + Power Up). 14. Press the ONLINE key to stop test print.
ACCEL-7450 16. With the printer power turned OFF, press and hold the LF and RLF keys while turning ON the printer power switch. Hold keys until printer initialization (carriage movement) is completed. 17. Press the TEAR OFF key to enter “HEAD GAP ADJ UP” mode. 18. Press the LF or RLF key based on feeler gauge measurements; RLF key will increase gap value (enlarge print gap), or LF key will decrease gap value (reduce print gap). 19. Press the ENTER key two times to print “H” pattern.
ACCEL-7450 HA Gap Adjust Label Refer to the HA AJUST label located inside the printer behind the printhead carrier. The numbers shown on the label represent the HA Print Gap settings made prior to shipment. Restore the settings shown on the label using the HA PRINT GAP procedures on pages 6~9. The following example shows how to read the table.
ACCEL-7450 Horizontal Print Registration Scope: This adjustment is used to align adjacent lines of print horizontally. Required materials: Cut-sheet paper, or pin feed paper Procedure: 1. Select control panel AUTO print gap, and Cut Sheet modes. Tractor mode and pin feed paper is optional. 2. With the printer power turned OFF, press and hold the ENTER and RLF keys while turning ON the printer power switch. Hold keys until printer initialization (carriage movement) is completed.
ACCEL-7450 Vertical Print Registration Scope: This adjustment is used to align first line of print vertically in relation to the top of form. Required materials: Cut-sheet paper Procedure: Select control panel AUTO print gap, and Cut Sheet modes. Power ON printer. Load a sheet of cut-sheet paper. Press and hold the ENTER key for six seconds to enter “TOP EDGE ADJUST” mode. 5. Press LF or RLF keys to adjust paper up or down. NOTE: LF key moves paper up, 1. 2. 3. 4. print down on the page.
ACCEL-7450 Cut-sheet pinch roller adjustment Scope: This adjustment is used to set front and rear pinch roller assembly tension to prevent Cut-sheet paper skewing. Procedure: 1. With the printer power turned OFF, press and hold the ONLINE key while turning ON the printer power switch. Hold key until printer initialization (carriage movement) is completed. The printer is now in the hidden menu mode. 2. Press HIGH IMPACT and ENTER keys to enter MENU SETUP. 3.
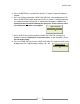
ACCEL-7450 Diagnostic Test Functions Hexadecimal Dump Function The hexadecimal dump function produces an exact printout of the codes received by the printer. Procedure: 1. To enter the hexadecimal dump mode, depress the SPEED button while turning ON the printer's power. 2. When the host sends output to the printer, all codes and data are printed in hexadecimal format. The example as below.
ACCEL-7450 AMT Datasouth Corporation www.amtdatasouth.com Corporate Headquarters 803 Camarillo Springs Rd. Suite D Camarillo, CA 93012 800-215-9192 PH (805) 389-3657 FX Charlotte Operations 5033 Sirona Dr.