OWNER’S MANUAL LED LCD TV / LCD TV Please read this manual carefully before operating your set and retain it for future reference. www.lg.
WARNING / CAUTION WARNING / CAUTION To prevent fire or shock hazards, do not expose this product to rain or moisture. TO REDUCE THE RISK OF ELECTRIC SHOCK DO NOT REMOVE COVER (OR BACK). NO USER SERVICEABLE PARTS INSIDE. REFER TO QUALIFIED SERVICE PERSONNEL.
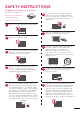
SAFETY INSTRUCTIONS Important Safety Instructions Read these instructions. Keep these instructions. Heed all warnings. Follow all instructions. 1 2 6 Protect the power cord from being walked on or pinched particularly at plugs, convenience receptacles, and the point where they exit from the apparatus. 7 Only use attachments/accessories specified by the manufacturer. 8 Use only with the cart, stand, tripod, bracket, or table specified by the manufacturer, or sold with the apparatus.
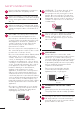
SAFETY INSTRUCTIONS 11 Never touch this apparatus or antenna during a thunder or lighting storm. 12 When mounting a TV on the wall, make sure not to install the TV by the hanging power and signal cables on the back of the TV. 13 When mounting a TV on the wall, make sure not to install the TV by the hanging power and signal cables on the back of the TV.
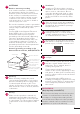
20 ANTENNAS Outdoor antenna grounding If an outdoor antenna is installed, follow the precautions below. An outdoor antenna system should not be located in the vicinity of overhead power lines or other electric light or power circuits, or where it can come in contact with such power lines or circuits as death or serious injury can occur. Be sure the antenna system is grounded so as to provide some protection against voltage surges and built-up static charges.
Contents WARNING / CAUTION.............2 MENU ADJUSTMENTS SAFETY INSTRUCTIONS.........3 On-Screen Menus Selection...................30 Important Safety Instructions....................3 FEATURE OF THIS TV..............7 PREPARATION Accessories.....................................................9 Front Panel Information.............................10 Back Panel Information.............................. 11 Stand Instructions....................................... 13 Desktop Pedestal Installation........
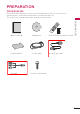
PREPARATION Accessories Ensure that the following accessories are included with your TV. If an accessory is missing, please contact the dealer where you purchased the TV. The accessories included may differ from the images below. Owner’s Manual CD Manual Remote Control, Batteries (AAA) Polishing Cloth Power cable D-sub 15 pin cable AV cable PREPARATION 1.5V 1.
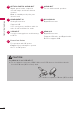
Front Panel Information r Image shown may differ from your TV. PREPARATION POWER button MENU button CHANNEL buttons VOLUME buttons INPUT button Speaker Remote Control Sensor Power/Standby Indicator NOTE a Do not step on the glass stand or subject it to any impact.It may break, causing possible injury from fragments of glass, or the TV may fall. a Do not drag the TV. The floor or the product may be damaged.
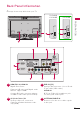
Back Panel Information r Image shown may differ from your TV. 32LD400, 42LD400 47LD500 PREPARATION 10 AC IN 9 9 11 2 / DVI IN 1 3 RGB IN RGB (PC) 4 AV IN AUDIO AUDIO VIDEO ANTENNA/ CABLE IN 5 OPTICAL DIGITAL AUDIO OUT 1 COMPONENT IN 2 DVI AUDIO Y PB PR VIDEO 8 7 AUDIO AUDIO OUT 6 1 HDMI/DVI IN, HDMI IN Digital Connection. Supports HD video and Digital audio. Doesn’t support 480i. Accepts DVI video using an adapter or HDMI to DVI cable (not included).
PREPARATION 5 OPTICAL DIGITAL AUDIO OUT Digital optical audio output for use with amps and home theater systems. Note: In standby mode, this port doesn’t work. 6 AUDIO OUT For use with external speakers. 7 COMPONENT IN Analog Connection. Supports HD. Uses a red, green, and blue cable for video & red and white for audio. 8 DVI AUDIO IN Digital Connection. 9 USB INPUT Used for viewing photos and listening to MP3s. 10 HDMI IN 3 Digital Connection. Supports HD video and Digital audio.
Stand Instructions r Image shown may differ from your TV. INSTALLATION DETACHMENT Carefully place the TV screen side down on a cushioned surface to protect the screen from damage. 1 Carefully place the TV screen side down on a cushioned surface to protect the screen from damage. 2 Assemble the TV and install the 6 screws into the holes as shown. 2 Remove the screws and detach the stand from the TV.
Desktop Pedestal Installation r Image shown may differ from your TV. For proper ventilation, allow a clearance of 10.1 cm (4 inches) on all four sides from the wall. PREPARATION 10.1 cm (4 inches) 10.1 cm (4 inches) 10.1 cm (4 inches) 10.1 cm (4 inches) CAUTION a Ensure adequate ventilation by following the clearance recommendations. a Do not mount near or above any type of heat source.
Antenna or Cable Connection 1. Antenna (Analog or Digital) Wall Antenna Socket or Outdoor Antenna without a Cable Box Connections. For optimum picture quality, adjust antenna direction if needed. For proper ventilation, allow a clearance of 10.1 cm (4 inches) on all four sides from the wall.
EXTERNAL EQUIPMENT SETUP r To prevent the equipment damage, never plug in any power cords until you have finished connecting all equipment. r This part of EXTERNAL EQUIPMENT SETUP mainly use picture of for 32LD400/42LD400. HD Receiver Setup This TV can receive digital over-the-air/digital cable signals without an external digital set-top box. However, if you do receive digital signals from a digital set-top box or other digital external device. EXTERNAL EQUIPMENT SETUP Component Connection 1.
HDMI Connection 1. How to connect 1 2 Connect the digital set-top box to HDMI/DVI IN 1, 2, or 3* jack on the TV. /D DVI IN RGB IN RGB (PC) 1 AV IN A ANTENNA/ CABLE IN OPTICAL DIGITAL T AUDIO OUT COMPONENT IN 2 No separate audio connection is necessary. HDMI supports both audio and video. AUDIO VIDEO AUDIO DVI AUDIO D Y PB VIDEO PR AUDIO AUDIO OUT 1 r Turn on the digital set-top box. (Refer to the owner’s manual for the digital set-top box operation.
DVI to HDMI Connection 1. How to connect 1 2 Connect the digital set-top box to HDMI/DVI IN 1 or 2 jack on the TV. RGB IN /D DVI IN RGB (PC) 1 AV IN A AUDIO VIDEO AUDIO ANTENNA/ CABLE IN OPTICAL DIGITAL T AUDIO OUT COMPONENT IN 2 Connect the digital set-top box audio output to the DVI AUDIO jack on the TV. Y D AUDIO DVI AUDIO PB VIDEO PR AUDIO AUDIO OUT 1 2 EXTERNAL EQUIPMENT SETUP 2. How to use r Turn on the digital set-top box.
Composite (RCA) Connection 1. How to connect 1 Connect the AUDIO/VIDEO jacks between TV and DVD. Match the jack colors (Video = yellow, Audio Left = white, and Audio Right = red) RGB IN /D DVI IN RGB (PC) 1 ANTENNA/ CABLE IN AV IN A AUDIO VIDEO AUDIO OPTICAL DIGITAL T AUDIO OUT COMPONENT IN 2 DVI AUDIO D Y PB VIDEO PR AUDIO AUDIO OUT 1 2. How to use VIDEO L R AUDIO HDMI Connection 1. How to connect 1 2 Connect the digital set-top box to HDMI/DVI IN 1, 2, or 3* jack on the TV.
VCR Setup Antenna Connection 1. How to connect 1 2 Connect the RF antenna out socket of the VCR to the ANTENNA/CABLE IN socket on the TV. 1 ANTENNA/ CABLE IN ANT OUT S-VIDEO ANT IN OUTPUT SWITCH EXTERNAL EQUIPMENT SETUP Connect the antenna cable to the RF antenna in socket of the VCR. VIDEO L AUDIO 2 2. How to use r Set VCR output switch to 3 or 4 and then tune TV to the same channel number. r Insert a video tape into the VCR and press PLAY on the VCR (Refer to the VCR owner’s manual).
Other A/V Source Setup 1. How to connect 1 Connect the AUDIO/VIDEO jacks between TV and external equipment. Match the jack colors. (Video = yellow, Audio Left = white, and Audio Right = red) /D DVI IN 1 RGB IN RGB (PC) AV IN A AUDIO VIDEO AUDIO ANTENNA/ CABLE IN OPTICAL DIGITAL T AUDIO OUT COMPONENT IN 2 DVI AUDIO D Y PB VIDEO PR 2. How to use AUDIO AUDIO OUT 1 VIDEO L R AUDIO Video Game Set Camcorder USB Connection 1.
Audio Out Connection Send the TV’s audio to external audio equipment via the Audio Output port. If you want to enjoy digital broadcasting through 5.1-channel speakers, connect the OPTICAL DIGITAL AUDIO OUT terminal on the back of TV to a Home Theater (or amp). 1. How to connect 1 Connect one end of the optical cable to the TV port of OPTICAL DIGITAL AUDIO OUT. EXTERNAL EQUIPMENT SETUP 2 Connect the other end of the optical cable to the digital audio input on the audio equipment.
PC Setup This TV provides Plug and Play capability, meaning that a PC adjusts automatically to the TV’s settings. VGA (D-Sub 15 Pin) Connection 1. How to connect Connect the VGA output of the PC to the RGB IN (PC) jack on the TV. 2 Connect PC audio output to the RGB IN (AUDIO) jack on the TV. RGB IN /D DVI IN RGB (PC) 1 AV IN A AUDIO VIDEO AUDIO ANTENNA/ CABLE IN OPTICAL DIGITAL T AUDIO OUT COMPONENT IN 2 Y DVI AUDIO D 2.
NOTE EXTERNAL EQUIPMENT SETUP 24 a To get the the best picture quality, adjust the PC graphics card to 1360 x 768 or 1920 x 1080. a Depending on the graphics card, DOS mode may not work if a HDMI to DVI Cable is in use. a In PC mode, there may be noise associated with the resolution, vertical pattern, contrast or brightness.
WATCHING TV/ CHANNEL CONTROL Remote Control Functions When using the remote control, aim it at the remote control sensor on the TV. The remote control may differ from the images below. POWER TV 1 2 INPUT PICTURE SOUND SAP RATIO 2 3 4 5 6 7 8 9 - 0 FLASHBK FAV 3 VOL CC CH MUTE Q.MENU 4 MENU RETURN ENTER MKJ36998105 Group No. Item 1 2 Description TV Returns to the last TV channel. POWER Turns the TV on from standby or off to standby. INPUT Rotates through inputs.
Group No. Item 3 WATCHING TV / CHANNEL CONTROL 26 4 Description CHANNEL (UP/DOWN) Changes the channel. RETURN Allows the user to move return one step in an interactive application or other user interaction function. FAV Scroll through the programmed Favorite channels. CC Switches the caption on or off. MUTE Switches the sound on or off. MENU Displays the main menu or clears all on-screen displays and return to TV viewing. VOLUME (UP/DOWN) Adjusts the volume. Q.
Turning on the TV 1 First, connect power cord correctly. At this moment, the TV switches to standby mode. a In standby mode to turn TV on, press the POWER button. 2 Select the viewing source by using the INPUT button on the remote control. 3 When finished using the TV, press press the POWER button. on the remote control. The TV reverts to standby mode. NOTE a If you intend to be away on vacation, disconnect the power plug from the wall power outlet.
Initial Setting This Function guides the user to easily set the essential items for viewing the TV for the first time when purchasing the TV. It will be displayed on the screen when turning the TV on for the first time. It can also be activated from the user menus. r Default selection is “Home”. We recommend setting the TV to “Home” mode for the best picture in your home environment. r “In Store” Mode is only intended for use in retail environments.
3. Option Setting Step3. Option Setting 1.OSD Language Setting English 2.Audio Language Setting English Enter RETURN Exit 1 Select OSD Language Setting option. 2 Select Audio Language Setting option. ENTER 1 ENTER Press the ENTER button. 4. Auto Tuning Step4. Auto Tuning Auto Tuning can change channel map. Do you want to start Auto Tuning? Enter CHANNEL Select Yes to begin auto tuning.
MENU ADJUSTMENTS On-Screen Menus Selection Your TV’s OSD (On Screen Display) may differ slightly from that shown in this manual. 1 MENU 2 ENTER Display each menu. 3 ENTER Accept the current selection. Select a menu item. 4 RETURN Return to TV viewing.
Input Move USB Enter INPUT USB TV Move Enter PHOTO LIST MUSIC LIST AV Component RPG-PC HDMI1 HDMI2 * HDMI 3: For 47LD500 Quick Menu Your TV’s OSD (On Screen Display) may differ slightly from what is shown in this manual. Q.Menu (Quick Menu) is a menu of features which users might use frequently. Q.Menu 1 Aspect Ratio Full 5 Picture Mode Standard Sound Mode Standard Caption M CH 2 Select a menu item. 3 Choose the setting.
Channel Menu The Channel menu offers options to setup of your television to receive TV channels. CHANNEL Move CHANNEL Enter Auto Tuning Auto Tuning Manual Tuning Manual Tuning Channel Edit Channel Edit Move Enter Press 'Yes' button to begin auto tuning. Yes No 1 2 MENU ENTER ENTER Display CHANNEL menu. 3 Select a menu item. 4 ENTER RETURN Set the setting. Return to TV viewing.
Picture Menu The Picture menu offers options to enhance and refine the picture displayed on your TV based on ambient room light and personal preferences.
a Sharpness: Adjusts the level of crispness in the edges between the light and dark areas of the picture. The lower the level, the softer the image. a Color: Adjusts intensity of all colors. a Tint: Adjusts the balance between red and green levels. a Advanced Control: Allows you to adjust some of the advanced features of your LG display such as Color Temperature, Fresh Contrast, Fresh Color, Noise Reduction, Gamma, Black Level, and Real Cinema settings. a Reset: Returns to factory default settings.
a Digital Audio Out r Sets the digital audio out setting. a Analog Audio Out r Sets the analog audio out setting. Time Menu The Time menu offers options to adjust the time setting, set the TV turn/off time, sleep timer, and auto sleep.
a Sleep Timer r Turns the TV off at the preset time. a Auto Sleep r If sets “Auto Sleep” to “On”, the TV will automatically turn off in case of: a TV without signal: You do not press any remote control / TV buttons within 10 minutes. a TV with signal: You do not press any remote control / TV buttons within 2 hours. Option Menu The Option menu offers options to set the TV operating environment.
r If this function is set to On: a A password is required to gain access to this menu. a The TV is set up with the initial password “0-0-0-0”. a Caption r Captions are provided to help the hearing impaired watch TV. Select a caption mode for displaying captioning information if provided on a program. Analog caption displays information at any position on the screen and is usually the program’s dialog.
a Lock System r Enables or disables the blocking scheme you set up previously. a Set Password r Change the password by inputting a new password twice. a The TV is set up with the initial password “0-0-0-0”. a Block Channel r Blocks any channels that you do not want to watch or that you do not want your children to watch. MENU ADJUSTMENTS a Movie Rating r Blocks movies according to the movie ratings limits specified, so children cannot view certain movies.
a Sex-sexual situations (applies to TV-PG, TV-14, TV-MA). a Violence (applies to TV-PG, TV-14, TV-MA). a Downloadable Rating r This function is available only for digital channels. r This function operates only when TV has received Region5 Rating data. a Input Block r Enables you to block an input. Input Menu The Input menu offers options to select the desired input source.
USB Menu The USB menu will open automatically when you insert a USB drive. USB can also be accessed by choosing USB in the user menu. USB USB Enter Move Move PHOTO LIST PHOTO LIST MUSIC LIST MUSIC LIST 1 Connect the USB device to the USB IN jack on the side of TV. 2 MENU . ENTER 3 MENU ADJUSTMENTS Display USB menu. ENTER 4 RETURN Enter Select PHOTO LIST or MUSIC LIST. Return to TV viewing. a PHOTO LIST Supported photo file: *.
/ r Press the MENU button to more options: Photo a Slideshow Mode: Selects the Slideshow Mode slideshow mode. Slideshow With Music Repeat a Slideshow With Music: Selects the Sort By slideshow mode with music. Duration Slideshow Effect a Music file list: Selects the audio Thumbnail Size file that will be playback during the Info slideshow. a Repeat: Sets the repeat mode to on or off. a Sort By: Selects the file sorting type. a Duration: Sets the time interval of the slide show.
APPENDIX Troubleshooting Abnormal Operation The remote control doesn’t work a Check to see if there is any object between the product and the remote control causing obstruction. Ensure you are pointing the remote control directly at the TV. a Ensure that the batteries are installed with correct polarity (+ to +, - to -). a Ensure that the correct remote operating mode is set: TV, VCR etc. a Install new batteries. TV turns off suddenly a Is the sleep timer set? a Check the power control settings.
Video Problems Lines or streaks in pictures a Check antenna (Change the direction of the antenna). No picture when connecting HDMI a If an HDMI cable doesn’t support High Speed HDMI, it can cause flickers or no screen display. In this case use the latest cables that support High Speed HDMI. Audio Problems No output from a Adjust Balance in menu option.
Maintenance Early malfunctions can be prevented. Careful and regular cleaning can extend the amount of time you can enjoy your new TV. Caution: Be sure to turn the power off and unplug the power cord before you begin any cleaning. Cleaning the Screen 1 Here’s a great way to keep the dust off your screen for a while. Wet a soft cloth in a mixture of lukewarm water and a little fabric softener or dish washing detergent. Wring the cloth until it’s almost dry, and then use it to wipe the screen.
Product Specifications Models 32LD400 42LD400 Resolution 47LD500 1920 x 1080 Brightness (cd/m2) Contrast Ratio 500 1400:1 1450:1 1450:1 Number of Colors 8 bit, 16.7M 8 bit, 16.7M 1.06B colors @ 10 bit Color Depth (D) Actual Diagonal Viewable Size (in) 31.55 42.02 46.
The model and serial number of the TV is located on the back and one side of the TV. Record it below should you ever need service.