
Installation Guide

Amvic Insulated Radiant PEX panel Installation Guide
Before starting your installation:
• You will need to determine the
number of Insulated Radiant PEX
Panels you require, while each panel
measures 29.1/4” x 491/4” the
usable area of the panels are 24” x
48” or 8 sq. ft. per panel. Measure
the total square footage of the
installation area and divide this by 8
to arrive at the number of PEX
panels needed.
• The Amvic Insulated Radiant PEX panel will accommodate 3/8”, ½”, 5/8”, ¾” and 1”
PEX tubing.
• The Amvic radiant PEX panel is designed to accommodate a 3” on center pattern,
your design layout will need to use the same 3” on center and multiples for you
project.
• Ensure that your sub base is smooth, compacted and at the proper grade.
• Check your local building code to see if you require a vapour barrier if so this will
need to be installed prior to starting your project.
Installation Steps:
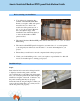
Step1:
Start in the far left corner and working from left
to right lay down the first panel so that the
exposed interlock is to the right side and forward,
note; you can lay the panels down either length or
width wise along the outer wall. Continue to lay
the panels ensuring that they are properly
interlocked and are snug and aligned. When you
come to the end of the first row you may need to
cut the last panel to fit properly.
1