Instruction Manual APWeb Version 1.6.
Contents Contents Initial APWeb Setup by Network Admin .............................................................1 Overview ................................................................................................................................. 1 Opening the APWeb Server .................................................................................................... 2 Overview of the Admin Home Page ........................................................................................
Contents ii APWeb Instruction Manual
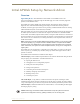
Initial APWeb Setup by Network Admin Initial APWeb Setup by Network Admin Overview Applicability Notice: The information in this manual covers APWeb Version 1.6.0. (The version number is in the upper right on the Home page.) For a list of currently supported products, see the Release Notes. The APWeb server delivers HTML pages and Java applets, which allow for remote control and diagnostics of an AMX AutoPatch Routing System using PC-based Internet browsing software.
Initial APWeb Setup by Network Admin System Requirements PC with Windows XP Professional®, Windows 2000®, or Windows NT® Web browser (e.g., Internet Explorer or Firefox) JRE v1.4.x or greater (Java Plug-in for the XBar Controller, see page 17) Design Requirement AMX highly recommends deploying only one APWeb server per system. This is a design requirement: any configuration violating this recommendation may not be backed by the technical support agreement.
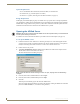
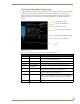
Initial APWeb Setup by Network Admin Overview of the Admin Home Page APWeb’s Admin Home page has links for complete site access, while the links on the user’s Home page are limited to control access. The Admin Home page displays information on the system’s virtual matrices (VMs) and the number of macros currently defined in APWeb. It also displays information regarding the discovery of hardware devices and channel names during bootup if these features are enabled.
Initial APWeb Setup by Network Admin Setting a Static IP Address The current (default) IP address is displayed on the APWeb Configuration page under the section for Current APWeb Settings. A field is provided on the APWeb Administration page under Configure APWeb Settings for entering a static IP address.
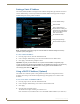
Initial APWeb Setup by Network Admin Setting Admin & User Account Logins For security purposes, we recommend that the Network Administrator set the account profiles as part of the initial setup. APWeb uses HTTP basic access authentication with multi-tier access (i.e., the Network Administrator and the user accounts each have their own user name and password). Resetting the account profiles (see page 16) requires physical access to the system.
Initial APWeb Setup by Network Admin 4. Enter the new password in the New Password field, and confirm by reentering it in the next field. 5. Click Submit. 6. Under Change Administration Account Login, enter super in both the Admin Username and Admin Password fields, and then enter the new information in the applicable fields. 7. Click Submit. Executing a Test Switch with the XBar We recommend executing a test switch with the XBar Controller (see below) or with BCS commands (see page 7).
Initial APWeb Setup by Network Admin To disconnect the test switch with the XBar: 1. Click the red crosspoint. The red crosspoint image turns blue as the test switch is disconnected. Executing a Test Switch with BCS We recommend routing a test switch with BCS (Basic Control Structure) commands on the Diagnostics page (see below) or with the XBar Controller (see page 6).
Initial APWeb Setup by Network Admin Customizing the Site The APWeb site can be customized in several different ways. This section covers customizing the site name, access to product services, and bootup operations. Customizing the control options is covered in the next section (see page 10). Customizing the Site Name The site name for the APWeb server can be customized at the APWeb Configuration page.
Initial APWeb Setup by Network Admin XNNet Tunnel (not supported on all systems) – check this option to be able to open a Tunneling Access Point (TAP) for AMX AutoPatch’s proprietary XNNet configuration protocol. With this service turned on, XNConnect configuration software can be used to discover and configure the attached routing system over TCP/IP. When site security is turned on, the Admin user name and password are required to log into this service.
Initial APWeb Setup by Network Admin Channel names are defined in XNConnect and will appear truncated in the XBar. To display the full 23-character channel names in the XBar, see below. Discover Hardware Devices: Check this option for APWeb to query the attached system for its hardware devices. The default setting for this option is off. Since hardware information is not stored in memory, it is lost when APWeb is shut down.
Initial APWeb Setup by Network Admin You also have the option of displaying channel numbers instead of channel names. To remove customized channel names in the XBar: 1. From any page in the site, click the Configuration link. 2. Under Bootup Operations, unselect Discover Channel Names. 3. Click Apply, and reboot when prompted to do so. Only the channel numbers will display in the XBar.
Initial APWeb Setup by Network Admin Creating/Editing Macros A macro is a sequence of BCS (Basic Control Structure) control commands that are executed simultaneously. Up to 50 macros can be created on the Create/Edit Macro page and executed from the Execute Macro page. (A macro can contain up to 63 individual command characters). Note: If you are not familiar with BCS (Basic Control Structure) commands, see the “BCS Protocol Instruction Manual” on the AMX AutoPatch CD or at www.amx.com.
Initial APWeb Setup by Network Admin To create a macro: 1. From any page in the site, click the Create Macro link. 2. Enter the BCS commands (63 character maximum) in the BCS String field. 3. Enter a unique name up to 23 characters for the macro in the Macro Name field. 4. Click Create. The macro is added to the list on the Execute Macro page. Tip: A macro can be created to disconnect the switches in an existing macro. The contents of a macro can be redefined at the Create/Edit Macro page.
Initial APWeb Setup by Network Admin When entering the number of the new virtual matrix (VM), apply the following rules: VM Numbering Rules Must be a unique VM number (cannot be a duplicate). Must match the level numbers on the routing system, for example: All (audio-follow-video) virtual matrix (VM) = 0 Video virtual matrix (VM) = 1 Audio virtual matrix (VM) = 2 Must match the level numbers on heritage systems for control purposes.
Initial APWeb Setup by Network Admin Handling Security Issues APWeb’s system security limits access to the site. The security setup is explained on page 5. We recommend that the following security measures be followed: Leave system security turned on (the default setting). Place the APWeb server site inside your network firewall. Set the account profiles as part of the initial setup (see page 5). Deploy APWeb in a secure LAN environment.
Initial APWeb Setup by Network Admin To reset the user name and password to their default values: 1. Flip the Service switch up or to the right to place it in Service mode (FIG. 8). FIG. 8 Service switch in Service mode 2. Log on to the Admin Home page, using the Admin user name and password (default: super and super). 3. From any page in the site, click the Configuration link. 4. On the APWeb Configuration page, click Reboot APWeb. 5.
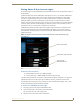
Initial APWeb Setup by Network Admin Executing & Disconnecting Switches APWeb’s two control points for executing and disconnecting switches on an AMX AutoPatch Routing System are the crosspoints on the XBar Controller (see below) and the macros on the Execute Macro page (see page 20). Executing & Disconnecting Switches on the XBar The XBar Controller is a graphic interface control panel that executes switches on an AMX AutoPatch Routing System.
Initial APWeb Setup by Network Admin To execute or disconnect switches: 1. From any page in the site, click the Controller link. The XBar launches. 2. Optional (to change the virtual matrix) – Click the VM title block in the upper left corner. The VM Selection Pad dialog box opens. From the VM list, select the new VM. Close the VM Selection Pad. Select VM (virtual matrix) from list 3. Click a blue (inactive) crosspoint to execute a switch. The blue crosspoint image turns red as the switch is routed.
Initial APWeb Setup by Network Admin 3. Right click on the output channel (e.g., O_Ch:0004) needing adjustment. The Audio Control dialog box opens. 4. Move the slider to adjust the volume (up increases; down decreases) or click the Mute button to mute or unmute. 5. Close the Audio Control dialog box. 6. Repeat Steps 3 through 5 as necessary for additional outputs.
Initial APWeb Setup by Network Admin 4. Right click on the input channel (e.g., I_Ch:0001) that was just routed. The Audio Control dialog box opens. 5. Move the slider to adjust the input gain (up increases; down decreases). 6. Close the Audio Control dialog box. 7. Repeat Steps 3 through 6 as necessary for additional sources (inputs) that will be routed to the same destination (output).
Initial APWeb Setup by Network Admin ********************************************************** APWeb Connection Information Worksheet This worksheet is provided for your convenience. Print or photocopy as many copies of this form as necessary. Login Names (Required) Login Names (user name) and Passwords for administrative and user access are required. (The user names and passwords are case sensitive.) Addresses (Must Be Supported) Fixed or Static IP Address: ______ . ______ . ______ .
Using APWeb Using APWeb This chapter starts with four easy steps for connecting to APWeb after the initial setup by the Network Administrator. It explains how to use APWeb’s two control options for executing and disconnecting switches: the XBar Controller (a crosspoint interface) and Macros (which are programmed by the Network Administrator). Connecting to APWeb To connect to the APWeb server: 22 1. Launch a browser (e.g., Internet Explorer or Firefox) on your PC. 2. Type http://192.168.0.
Using APWeb Home Page The Home page for APWeb contains information on the system’s virtual matrices (VMs) and the number of macros currently defined in APWeb. The site name can be customized to uniquely identify your system (contact your Network Administrator). Customizable site name Click for AMX Website Current virtual matrices Number of macros defined in APWeb Links FIG.
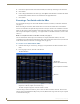
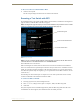
Using APWeb Navigating the XBar Controller Output channels VM title block Input channels Crossbar field with blue & red crosspoints Cursor shows crosspoint I/O pair numbers Status bar The crosspoint images in the XBar’s crossbar field represent the intersections of the input channels and the output channels.
Using APWeb 5. Click a blue (inactive) crosspoint to execute a switch. The blue crosspoint image turns red as the switch is routed. Or Click a red (active) crosspoint to disconnect a switch. The red crosspoint image turns blue as the switch is disconnected. Tip: To select or unselect consecutive crosspoints, hold down the Control key and move the mouse across the desired crosspoints (do not hold down any of the mouse buttons).
Using APWeb Updating Status on the XBar The XBar can be updated from the VM Selection Pad to show changes in system status. This can be helpful when the XBar is used simultaneously by multiple users or when other control options (such as control panels or external serial controllers) are also being used. To update system status when using multiple control points: 1. Click the VM title block in the upper left corner of the XBar. The VM Selection Pad dialog box opens. 2. Click Update Status.
Additional APWeb Info for Network Admin Additional APWeb Info for Network Admin This chapter contains information on embedding the XBar applet (see below) and on changing the proxy setting (see page 28). Embedding the XBar Applet The XBar applet can be embedded in a custom website by using the applet tag shown below. Make any of the following adjustments to the code to fit your particular system’s requirements.
Additional APWeb Info for Network Admin Changing the Proxy Setting If the Enter Network Password dialog box does not open during setup, try the following APWeb troubleshooting strategies: Check all power, signal, and link connections. Check the Link indicator LED on the TCP/IP connection on the APWeb module (or expansion board). If the indicator is not illuminated, check the cable type.
Additional APWeb Info for Network Admin 2. Select the Connections tab. 3. Click LAN Settings. The Local Area Network (LAN) Settings dialog box opens. If the Proxy server box is checked, go to Step 4. If the Proxy server box is not checked, check it before going to Step 4.
Additional APWeb Info for Network Admin 4. Click Advanced. The Proxy Settings dialog box opens. Enter APWeb IP address 30 5. In the Exceptions field, enter the appropriate APWeb IP address (the default is 192.168.0.251). 6. Click OK to exit each of the dialog boxes used in these steps.
AMX. All rights reserved. AMX and the AMX logo are registered trademarks of AMX. AMX reserves the right to alter specifications without notice at any time. ©2009 2/09 It’s Your World - Take Control™ 3000 RESEARCH DRIVE, RICHARDSON, TX 75082 USA • 800.222.0193 • 469.624.8000 • 469-624-7153 fax • 800.932.6993 technical support • www.amx.