
Instruction manual


Appendix B – Managing Configuration Files
184
Instruction Manual – Enova DGX 8/16/32 Digital Media Switchers
Loading an .xcl Configuration File
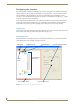
Once modifications have been made to the .xcl configuration file, the new file must be loaded onto the
system’s CPU for the changes to be implemented.
The two basic options for loading an .xcl configuration file are:
Load the entire file using the “Configure All” option (see Caution below).
Load part of the file using one of the “Configure Special” options.
To determine which configuration option to use, see “Configure Menu Commands” in the Help file.
When loading any part of an .xcl configuration file, the switcher must not be actively switching. You may
want to lock the Control Panel (see page 122) and disconnect any external controllers to make sure that no
switches are executed during the loading of the file.
Caution: Using the “Configure All” option or the “Configure All Virtual Matrices” option will erase any
global presets that have already been defined for the system (for information on defining and executing
global presets, see the “Instruction Manual – BCS Basic Control Structure Protocol”).
To load an .xcl configuration file to the enclosure’s CPU:
Important: The switcher must not be actively switching when loading any part of or all of the
.xcl configuration file.
1. Recommended – Lock the Control Panel and/or disconnect any external controllers to make sure that
no switches are executed during the loading of the file.
2. If you have not already done so – From the File menu, select Save As and save an .xcl file with a new
name to the PC. (We strongly recommend making a duplicate copy every time the file is modified.)
3. Connect the Enova DGX enclosure to the PC (see page 52).
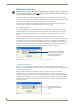
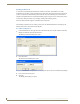
4. In XNConnect, open the Communication menu and select Serial Port.
5. Open the Communication menu again, select Change Comm Settings.
6. Check the settings for the selected port and adjust if necessary (the default is COM 1 with a baud rate
of 9600).
7. Optional – Click Test to verify that communication has been established with the Enova DGX
Switcher. Click OK.
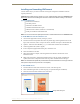
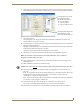
8. From the Configure menu, select the appropriate configuration option. For an explanation of Configure
menu options, see the Help file. (The Configure All option will not load password information. For
instructions on loading password information, see page 181.)
The system automatically reboots (applies to non-hardware configuration options only; for hardware, select
the appropriate configuration option and then select Configure > Reboot All Devices).
9. If local presets were created and loaded to the CPU – Reload the .xcl file from the CPU to the Control
Panel according to the directions on page 126.