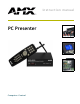
instruction manual PC Presenter Computer Control
AMX Limited Warranty and Disclaimer AMX Corporation warrants its products to be free of defects in material and workmanship under normal use for three (3) years from the date of purchase from AMX Corporation, with the following exceptions: • Electroluminescent and LCD Control Panels are warranted for three (3) years, except for the display and touch overlay components that are warranted for a period of one (1) year.
Table of Contents Table of Contents Introduction ...............................................................................................................1 TXC-MS(L) Transmitter ..................................................................................................... 2 TXC-MS(L) controls ................................................................................................................. 3 TXC-MS(L) mouse controls................................................................
Table of Contents Programming Transmitter Pushbuttons .......................................................................... 21 Exiting program mode ............................................................................................................ 22 Programming the PC Presenter for Use With an Axcess Central Controller .................. 23 Creating a buffer for keyboard input....................................................................................... 23 Send_Commands ...........
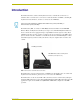
Introduction Introduction The PC Presenter PC is a wireless PC keyboard and mouse controller that can be used as a standalone unit or as an bus device connected to a Central Controller via AXlink; controlling PC keyboard and mouse functions, and devices connected to the AXlink bus. The PC Presenter transmitter is available with a built-in laser pointer (TXC-MSL), or without the laser pointer (TXC-MS). The PC Presenter (FIG.
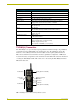
Introduction TXC-MS(L) Specifications Dimensions (HWD) 8.50" x 2.00" x 1.56" (21.59 cm x 5.08 cm x 3.96 cm) Power 3.0 VDC (two AA alkaline batteries - supplied) Enclosure Molded black matte plastic DIP switch 8-position sets IR or RF mode and radio mode Pushbuttons Up to 26 pushbuttons (with custom overlay) Mouse controls • 16-position mouse disc (two speeds), left and right mouse buttons • Trigger switch operates left mouse button on TXC-MS Range • RF: 1-way @ 200 ft (60.
Introduction TXC-MS(L) controls The TXC-MS(L) is available in configurations with up to 26 pushbuttons and PC mouse controls (mouse disc and left and right mouse buttons). The TXC-MS(L) includes a custom engraved overlay with text as desired by the customer. TXC-MS(L) mouse controls The TXC-MS(L) mouse disc affords you 360° control of cursor direction and speed. The two pushbuttons located on either side of the mouse disc replace those found on any standard Microsoft® compatible mouse.
Introduction FIG. 4 Laser Radiation warning AXR-MSE Wireless Mouse and Keyboard Controller The AXR-MSE is the receiver/processor component of the PC Presenter. The AXR-MSE receives RF or IR signals from the TXC-MS(L) transmitter using the attached RF receiving antenna or an external IR sensor. The AXR-MSE connects between the PC keyboard and mouse cables, and the keyboard and mouse ports on the PC CPU.
Introduction AXR-MSE Specifications (Cont.) Rear Panel TNC RF antenna Accepts the flexible RF receiving antenna (up to 6 feet of RG-58 coax cable for remote antenna set up can also be used). KEYBOARD IN/OUT Two PS/2 style keyboard connectors are used to connect the AXR-MSE to the PC keyboard and CPU. The top connector, labeled "TO PC" connects the AXR-MSE to the CPU with a PS/2 style cable (included). Plug the PC keyboard into the bottom connector.
Introduction 6 PC Presenter
Pre-Installation Pre-Installation Setting the TXC-MS(L) transmitter DIP switch The TXC-MS(L) transmitter transmits IR or RF signals, according to how you set position 1 on the 8-position DIP switch. The DIP switch is located under the battery cover, on the back of the TXC-MS(L), as shown in FIG. 6. To open the battery compartment, slide the cover down and remove. 8-position DIP switch Battery compartment FIG. 6 Location of 8-position DIP switch and battery compartment locations FIG.
Pre-Installation Radio Code Settings Each pushbutton on the TXC-MS(L) transmitter represents an Axcess channel number. All of the pushbuttons on the transmitter represent a group of channel numbers. This grouping is known as a radio code. Use the transmitter DIP switch to assign a unique radio code to this transmitter. Radio codes are important in applications that use more than one transmitter, because each transmitter must be assigned its own unique radio code.
Pre-Installation 1 8 15 2 9 16 3 10 17 25 24 27 30 29 28 26 4 11 18 5 12 19 6 13 20 7 14 21 22 23 FIG. 9 TXC-MS(L) pushbutton configuration Setting the Device DIP switch The eight-position Device DIP switch located on the front panel of the AXR-MSE as shown in FIG. 10 sets the AXlink device number for the AXR-MSE. Each device on the AXlink bus must have a unique AXlink device number. AXlink DEVICE MOUSE KEYBOARD DATA ON Device DIP switch FIG.
Pre-Installation The device can be 1 of the 255 devices in an Axcess, Axcent, Axcent2, Axcent3, AXB-MPE, or AXB-EM232 system. The device number must match the device assignment in the Axcess program. AMX assigns device numbers into the following three segments: Cards - 1 through 95 Boxes - 96 through 127 Panels - 128 through 255 The device number takes effect only on power-up. Set the device number by setting the device DIP switch.
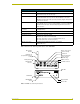
Pre-Installation SW3 SW2 Top front view FIG. 11 AXR-MSE internal circuit board showing the location of the SW2 and SW3 slide switches FIG. 12 shows a close-up view of the SW2 and SW3 internal slide switches. SW3 PS2 mouse SW2 Serial mouse NO PC PC FIG. 12 Close-up view of SW2 and SW3 internal slide switches 1. Discharge the static electricity from your body and the screwdriver. 2. Unplug all connectors from the rear panel of the AXR-MSE. 3.
Pre-Installation For keyboard use with a PC, slide the SW2 switch to the "PC" position as shown in FIG. 14. SW2 NO PC PC FIG. 14 Switch setting for keyboard use with PC connected Setting Mouse Mode The PC Presenter supports PS2 mice by default. If you prefer to use a serial mouse you must set internal slide switch SW3 for this mode (FIG. 15). Serial mice typically have a 9 pin D-sub connector. An adapter will be required to plug it into the mouse connector on the AXR-MSE.
Pre-Installation Wiring guidelines The AXR-MSE requires 65 mA @ 12 VDC power to operate properly. The Central Controller supplies power via the AXlink cable. The maximum wiring distance between the Central Controller and AXR-MSE is determined by power consumption supplied voltage, and the wire gauge used for the cable. The following wiring guidelines table lists wire sizes and the maximum lengths allowable between the AXR-MSE and the Central Controller.
Pre-Installation 14 PC Presenter
Installing the PC Presenter Installing the PC Presenter This section describes how to connect the AXR-MSE to the PC and to the Central Controller. Before installation, check to verify that the Device DIP switch on the front panel of the AXR-MSE is set correctly. Setting the Device DIP switch is described in the previous section (Setting the TXCMS(L) transmitter DIP switch section on page 7).
Installing the PC Presenter G N D G N D R I N E x t e r n a l I R S e n s oI O u t p u t o n A X R M S E A U X R X S M + o r O U T I M + I R X D X O U T A U P W R + 1 2 V FIG. 17 IRX-SM+ or IRX-DM+ external IR sensor wiring diagram Installing the PC Presenter for AXlink Operation To use the PC Presenter as an integrated AXlink device, connect the AXR-MSE to the PC keyboard/mouse and a Central Controller.
Installing the PC Presenter Make sure to connect only the GND wire on the AXlink connector when using a 12 VDC power supply. Do not connect the PWR wire to the AXlink connector's PWR opening. LED indicators When the AXR-MSE is powered up, the front panel LEDs light to indicate the status of the unit as described below: All LED's lighting sequentially from left to right indicates that the AXR-MSE firmware is loaded and running.
Installing the PC Presenter 18 PC Presenter
Programming the PC Presenter Programming the PC Presenter This section describes how to program the PC Presenter. Before programming, make sure the PC Presenter is properly installed: Verify that the PC keyboard and mouse are connected to the AXR-MSE, and the AXR-MSE is connected to the keyboard and mouse ports on the CPU. Device DIP switch settings (on the front panel of the AXR-MSE) match the device number assigned to it in the Axcess program.
Programming the PC Presenter The characters "C:\>rem" before the blinking cursor indicates that the PC Presenter is in program mode, waiting for a command key. 4. Press a command key. For a listing of available commands, type the character "H".
Programming the PC Presenter C:\>rem Code : 128 C:\>rem Code : 129 C:\>rem Code : 130 Size : 24 bytes Size : 24 bytes Size : 24 bytes PRGM EX. 7 M - Display available memory Press "M" at the program/command prompt to display the amount of memory available in the PC Presenter: C:\>rem Memory available : 60436 bytes PRGM EX. 8 T - Long form list of stored keycodes Press "T" at the program/command prompt to display a listing of the keycodes currently saved in PC Presenter memory, in long form.
Programming the PC Presenter All PC Presenter programming is retained in the PC Presenter's non-volatile memory. It is not lost during power down or shipping. 4. Press the first transmitter button to be programmed. When the button is pressed, the button's code number and an asterisk (*) appear at the DOS prompt. The following example shows that the transmitter button (code number 128) was pressed. C:\>rem (128)* PRGM EX.
Programming the PC Presenter Programmed keystrokes are not saved in permanent memory until program mode is exited. Programming the PC Presenter for Use With an Axcess Central Controller The PC Presenter can be connected to a Central Controller via AXlink, to control devices on the AXlink bus. The following sub-sections describe the Axcess commands for the PC Presenter.
Programming the PC Presenter Send_Commands (Cont.) Command Description 'REPEATOFF' Disables macro repeat when holding transmitter button. 'REPEATON' Enables macro repeat when holding transmitter button (default). 'RMACRO-' Records strings in keystroke macro memory under channel code n. = ASCII number 1 to 255 = ASCII string 'RFOFF' Disables RF reception. 'RFON' Enables RF reception (default). 'TXID' Sets the transmitter ID, for mouse disc only.
Programming the PC Presenter Send_Strings (Cont.
Programming the PC Presenter Mouse Control Channels (Cont.
Using the OLDesign Engraving Program Using the OLDesign Engraving Program The AMX OLDesign software program is a Windows-based design tool for creating panel overlays, pushbutton names, and pushbutton operation descriptions. The operation descriptions are used when the Axcess operating software is programmed. OLDesign also contains an online help system that describes producing custom overlay designs and pushbutton descriptions, and then storing them on your computer. FIG.
Using the OLDesign Engraving Program 28 PC Presenter
TXC-MS(L) Battery Replacement TXC-MS(L) Battery Replacement The TXC-MS(L) transmitter uses two AA batteries. Under normal conditions, battery life will exceed one year. Use alkaline batteries for long battery life and optimum performance. Replacing the batteries The battery compartment of the TXC-MS(L) is located on the back of the transmitter (FIG. 21). Slide the battery compartment cover off, and replace the two AA batteries. TXC-MS(L) bottom view AA batteries Battery compartment cover FIG.
brussels • dallas • los angeles • mexico city • philadelphia • shanghai • singapore • tampa • toronto* • york 3000 research drive, richardson, TX 75082 USA • 469.624.8000 • 800.222.0193 • fax 469.624.7153 • technical support 800.932.6993 046-004-1901 4/05 ©2005 AMX Corporation. All rights reserved. AMX, the AMX logo, the building icon, the home icon, and the light bulb icon are all trademarks of AMX Corporation. AMX reserves the right to alter specifications without notice at any time.