
Specifications


Installation
25
MXD/T-1000 10.1" Modero® X Series Touch Panels
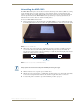
Uninstalling the MXD-1000
The MXD-1000 is held in place to the back box via latch hooks and clips on the back box (FIG. 19), securing
it to the mounting surface. In certain circumstances, such as firmware updates or other maintenance that
requires accessing the device’s USB or Micro-USB ports, the device may need to be removed from the back
box. The clips that lock down the MXD-1000’s bottom edge (Landscape) or right edge (Portrait) may be
unlatched in order to remove the device from the mounting surface.
To remove an MXD-1000 from its back box:
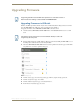
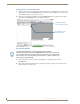
1. The bottom (Landscape) or right side (Portrait) of the MXD-1000 has a series of ventilation holes along
the molding (FIG. 20). From each end, count to the eighth and ninth holes on the row closest to the panel.
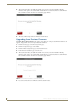
2. With a stout, strong point (a push pin or straightened paperclip, for example), carefully press into the
access holes in either end of the molding (FIG. 21) until the snap is disconnected. To facilitate the
disconnection, grasp the bottom of the panel (Landscape) or right side (Portrait) and pull gently outward
until the side of the panel is free of the snap..
3. When the first side is free, repeat the process with the other.
4. With the edge of the touch panel free, carefully lift up and out (Landscape) or to the left and out (Portrait)
to remove the touch panel from the back box. Be careful not to pull on the cables or connectors.
5. To reattach the panel to its back box, repeat the installation procedure on page 24.
FIG. 20 Underside of MXD-1000
FIG. 21 Location of access holes on MXD-1000 molding
Molding
Access holes
Always pull on the frame of the touch panel. NEVER pull on the glass edge.