
User Guide


Using the DXP-HT Project Wizard
24
DXP-HT v1.3 - Programmer’s Guide
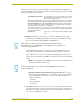
Inversely, you can manually remove any IR functions from Touch Panel functions by selecting
a Touch Panel function (from the right-hand table), and click the left-arrows button.
Adding Serial-Controlled Devices to the Project
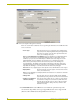
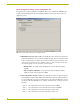
To add a serial (RS-232)-controlled device to your system, click the Add button in the System
Information dialog. This opens the Device Configuration dialog - Device Data tab.
Be aware that the target NetLinx Master device (being used by the project) must be able to support
the number of serial devices being added to the system. For example, if four serial devices were
added to a System (where they directly connect to the Master), then the NI-700 is not a valid choice
because it only supports 2 serial connections. In this case. The NI-700 option is disabled during the
final project build process (using the Finish button).
However, if the serial devices were communicating to the Master via external serial interfaces such
as an AXB-232++, an NI-700 could be used. If the cable run distance from the COM port and the
external Serial device is too far, it is recommended that you assign a different COM port within the
Use remote serial interface drop-down list. If the cable run distance from the serial interface and
the external Serial device is close enough, you can use both ports on the serial interface.
These external Serial devices communicate via the external serial interfaces to an AXB-232++ and
are not directly communicating with a Master (NI-700); therefore, these interfaces do not consume
Serial communication ports on the Master. This device configuration can function with an NI-700
when all of the Serial communications are routed from the external serial interfaces through an
AXB-232++ RS232/422/485.
The AXB-232++ provides a way to bridge the gap between an NI-700 (with no ICSNet port) and
the external serial interfaces, but when working with the RS232/422/485 device, the end-user must
use the AXlink device IDs generated by DXP-HT.
This device ID information is saved along with the COM port assignments and if another Master
device is later chosen as the target Master, the COM port assignments will be reflected within the
project report and used by the project wizard.
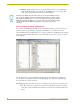
To add a serial-controlled device to your system, click the Add button in the System Information
dialog. This opens the Device Configuration dialog - Device Data tab:
1. Select the type of equipment you are adding from the Source Type drop-down list.
2. Enter a name for the device in the Display Name field. This is the name for the device that will
appear on the touch panel.
3. Use the radio buttons to select Serial as the Control Method associated with the new device.
When adding multiple devices of similar type to a Project, in some cases the devices
could have very different requirements in terms of functionality and associated Touch
Panel pages/buttons. For example you could set up a high-end model DVD player
with full IR functionality and a second one with only basic DVD transport control. The
Design XPress - Home Theater TPD pages for both devices will show the same
number of buttons, but many buttons for the second DVD will not work, because
functions weren't mapped to them.
Try to keep the number of functions for multiple same-type devices as close as
possible, for ease-of-use for the end user.